Printing to the console
In this exercise, we will practice using the user-friendly printk() function to print strings to the console.
We will modify Lesson 2 Exercise 2 so that when Button 1 is pressed, the factorials of the numbers from 1 to 10 are calculated and printed on the console as shown below. We are using the UART console, which is the default set in the board configuration file.
*** Booting Zephyr OS ***
nRF Connect SDK Fundamentals - Lesson 4 - Exercise 1
Calculating the factorials of numbers from 1 to 10:
The factorial of  1 = 1
The factorial of  2 = 2
The factorial of  3 = 6
The factorial of  4 = 24
The factorial of  5 = 120
The factorial of  6 = 720
The factorial of  7 = 5040
The factorial of  8 = 40320
The factorial of  9 = 362880
The factorial of 10 = 3628800

_______________________________________________________
Exercise steps
1. In the GitHub repository for this course, use the base code for this exercise, in l4/l4_e1 of whichever version branch you are using.
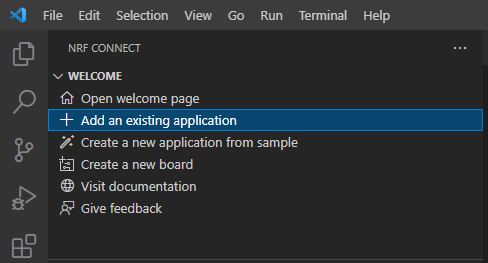
2. Use the Add an existing application option in nRF Connect for VS Code to open the base code for this exercise, as we have done in lesson 2 and lesson
3. Make sure that your development kit is powered on and connected to your computer.
4. Configure a terminal emulator on your machine. This has already been covered in Lesson 3 Exercise 1.
5. Open the main.c file inside l4_e1/src.
6. Under STEP 6, include the header file of the printk() function by adding the following line:
#include <sys/printk.h>Note
The console driver (CONFIG_CONSOLE) and console type (e.g. CONFIG_UART_CONSOLE) configuration options are already enabled in the board configuration file, which can be found in <sdk_folder>/<sdk_version>/zephyr/boards/arm/<your_board>/*_defconfig. Hence, we do not have to do anything in the application configuration file (prj.conf).
7. Let’s print out our first message, a simple banner that says nRF Connect SDK Fundamentals - Lesson 4 - Exercise 1. Search for STEP 7 and add the following line
printk("nRF Connect SDK Fundamentals - Lesson 4 - Exercise 1\n\r");Build and flash the application to your board as we have done in previous lessons, and you should see this message is printed on the console.
*** Booting Zephyr OS build ***
nRF Connect SDK Fundamentals - Lesson 4 - Exercise 1
8. Now let’s replace the button callback function (ISR) with a code that generates numbers’ factorials:
8.1 Define the macro MAX_NUMBER_FACT that represents the maximum number to calculate its factorial and set its value to 10.
#define MAX_NUMBER_FACT 10Since code in ISR runs at a high priority (higher than all system and user threads), it should be written with timing in mind. Tasks that are too lengthy or complex should not be performed by an ISR, they should be deferred to a thread. This will be covered in-depth in Lesson 7.
8.2 In main.c, replace the callback function button_pressed() with the following:
void button_pressed(const struct device *dev, struct gpio_callback *cb,
            uint32_t pins)
{
    int i;
    long int factorial = 1;
    printk("Calculating the factorials of numbers from 1 to %d:\n", MAX_NUMBER_FACT);
    for (i = 1; i <= MAX_NUMBER_FACT; i++) {
    	factorial = factorial * i;
    	printk("The factorial of %2d = %ld\n", i, factorial);
    }
    printk("_______________________________________________________\n");
    /*Important note!
    Code in ISR runs at a high priority, therefore, it should be written with timing       in mind.
    Too lengthy or too complex tasks should not be performed by an ISR, they should be deferred
    to a thread.
    */
}
Copy the code above and use it to replace the button_pressed() function in main.c as shown in the screenshot below:

button_pressed() functionIn this code, we are using printk() in three different locations:
The first call is to print a formatted string that contains one integer %d.
printk("Calculating the factorials of numbers from 1 to %d:\n\r",MAX_NUMBER_FACT);The second call is to print a formatted string containing an integer with a width specifier of %2d, and a long integer %ld. This is placed inside a loop, so it will be executed multiple times.
printk("The factorial of %2d = %ld\n\r",i,factorial);The third and last call to printk() is to print a simple string that contains one long underline.
printk("_______________________________________________________\n\r");9. Build the exercise and flash it to the board.
Observe that when button 1 on the board is pressed, the factorials of the numbers from 1 to 10 are calculated and printed on the console as shown below:
*** Booting Zephyr OS build v2.6.99-ncs1-1  ***
nRF Connect SDK Fundamentals - Lesson 4 - Exercise 1
Calculating the factorials of numbers from 1 to 10:
The factorial of  1 = 1
The factorial of  2 = 2
The factorial of  3 = 6
The factorial of  4 = 24
The factorial of  5 = 120
The factorial of  6 = 720
The factorial of  7 = 5040
The factorial of  8 = 40320
The factorial of  9 = 362880
The factorial of 10 = 3628800
_______________________________________________________
The solution for this exercise can be found in the GitHub repository, l4/l4_e1_sol of whichever version directory you are using.

