In this exercise, we will establish bidirectional communication between your board (acting as an MQTT client) and another remote MQTT client, running on a PC, tablet, or a smartphone. The remote client will control the LEDs and monitor the status of the buttons on the board via MQTT subscribe and publish commands.
To achieve this, we will program the board to publish the status of its buttons to a “buttons topic” upon a button push. Consequently, the remote client (for example, your mobile app) can subscribe to this topic and receive messages whenever a button is pushed.
Following the same logic, the board will subscribe to a LEDs topic. The remote client can then publish to this topic with commands on whether the LED should be off or on. This will make the board receive commands about what the status of its LEDs should be.

We will practice using the MQTT library in nRF Connect SDK to:
- Configure the board as an MQTT client
- Connect to a public MQTT broker (broker.hivemq.com)
- Publish and subscribe to MQTT topics, set by the Kconfig symbols:
CONFIG_MQTT_PUB_TOPICandCONFIG_MQTT_SUB_TOPIC - Control LEDs on the board via the remote MQTT client running on a smartphone
- Read the status of buttons 1 and 2 on the board via the remote MQTT client running on a smartphone
Exercise steps
In the GitHub repository for this course, go to the base code for this exercise, found in l4/l4_e1.
1. Enable and configure the MQTT library.
1.1. Enable and configure the MQTT library in your application by enabling the following Kconfig symbols in the prj.conf file.
CONFIG_MQTT_LIB=y
CONFIG_MQTT_CLEAN_SESSION=yCONFIG_MQTT_CLEAN_SESSION is to disable/enable persistent sessions. Setting this flag to y disables a persistent MQTT session.
1.2 Configure MQTT parameters.
CONFIG_MQTT_PUB_TOPIC: the topic name that the board will publish to.-
CONFIG_MQTT_SUB_TOPIC: the topic name that the board will subscribe to. CONFIG_MQTT_BROKER_HOSTNAME: the hostname of the MQTT broker.CONFIG_MQTT_BROKER_PORT: the port of the MQTT broker.
CONFIG_MQTT_PUB_TOPIC="wifi/fund/board/publish/button/topic99"
CONFIG_MQTT_SUB_TOPIC="wifi/fund/board/subscribe/led/topic99"
CONFIG_MQTT_BROKER_HOSTNAME="broker.hivemq.com"
CONFIG_MQTT_BROKER_PORT=1883Note
We are configuring a connection to a public MQTT broker (broker.hivemq.com) over TCP port 1883, but you can choose any other preferred MQTT broker. For the CONFIG_MQTT_PUB_TOPIC and CONFIG_MQTT_SUB_TOPIC, we highly recommend selecting your own topic names as other users of this course are likely to use the same topic and be publishing and subscribing to it simultaneously.
1.3 Include the header file for the MQTT library in main.c.
#include <zephyr/net/mqtt.h>2. Define the function client_init() to initialize the MQTT client instance.
2.1 Initialize the client instance with mqtt_client_init().
mqtt_client_init(client);2.2 Call the function server_resolve() to resolve the hostname and get the IP address, which we will use to populate the MQTT broker structure.
err = server_resolve();
if (err) {
	LOG_ERR("Failed to initialize broker connection");
	return err;
}
2.3 Populate the mqtt_client struct, which includes:
- Passing the pointer to the broker structure
client->broker = &server. - Registering the MQTT event handler
client->evt_cb = mqtt_evt_handler. - Assigning an MQTT client ID for the board.
client->client_id.utf8 = client_id_get(); - The broker does not require a password or a user name, therefore we set these two to
NULLinclient->password = NULL;andclient->user_name = NULL;
client->broker = &server;
client->evt_cb = mqtt_evt_handler;
client->client_id.utf8 = client_id_get();
client->client_id.size = strlen(client->client_id.utf8);
client->password = NULL;
client->user_name = NULL;
client->protocol_version = MQTT_VERSION_3_1_1;2.4 Assign the receive and transmit buffers.
Note that rx_buffer and tx_buffer are already defined in the beginning of the main.c file.
client->rx_buf = rx_buffer;
client->rx_buf_size = sizeof(rx_buffer);
client->tx_buf = tx_buffer;
client->tx_buf_size = sizeof(tx_buffer);2.5 Set the transport type of the MQTT client to non-secure.
Since we are using non-secure TCP transport for the MQTT connection in this exercise, we set the transport type to non-secure (MQTT_TRANSPORT_NON_SECURE).
client->transport.type = MQTT_TRANSPORT_NON_SECURE;3. Define the function subscribe() to subscribe to a specific topic.
We can subscribe to as many MQTT topics as we want.
3.1 Declare a variable of type mqtt_topic.
For each topic of interest, declare a variable of type mqtt_topic. This variable needs to contain the topic name (in UTF-8 format), the length of the topic name, and the quality of service requested for the subscription.
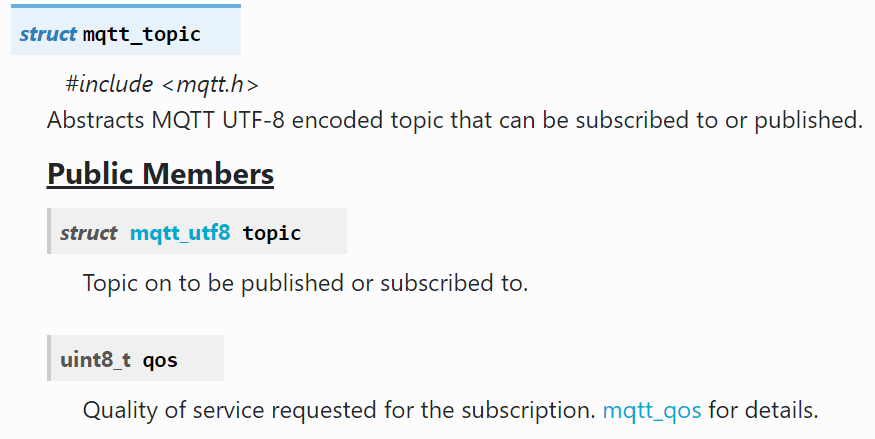
struct mqtt_topic signatureThis is done in the code below where we have created one variable subscribe_topic of type mqtt_topic, to subscribe to CONFIG_MQTT_SUB_TOPIC with QoS1.
struct mqtt_topic subscribe_topic = {
	.topic = {
		.utf8 = CONFIG_MQTT_SUB_TOPIC,
		.size = strlen(CONFIG_MQTT_SUB_TOPIC)
	},
	.qos = MQTT_QOS_1_AT_LEAST_ONCE
};3.2 Define a subscription list.
Once we have declared the topic(s) of interest, we need to create a subscription list variable of type mqtt_subscription_list. In the initialization of the list, we must provide a pointer to the topic or a pointer to the array of topics (if subscribed to more than one topic). In addition, we specify the number of topics and a message id, which can be a random number, and is used to identify the subscription request.
const struct mqtt_subscription_list subscription_list = {
	.list = &subscribe_topic,
	.list_count = 1,
	.message_id = 1234
};3.3 Subscribe to topics using mqtt_subscribe().
Once we have the list variable initialized, we can call the MQTT library function mqtt_subscribe(), which takes two parameters, the mqtt_client and the mqtt_subscription_list.
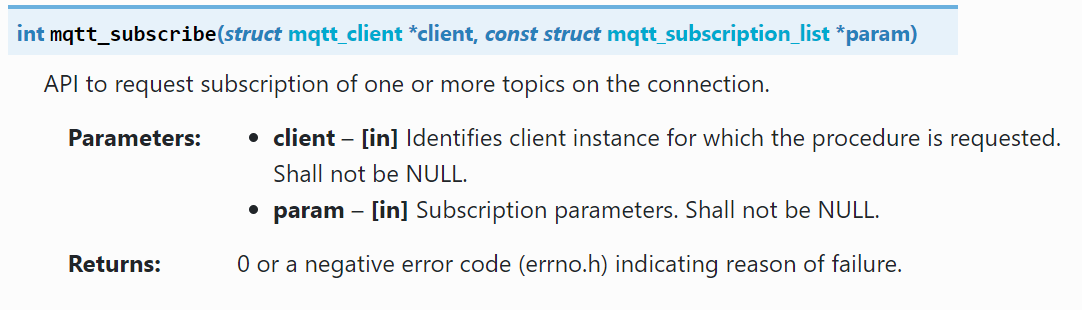
mqtt_subscribe() signatureLOG_INF("Subscribing to %s", CONFIG_MQTT_SUB_TOPIC);
return mqtt_subscribe(c, &subscription_list);Note
To keep it simple, messages with QoS 2 are not supported by this application.
4. Upon a successful connection, subscribe to topics.
Upon a successful connection to a broker, MQTT_EVT_CONNACK, call subscribe() to subscribe to topics. First, investigate evt->result for a successful connection or not, then call subscribe() to subscribe to the topic CONFIG_MQTT_SUB_TOPIC.
Add the following lines under the MQTT_EVT_CONNACK case.
if (evt->result != 0) {
	LOG_ERR("MQTT connect failed: %d", evt->result);
	break;
}

LOG_INF("MQTT client connected");
subscribe(c);
break;5. In event MQTT_EVT_PUBLISH, listen to published messages received from the broker and extract the message.
5.1 Extract the payload using get_received_payload(), and (if relevant) send an acknowledgment.
First, we extract the payload using get_received_payload(). Then we examine the QoS of the received message, and if it is 1 (at least once), we send an acknowledgment with mqtt_publish_qos1_ack().
The function to extract the published payload, get_received_payload() is already defined in main.c and uses the MQTT API functions mqtt_read_publish_payload_blocking() and mqtt_readall_publish_payload().
const struct mqtt_publish_param *p = &evt->param.publish;
err = get_received_payload(c, p->message.payload.len);

if (p->message.topic.qos == MQTT_QOS_1_AT_LEAST_ONCE) {
	const struct mqtt_puback_param ack = {
		.message_id = p->message_id
	};
	mqtt_publish_qos1_ack(c, &ack);
}5.2 On successful extraction of data, examine the command and toggle LED accordingly.
If the extraction of the received message was successful, examine the message and use strncmp() to compare it to the LED ON and LED OFF commands and turn the LED on or off accordingly.
if (err >= 0) {
	data_print("Received: ", payload_buf, p->message.payload.len);
	if (strncmp(payload_buf, CONFIG_LED1_ON_CMD,
		    sizeof(CONFIG_LED1_ON_CMD) - 1) == 0) {
		dk_set_led_on(DK_LED1);
	} else if (strncmp(payload_buf, CONFIG_LED1_OFF_CMD,
			   sizeof(CONFIG_LED1_OFF_CMD) - 1) == 0) {
		dk_set_led_off(DK_LED1);
	} else if (strncmp(payload_buf, CONFIG_LED2_ON_CMD,
			   sizeof(CONFIG_LED2_ON_CMD) - 1) == 0) {
		dk_set_led_on(DK_LED2);
	} else if (strncmp(payload_buf, CONFIG_LED2_OFF_CMD,
			   sizeof(CONFIG_LED2_OFF_CMD) - 1) == 0) {
		dk_set_led_off(DK_LED2);
	}
}5.3 On failed extraction of data, examine error code from get_received_payload().
If the error is the payload buffer being too small, print an error message. If the extraction failed for any other reason, disconnect from the MQTT broker.
else if (err == -EMSGSIZE) {
	LOG_ERR("Received payload (%d bytes) is larger than the payload buffer size (%d bytes).", p->message.payload.len, sizeof(payload_buf));
} else {
	LOG_ERR("get_received_payload failed: %d", err);
	LOG_INF("Disconnecting MQTT client...");
	err = mqtt_disconnect(c);
	if (err) {
		LOG_ERR("Could not disconnect: %d", err);
	}
}6. Define the function publish() to publish data to the broker.
In order to publish to a broker (send a message to a topic), we need to use the MQTT library function mqtt_publish(), which takes two parameters: a pointer to the client instance (mqtt_client) and a pointer to a variable of type mqtt_publish_param which encapsulates the message to be sent.
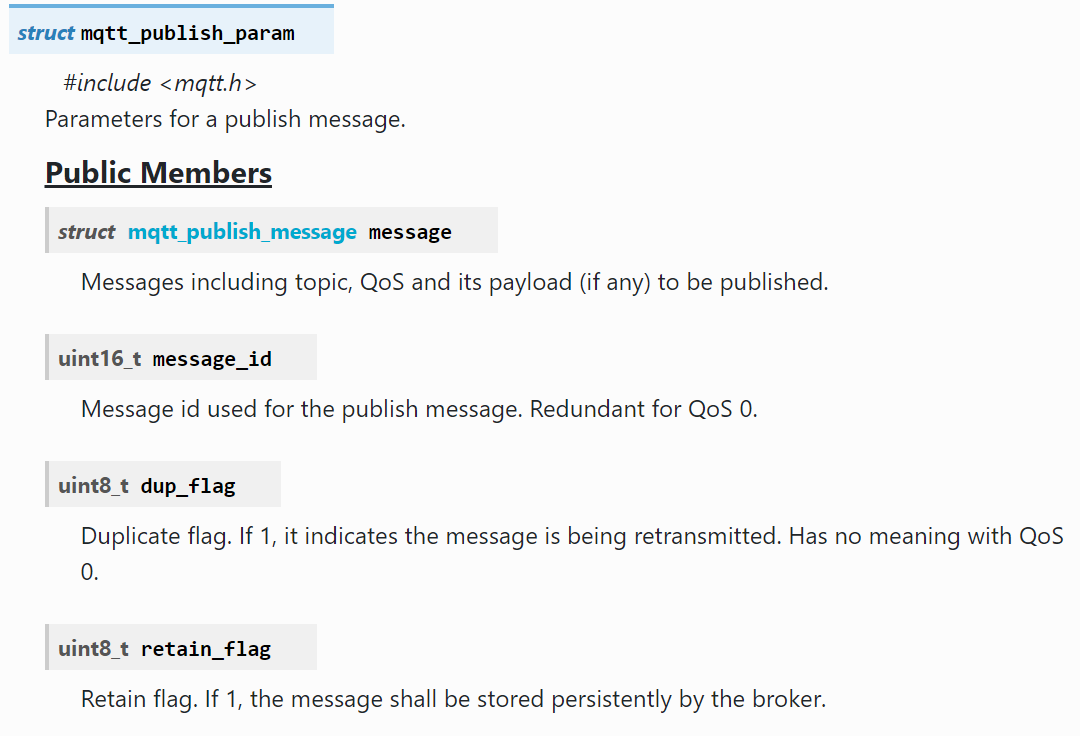
struct mqtt_publish_param signatureThe function should take as input the client instance pointer, the quality of service requested, the data to be sent, and the length of the data. The function needs to populate the members of the mqtt_publish_param struct and call mqtt_publish() to publish the message to the broker.
Add the following definition of publish().
int publish(struct mqtt_client *c, enum mqtt_qos qos,
uint8_t *data, size_t len)
{
struct mqtt_publish_param param;
param.message.topic.qos = qos;
param.message.topic.topic.utf8 = CONFIG_MQTT_PUB_TOPIC;
param.message.topic.topic.size = strlen(CONFIG_MQTT_PUB_TOPIC);
param.message.payload.data = data;
param.message.payload.len = len;
param.message_id = sys_rand32_get();
param.dup_flag = 0;
param.retain_flag = 0;
data_print("Publishing: ", data, len);
LOG_INF("to topic: %s len: %u",
CONFIG_MQTT_PUB_TOPIC,
(unsigned int)strlen(CONFIG_MQTT_PUB_TOPIC));
return mqtt_publish(c, ¶m);
}A few things to note:
- We are setting the topic the device will publish to in the line
param.message.topic.topic.utf8 = CONFIG_MQTT_PUB_TOPIC. - The data to be sent is passed to the function,
uint8_t *data, and is set in the lineparam.message.payload.data = data. - The message ID is set to be a random number by calling the function
sys_rand32_get(). - Since we are not using duplication or a persistent MQTT session, the flags
dup_flagandretain_flagare set to0
7. Define the button handler to publish upon button triggers.
Upon pressing either button 1 or button 2, we want the button handler to publish the corresponding message to the MQTT broker.
In button_handler(), if a button is pressed, call publish() with the four parameters:
- Client instance pointer
&clientwhich is defined at the top ofmain.cand initialized through the functionclient_init(). - The quality of service requested (
MQTT_QOS_0_AT_MOST_ONCE,MQTT_QOS_1_AT_LEAST_ONCE, orMQTT_QOS_2_EXACTLY_ONCE). In this exercise, we are usingMQTT_QOS_1_AT_LEAST_ONCEboth for subscription and publishing. - Pointer to the message to be sent
CONFIG_BUTTON_MSGdefined inKconfig. - The size of the message to be sent. Note that we are not sending the null terminator of the string here and hence the -1 at the end.
7.1 Publish BUTTON1_MSG if button one is pressed.
err = publish(&client, MQTT_QOS_1_AT_LEAST_ONCE, CONFIG_BUTTON1_MSG, sizeof(CONFIG_BUTTON1_MSG)-1);
if (err) {
	LOG_ERR("Failed to send message, %d", err);
	return;
}7.2 Publish BUTTON2_MSG if button two is pressed.
err = publish(&client, MQTT_QOS_1_AT_LEAST_ONCE, CONFIG_BUTTON2_MSG, sizeof(CONFIG_BUTTON2_MSG)-1);
if (err) {
	LOG_ERR("Failed to send message, %d", err);
	return;
}8. Establish a connection to the MQTT broker.
In main(), after establishing a Wi-FI connection and initializing the client, call mqtt_connect() with a pointer to the client instance &client to establish a connection to the MQTT broker.
err = mqtt_connect(&client);
if (err) {
	LOG_ERR("Error in mqtt_connect: %d", err);
	goto do_connect;
}9. Listen for incoming messages on the socket.
9.1 Configure fds to monitor the socket.
Set the fd field to the socket created by the MQTT library, found in the mqtt_client structure, and set the events we want to monitor to POLLIN, meaning there is data to be read from the socket.
fds.fd = client.transport.tcp.sock;
fds.events = POLLIN;9.2 Continuously poll the socket for incoming data.
Use poll() to poll the socket for incoming events. To ensure the connection stays alive, use the helper function mqtt_keepalive_time_left() to set the timeout of the poll function to the time that is left until the next keep alive message must be sent to the MQTT broker.
When poll() returns, either due to an event on the socket or because the timeout ran out, call mqtt_live(), which has the following signature

This ensures the connection to the MQTT broker is kept alive.
err = poll(&fds, 1, mqtt_keepalive_time_left(&client));
if (err < 0) {
	LOG_ERR("Error in poll(): %d", errno);
	break;
}
err = mqtt_live(&client);
if ((err != 0) && (err != -EAGAIN)) {
	LOG_ERR("Error in mqtt_live: %d", err);
	break;
}9.3. In the event of incoming data, call mqtt_input() to process it.
Upon a POLLIN event, call the API function mqtt_input() to process the incoming data, which will trigger the registered callback.
Let’s also check for the events POLLERR and POLLNVAL which indicate an error has occurred.
if ((fds.revents & POLLIN) == POLLIN) {
	err = mqtt_input(&client);
	if (err != 0) {
		LOG_ERR("Error in mqtt_input: %d", err);
		break;
	}
}
if ((fds.revents & POLLERR) == POLLERR) {
	LOG_ERR("POLLERR");
	break;
}

if ((fds.revents & POLLNVAL) == POLLNVAL) {
	LOG_ERR("POLLNVAL");
	break;
}10. Build and flash the application to your board.
This exercise uses the PSA backend for storing the Wi-Fi credentials. Therefore, you must build with TF-M.
| Board | Build with TF-M | Extra CMake arguments |
|---|---|---|
| nRF7002 DK | nrf7002dk_nrf5340_cpuapp_ns | N/A |
| nRF5340 DK + nRF7002 EK | nrf5340dk_nrf5340_cpuapp_ns | -DSHIELD=nrf7002ek |
If necessary, input the commands to connect to Wi-Fi, as we have done in the previous exercises.
You should see the following log output
[00:00:00.456,512] <inf> wifi_nrf: Firmware (v1.2.8.1) booted successfully
*** Booting nRF Connect SDK ***
[00:00:01.609,649] <inf> Lesson4_Exercise1: Waiting to connect to Wi-Fi
[00:00:07.349,853] <inf> Lesson4_Exercise1: Network connected
[00:00:07.886,535] <inf> Lesson4_Exercise1: Connecting to MQTT broker
[00:00:07.914,733] <inf> Lesson4_Exercise1: IPv4 address of MQTT broker found 52.28.62.138
[00:00:08.021,911] <inf> Lesson4_Exercise1: MQTT client connected
[00:00:08.021,911] <inf> Lesson4_Exercise1: Subscribing to wifi/fund/board/subscribe/led/topic99
[00:00:08.070,770] <inf> Lesson4_Exercise1: SUBACK packet id: 1234Testing
To test the application, let’s set up an MQTT client to communicate with our device.
You will need an MQTT client running on your PC, smartphone, or tablet. In this exercise, we will show you how to communicate with the device using a PC.
11. Set up an MQTT client on your computer.
11.1 Install MQTT Explorer and launch it on your computer.

11.2 Connect to the MQTT broker.
We want to connect to the same MQTT broker that the board has connected to, in this case, broker.hivemq.com.
In MQTT Explorer, add a connection to the same broker the board is connected to by providing the broker name, hostname and its port as shown in the illustration below. Make sure to switch off TLS and certificates. Now click on Advanced.

In the new window, under Topic, input the topic that the device is publishing to, specified in the Kconfig CONFIG_MQTT_PUB_TOPIC. The default value is wifi/fund/board/publish/button/topic99.
Select Add, and then Back to go to the previous window where you can select Connect to connect to the broker.

12. Publish commands to the LED topic, to control the LEDs on the board.
When the connection to the broker has been established, we want to publish a command to the LED topic, to control the LED on the board.
In the panel to the right, scroll down to the bottom. Enter the topic name that the board is subscribed to (set by CONFIG_MQTT_SUB_TOPIC defined in prj.conf). The default value is wifi/fund/board/subscribe/led/topic99.
Select raw as the message type and input one of the predefined commands to control the LEDs.
LED 1: LED1ON / LED1OFF
LED 2: LED2ON / LED2OFF

Click Publish and observe that the LED on the device reflects the command you sent.
13. Monitor the buttons on the board.
We programmed the device to publish a message whenever a button was pressed and we have configured the MQTT broker connection to subscribe to the topic that the device is publishing to.
Try to press button 1 or 2 on your board and notice a message appearing on the left-side of the screen. If you expand all the sub-headings, you will find the message posted at the bottom stating which button was pressed on the device.


