Important
This lesson covers how to define boards in the nRF Connect SDK using both hardware models v1 and v2 (HWMv1 and HWMv2 respectively).
This exercise tab is for nRF Connect SDK v2.6.2 – v2.5.2, where HWMv1 is used. HWMv1 is deprecated and removed in nRF Connect SDK v3.0.0. We recommend using HWMv2 for all new designs (other tabs).
Either watch the video or read the text below the video:
When developing applications with nRF Connect SDK, the concept of a board is really at the center of the development. Built on the Zephyr RTOS, the nRF Connect SDK emphasizes portability, making it easier to develop applications that can run across different hardware platforms.
What is a board?
In this context, a board refers to the specific hardware platform you are targeting – whether it’s a Nordic development kit or your own custom PCB. The board abstraction allows you to port your application from one platform to another with minimal changes. For example, you can transition an application from the nRF52840 DK to the nRF5340 DK – or even to a custom board, relatively easily.
Unlike traditional embedded development, where hardware is defined in C header files, the nRF Connect SDK uses devicetree and Kconfig to decouple hardware configuration from application code.
Board structure in nRF Connect SDK
In the context of the nRF Connect SDK and Zephyr, a board is essentially a folder containing a set of configuration and metadata file that describe your hardware.
This includes:
- Devicetree files – Describes the hardware, including SoC(s), peripheral configurations, etc.
- Kconfig files – Specifies software configuration options needed for your board.
- Optional C files – Includes special initialization procedures required for your hardware.
- Optional documentation – Provides board-specific documentation.
These components together form the board definition, which specifies:
- SoC configuration – The exact SoC(s) used, clock frequencies, memory configurations, and other hardware-specific details.
- Peripheral configuration – Settings for UART, SPI, I2C, GPIO, and other peripherals.
- Memory configuration – Flash/RAM sizes and memory partitioning used for application, internal storage, bootloader, and other software components.
- Pin mapping – Mapping between pins and their corresponding functions (SoCs have multiple pins that can be configured for different functions, e.g., GPIO, UART, SPI.
- Clock and interrupt configuration – Ensures accurate timing across the system.
- Driver configuration – Defines parameters for hardware drivers, like transport settings, clock settings, etc.
- Special initialization routines – Handles unique board requirements, such as configuring special bootloader configuration, hardware muxes configuration, or special PMIC features.
While this may sound intimidating, the SDK already provides most configurations—particularly for the CPU, SoC, and architecture.
Hardware support hierarchy (HWMv1)
nRF Connect SDK uses the same hardware support hierarchy as Zephyr, which is divided into layers, organized from most to least specific. The hierarchy starts with the most specific layer, the board, and moves towards more general layers such as SoC, SoC series, SoC family, CPU core, and finally architecture.
- Board – A specific hardware specification with SoC(s) and peripherals
- SoC – The exact System on Chip(s) the board’s CPU is a part of (Provided by nRF Connect SDK/Zephyr)
- SoC series – A smaller subset of tightly related SoCs (Provided by nRF Connect SDK/Zephyr)
- SoC family – A broad group of similar SoCs (Provided by nRF Connect SDK/Zephyr)
- CPU – The CPU in an architecture (Provided by nRF Connect SDK/Zephyr)
- Architecture – The instruction set architecture (Provided by nRF Connect SDK/Zephyr)
You can visualize the hierarchy like this:

The architecture of Nordic SoCs will either be ARM or RISC-V for the co-processors on the nRF54 Series.
Let’s take a look at some more examples of Nordic development kits:
| Board | SoC | SoC Series | SoC family | CPU Core | Architecture |
|---|---|---|---|---|---|
nrf52833dk_nrf52833 | nRF52833 | nRF52 | nRF5 Family | Arm Cortex-M4 | Arm |
nrf5340dk_nrf5340_cpuapp | nRF5340 | nRF53 | nRF5 Family | Arm Cortex-M33 | Arm |
nrf9160dk_nrf9160 | nRF9160 | nRF91 | nRF9 Family | Arm Cortex-M33 | Arm |
A note on drivers
While board files define internal SoC hardware, drivers are required for external components, like sensors. Drivers are declared via the compatible property in the devicetree. Drivers do not reside in the board folder, but rather, they have dedicated locations within the nRF Connect SDK (nrf/drivers/sensor) and Zephyr (zephyr/drivers/sensor).
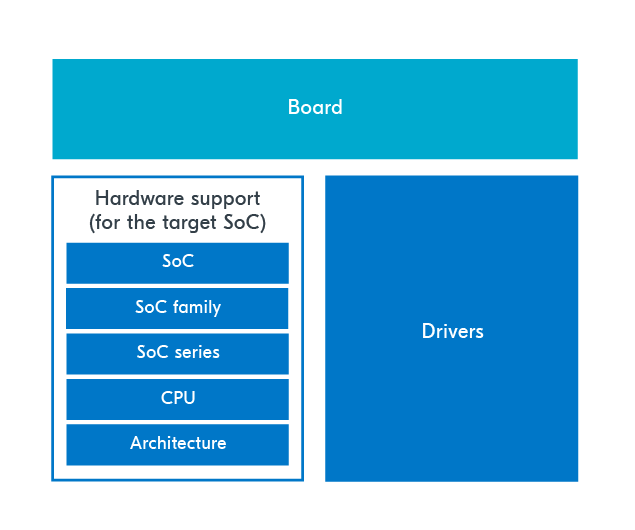
The nRF Connect SDK already includes a rich collection of drivers. Examples of boards with external sensors include micro:bit v2, Thingy:53, Thingy:91.
If your custom hardware uses a component without an existing driver, you will need to implement one. We will take a look at how to create your own custom driver in Lesson 7 – Device driver development.

