In this exercise, we will learn how to do DFU over Bluetooth Low Energy. This is often known as Firmware Over The Air (FOTA). We will base the exercise on the Bluetooth: Peripheral LBS sample. First, we will enable MCUboot and FOTA in our sample. Then, we will go through how to update the device from a mobile phone.
Documentation on enabling FOTA for each of our products can be seen under Device configuration guides, for example, developing with nRF52 Series and FOTA over Bluetooth Low Energy.
For this exercise, you can use any development kit that supports Bluetooth LE.
| nRF91XX DKs | nRF528XX DK | nRF5340 DK | nRF54L15 DK | nRF52 DK | nRF7002 DK | |
| Bluetooth LE | ❌ | ✅ | ✅ | ✅ | ✅ | ✅ |
Exercise steps
Open the code base of the exercise by navigating to Create a new application in the nRF Connect for VS Code extension, select Copy a sample, and search for Lesson 9 – Exercise 5.
Alternatively, in the GitHub repository for this course, go to the base code for this exercise, found in l9/l9_e5.
1. Test the sample out-of-box.
First, it is always a good idea to test the example as it is, to verify that it works from the start.
Build and flash the exercise code base, which is just a trimmed-down copy of the Bluetooth: Peripheral LBS sample. Verify that it works as expected.
The Peripheral LBS is also covered in-depth in the Bluetooth Low Energy Fundamentals course.
2. Add MCUboot and FOTA over Bluetooth Low Energy to the application.
2.1 Enable MCUboot in sysbuild.conf:
# STEP 2.1 Enable MCUboot
SB_CONFIG_BOOTLOADER_MCUBOOT=y2.2: Enable FOTA in the application; Set this in prj.conf:
# STEP 2.2 - Enable FOTA over Bluetooth LE
CONFIG_NCS_SAMPLE_MCUMGR_BT_OTA_DFU=yThis option will automatically add a service for FOTA to Bluetooth LE if you have already set up Bluetooth LE.
That means that the application still has to start Bluetooth LE, so while this option works for Bluetooth samples out of the box, it will not enable FOTA automatically for non-Bluetooth projects.
In Zephyr, a proper configuration is needed to enable FOTA. An example of how to set this up can be seen in the SMP Server sample. However, the nRF Connect SDK includes the option CONFIG_NCS_SAMPLE_MCUMGR_BT_OTA_DFU, which configures the project for us. This option makes it easier for us to enable FOTA, so we will use that.
Note
In the nRF Connect SDK, there are many options prefixed with CONFIG_NCS_SAMPLE. These options are used to preconfigure projects and can include Zephyr subset Kconfig options and source code variants. Although this significantly helps with project configuration, it is most suitable for prototyping and learning phases.
For your custom production project, we recommend that you look at what option CONFIG_NCS_SAMPLE_MCUMGR_BT_OTA_DFU sets for you, and include the ones from there you need instead.
config NCS_SAMPLE_MCUMGR_BT_OTA_DFU
	bool "MCUmgr OTA DFU over Bluetooth"
	select MCUMGR
	select NET_BUF
	select ZCBOR
	select CRC
	select MCUMGR_TRANSPORT_BT
	imply MCUMGR_TRANSPORT_BT_CONN_PARAM_CONTROL
	imply IMG_MANAGER
	imply STREAM_FLASH
	imply FLASH_MAP
	imply FLASH
	imply MCUMGR_GRP_IMG
	imply MCUMGR_GRP_OS
	imply MCUMGR_GRP_OS_BOOTLOADER_INFO
	imply MCUMGR_TRANSPORT_BT_REASSEMBLY
	imply NCS_SAMPLE_MCUMGR_BT_OTA_DFU_SPEEDUP
	depends on BT_PERIPHERAL
depends on BOOTLOADER_MCUBOOTAlso, it’s highly recommended to authenticate and encrypt the connection where the DFU will take place. This can be done by enabling CONFIG_MCUMGR_TRANSPORT_BT_PERM_RW_AUTHEN. When this option is enabled, a 6-digit passkey will be displayed on your serial terminal, which must be entered into the phone app.
Passkey for XX:XX:XX:XX:XX:XX (random): XXXXXX3. Build and flash the application.
4. Build a new image.
4.1 Next, create a new image with noticeable changes. Change the LED blinking period in main.c (e.g. from 1000 ms to 200 ms) and the project version (to 3.0.0) in the VERSION file, then build the project again.
#define RUN_LED_BLINK_INTERVAL 200VERSION_MAJOR = 3
VERSION_MINOR = 0
PATCHLEVEL = 0
VERSION_TWEAK = 0
EXTRAVERSION =DO NOT flash it using the debugger. Instead, we will send the zephyr.signed.bin file found in the build/l9_e5/zephyr/dfu_application.zip file found in the build/ folder.
5. Update the firmware using nRF Connect Device Manager.
5.1 Install the nRF Connect Device Manager app on your mobile device.
To perform DFU, we will use the nRF Connect Device Manager app for mobile (Android and iOS). Install this on your phone.
Another alternative for Android and iOS is to use the nRF Connect for Mobile. For PC, you can use AuTerm.
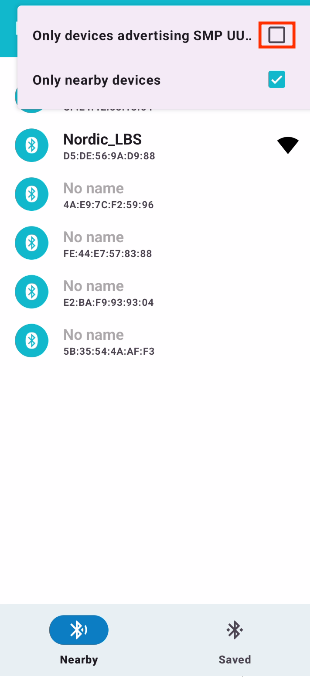
5.2 When opening the Device Manager app, it will not find any devices. This is because the app by default filters for an SMP Service UUID. We could add this to the advertising or scan response of the sample, as covered in the Bluetooth Low Energy Fundamentals on Advertising. In the field, your DFU Server would likely filter for your devices UUIDs rather than a generic SMP UUID. Either way, we will take a shortcut here and just disable the filter, as seen in the screenshot below. Uncheck the checkbox.
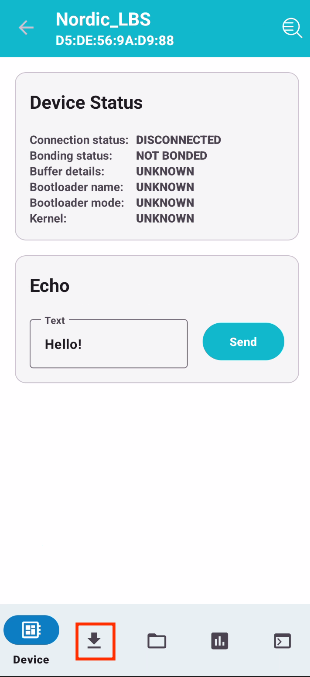
5.3 Select the Nordic_LBS to connect to.
After unchecking the box, select the Nordic_LBS to connect to. Observe the features listed in the menubar at the bottom. These are SMP Services. We will use the second tab: Image. This tab should look like the screenshot below.
5.4 The first step is to move our new firmware image to the phone. This would be the same file used in the previous exercises: build/l9_e5/zephyr/zephyr.signed.bin. Use your preferred method to transfer this file from your computer to the phone.
5.5 Click “Select file” and choose zephyr_signed.bin, and then press “Start”. You learned about “Test” and “Confirm” previously in this course. The “Test & Confirm” option first tags the image with “test”, and after the swap, the app will reconnect to the chip and confirm the image before it reverts. It is up to you which choice you use here.
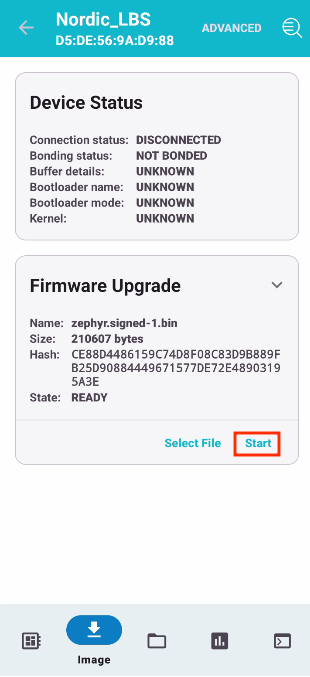
To see more options for FOTA, you can click the Advanced button at the top of the mobile screen.
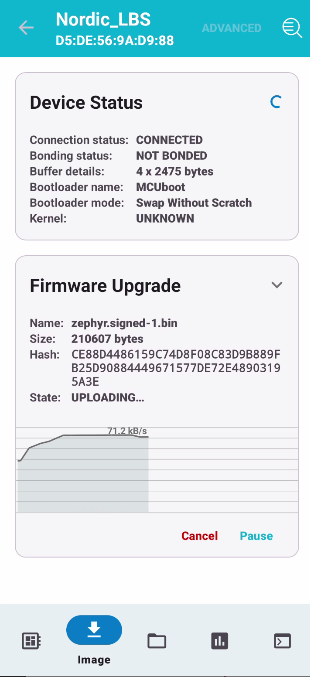
Now, you can observe the process of transferring the file into the device (in this case, nRF54L15 DK is used).
Important
The transfer speed is greatly influenced by the central mobile device and its operating system (Android or iOS). Additionally, the speed varies between different System on Chip (SoC) series. For instance, the nRF54L Series has twice the processing power of the nRF52 Series.
When the process is completed, the device will restart, and you can see new LED behavior. We can also check the version of the new image as done in the next step through the ADVANCED option.
5.6 After the device is reset, open it again. Head to Image, press ADVANCED from the top, and press read to see that the current version matches the one we set in Step 4.


Optional: Simultaneous updates for both cores of the nRF5340
The above exercise will work for the nRF5340 to update only the application core. However, as we learned from the theory on nRF5340 DFU, we often want to update both cores at the same time. This is referred to as simultaneous FOTA, which is covered in-depth as a separate optional exercise: Simultaneous updates for both cores of the nRF5340.

