In the previous exercise, you delivered a firmware update over Bluetooth LE from a local file copied manually from the development machine to your phone. In this exercise, you source it from the cloud using nRF Cloud powered by Memfault instead: you upload a signed release to the cloud, activate it for your fleet, and the device pulls it over the existing Bluetooth LE connection. The workflow you would use to fix an issue in the field without physical access to the device.
For product makers, this is what keeps a shipped product maintainable and future-proof. You can fix a bug or ship a new feature to devices already in the field over the Bluetooth LE link your companion app already uses. Because each device reports its version and update history back to nRF Cloud, you can stage a release to one or more cohorts, confirm it landed, and expand from there. And since the flow builds on open-source iOS and Android libraries, it can live inside your own branded app, rather than using nRF Connect Device Manager mobile app.
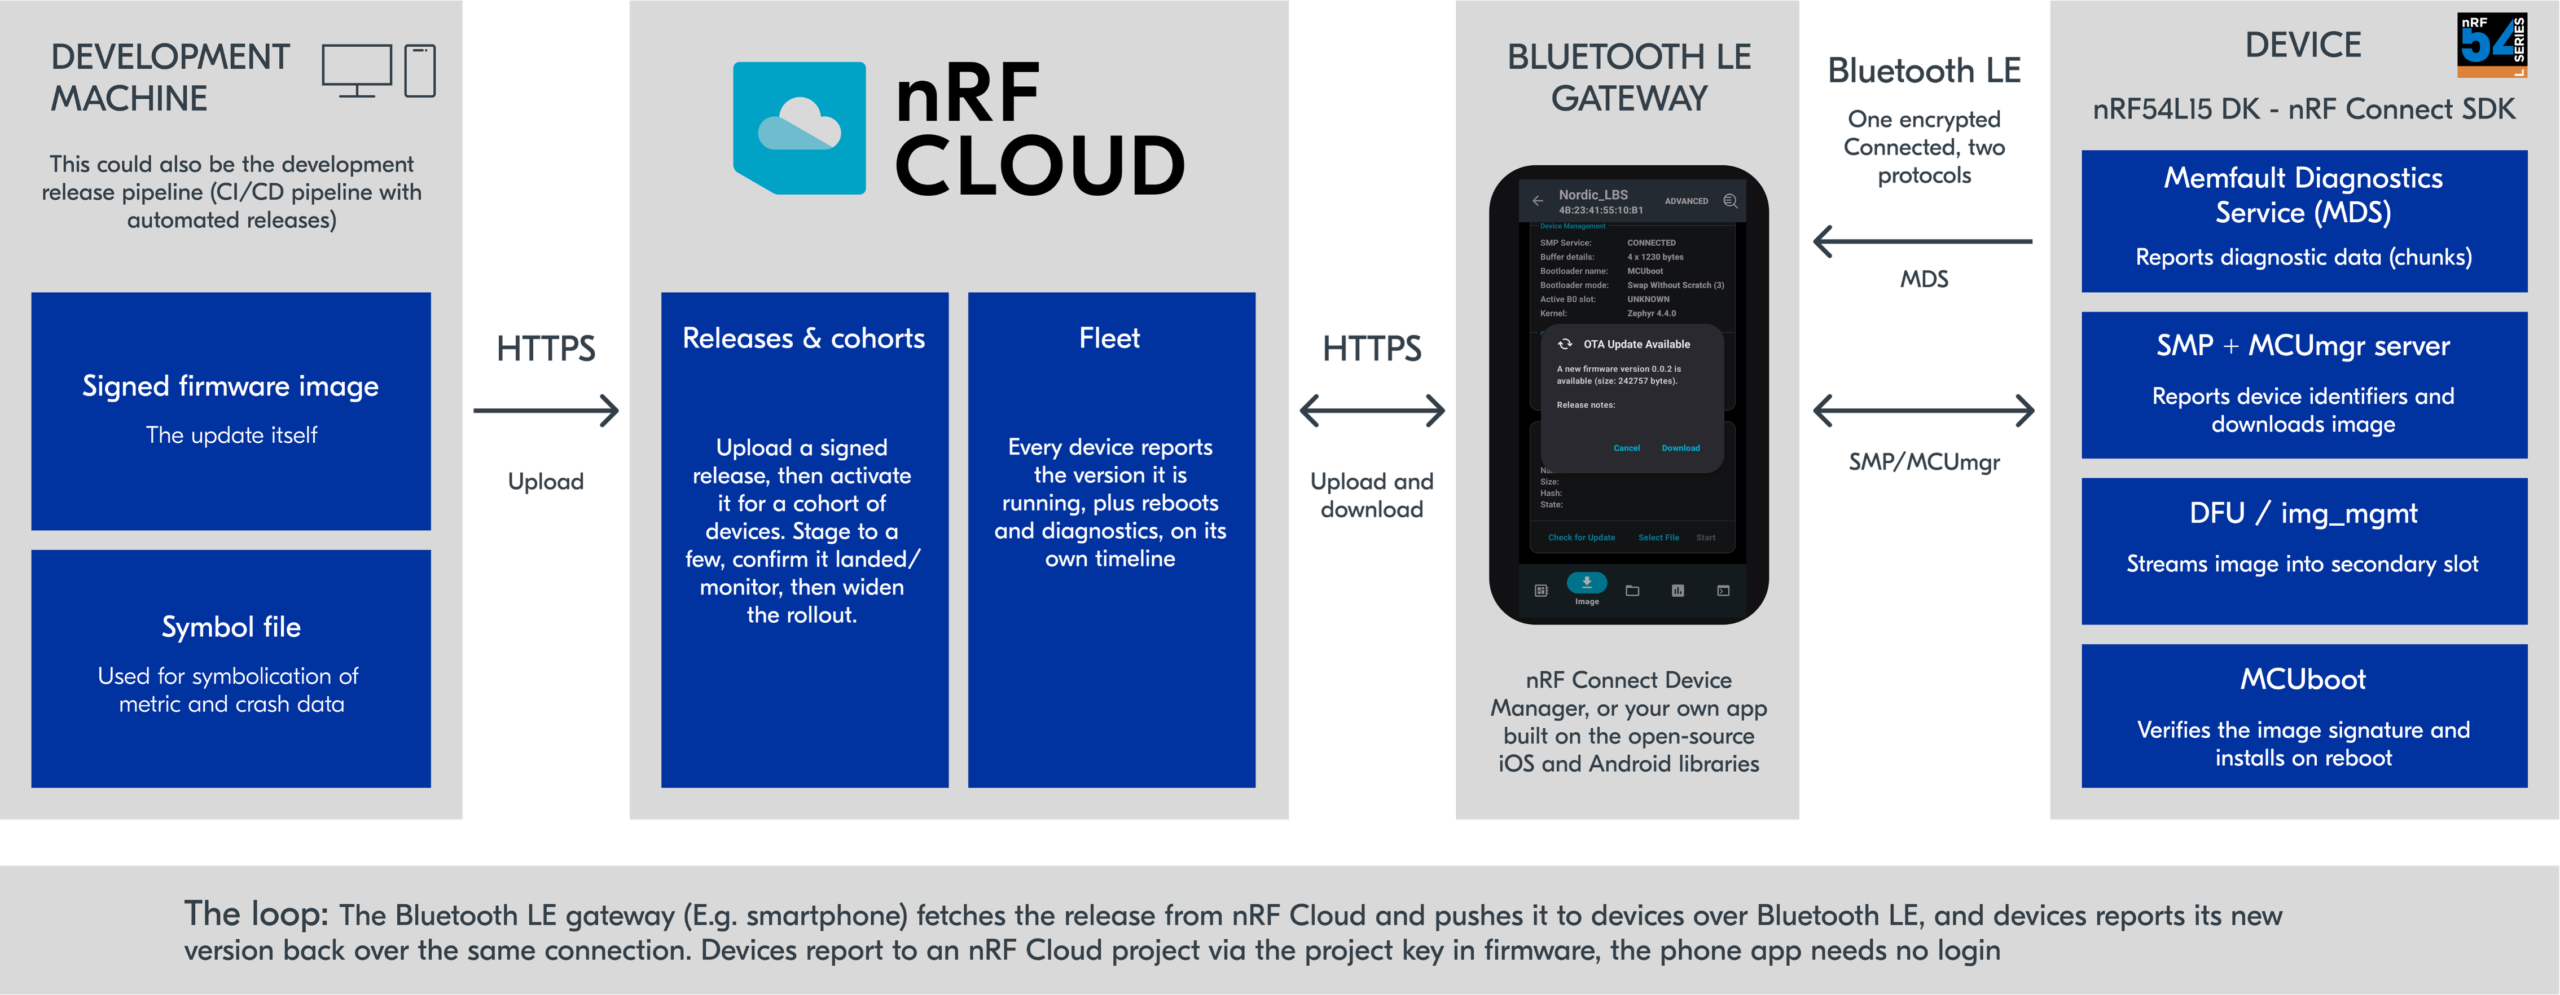
The image is transferred from a smartphone to the device using the Simple Management Protocol (SMP); MCUboot installs it after reboot. For the device to appear in the nRF Cloud fleet with its version and update history, it also runs the Memfault Diagnostic Service (MDS), which carries Memfault data to the cloud over the same connection.
Architecture diagram of Exercise 6 – FOTA over Bluetooth LE via nRF Cloud (How a firmware update reaches a device in the field over Bluetooth LE via nRF Cloud)
For this exercise, you can use any development kit that supports Bluetooth LE.
nRF91XX DKs
nRF54L Series DK
nRF5340 DK
nRF52 Series DK (nRF52840 DK/ nRF52833 DK / …)
nRF7002 DK
Bluetooth LE
❌
✅
✅
✅
✅
Exercise steps
This exercise is available in v3.4.0 and above. The base code of this exercise l9/l9_e6 starts from the previous Exercise 5 (Exercise 5 – FOTA over Bluetooth LE), the LED Button Service (LBS) firmware, which already has MCUboot enabled in sysbuild.conf and FOTA over Bluetooth LE enabled in prj.conf (CONFIG_NCS_SAMPLE_MCUMGR_BT_OTA_DFU).
In this exercise, you will add the nRF Cloud release loop on top.
1. Add the cloud configuration in prj.conf
1.1 Preserve Bluetooth bonds across the upgrade.
Copy
CONFIG_MCUMGR_GRP_ZBASIC_STORAGE_ERASE=n
Kconfig
Because the device stores settings in ZMS/NVS, the OTA DFU sample would otherwise let the Device Manager app erase the settings partition (your bonds) during an update.
1.2 Enable the Memfault SDK, project key, and software type.
Keep in mind that the CONFIG_MEMFAULT_NCS_FW_TYPE="main"must match the release’s Software Type set in step 7.
Note
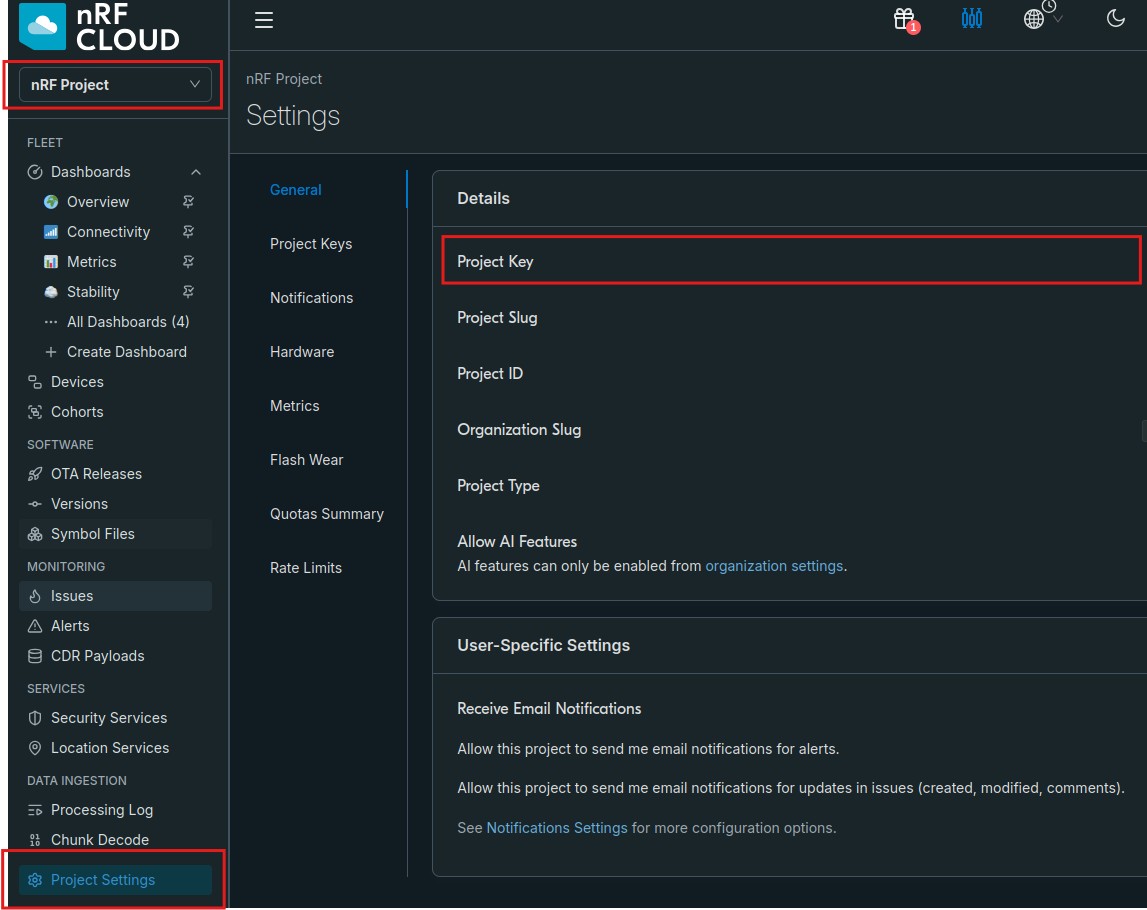
For the project key, you need to have an nRF Cloud account and create a new project.
If you don’t have an nRF Cloud, navigate to nRF Cloud and create a free account, with this developer account, you can connect up to 10 devices. Once you have an account, create a new project and copy the project key. You will need it for step 1.2. The project key must be 32 characters and written as a string in prj.conf, enclosed in double quotes.
1.3 Enable MDS so the device’s data reaches the cloud over Bluetooth LE.
Copy
CONFIG_BT_MDS=yCONFIG_BT_PRIVACY=y
Kconfig
1.4 Provide the device serial from the hardware UID.
CONFIG_MEMFAULT_NCS_FW_VERSION and CONFIG_MCUBOOT_IMGTOOL_SIGN_VERSIONmust match.
2. Add the MDS code inmain.c
Now we will move from prj.conf to main.c and make the necessary changes to add the MDS, which includes bluetooth/services/mds.h, track the encrypted connection, request BT_SECURITY_L2 on connect (and clear it on disconnect), record the connection once encrypted, define the MDS access gate, and register the MDS callback before bt_enable(). The pairing used here is Just Works (no PIN) for simplicity.
2.1 Include the Memfault Diagnostic Service header
Copy
#include<bluetooth/services/mds.h>
C
2.2 Track the connection that is allowed to access MDS
2.3 Request an encrypted link. MDS data may only be accessed over an encrypted (and, here, bonded) connection. Request an encrypted link when a central connects (in connected())
3. Build and flash the initial firmware (0.0.1). Add a build configuration with Use sysbuild enabled, Build, then Flash (programs MCUboot + the app). Reset and confirm advertising.
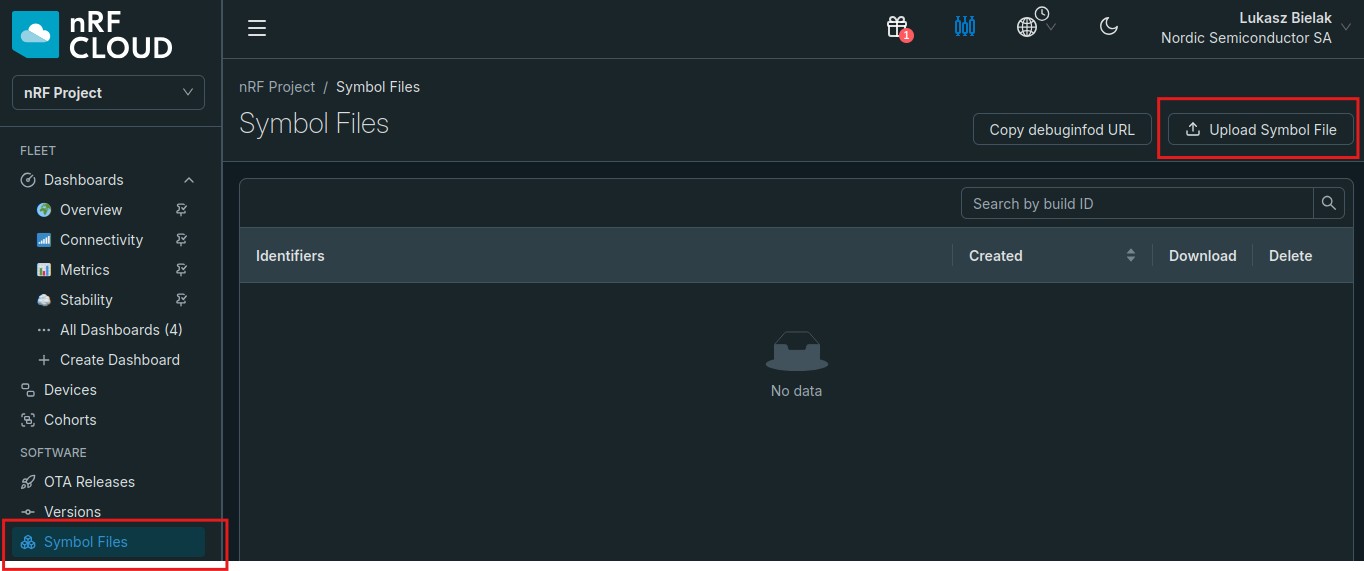
4. Upload the symbol file for 0.0.1. Open the web portal of nRF Cloud → Software → Symbol Files → upload build/<app_name>/zephyr/zephyr.elf so crash data from this version can be symbolicated.
5. Connect and verify data is flowing.
First, open nRF Connect Device Manager app (which will act as a Bluetooth LE gateway) and connect to the Nordic_LBS device to allow the device to connect to nRF Cloud via the gateway and report it’s current firmware version.
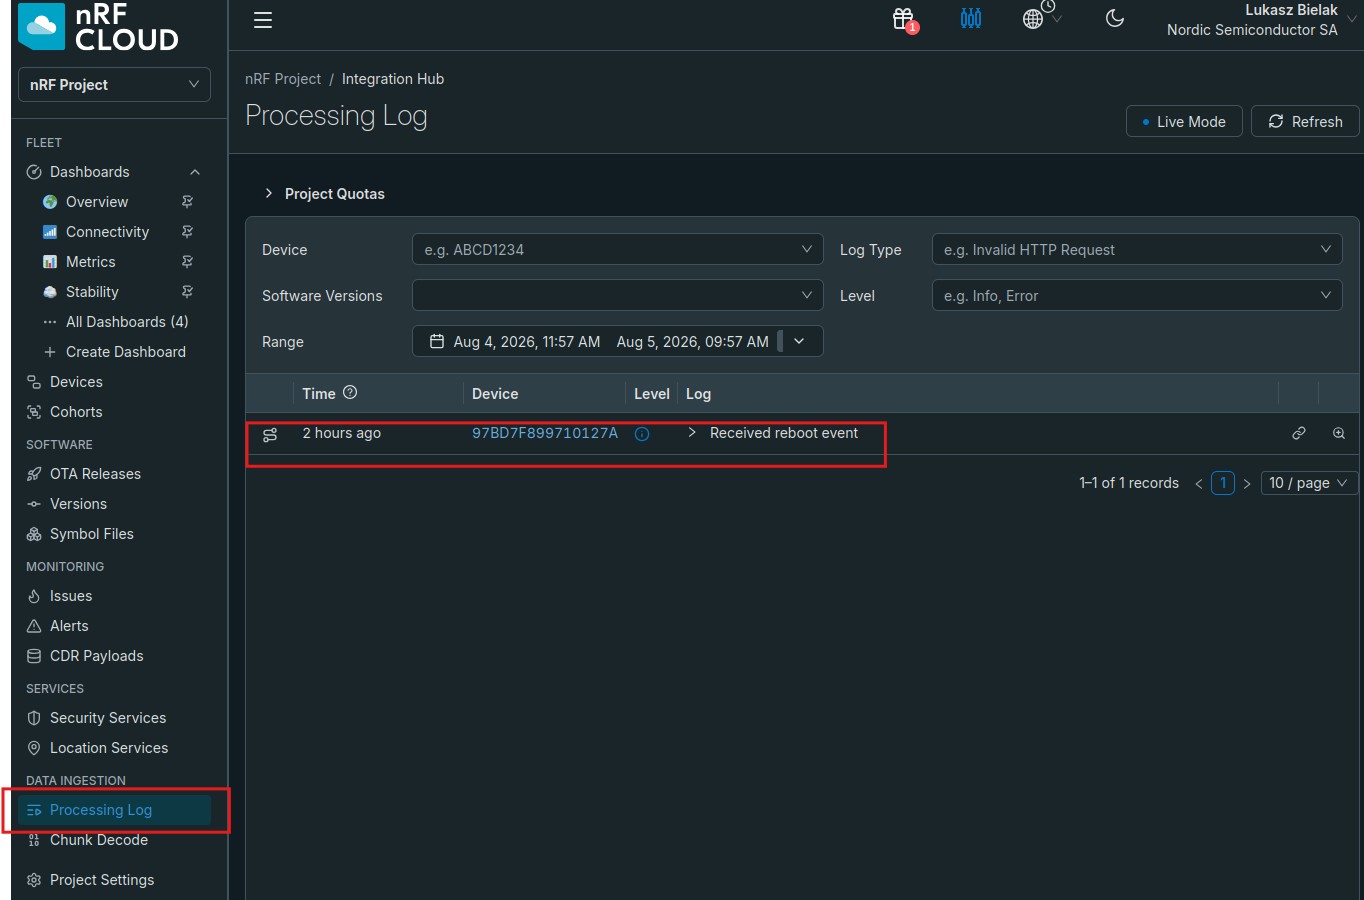
Then, open nRF Cloud web portal ,In nRF Cloud check Data Ingestion → Processing Log and that the device now appears in Fleet → Devices running 0.0.1.
6. Create a new firmware version (0.0.2).
6.1 Bump both version strings to 0.0.2 (this is where a real fix would go). In our simple exercise we will just bump up the version number in prj.conf
6.2 Build but do not flash — the build produces the signed dfu_application.zip, which can be found in the build/ directory
6.3 Upload the new zephyr.elf for 0.0.2 to Software → Symbol Files. same as we did in step 4.
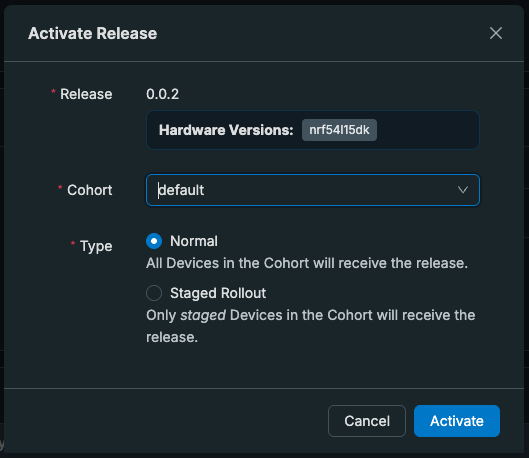
7.Create and activate an OTA release in nRF Cloud.
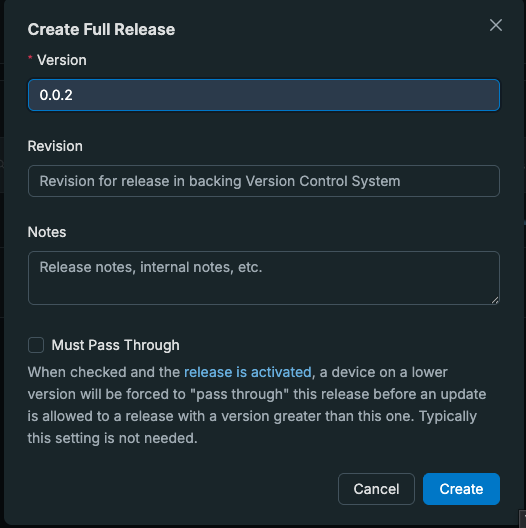
7.1 Create 0.0.2 release in nRF Cloud by heading to Software → OTA Releases → Create Release . In the Create Release window, set the Version to 0.0.2 relase and click on Create
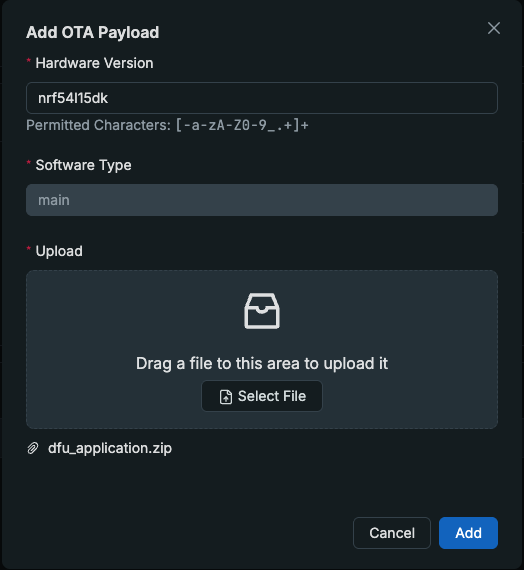
7.2 Inside the newly created release, click on “Add an OTA payload to Release”
In the Add OTA Payload window:
Specify your DK’s Hardware Version: E.g. nrf54l15dk, nrf5340dk , etc..
Software Type: main, which must match CONFIG_MEMFAULT_NCS_FW_TYPE in prj.conf; nRF Cloud ties the DK hardware types to main, and a mismatch makes the device report “up to date” .
upload dfu_application.zip found in the build/ directory, and click Add.
Lorem ipsum dolor sit amet, consectetur adipiscing elit. Ut elit tellus, luctus nec ullamcorper mattis, pulvinar dapibus leo.
Android
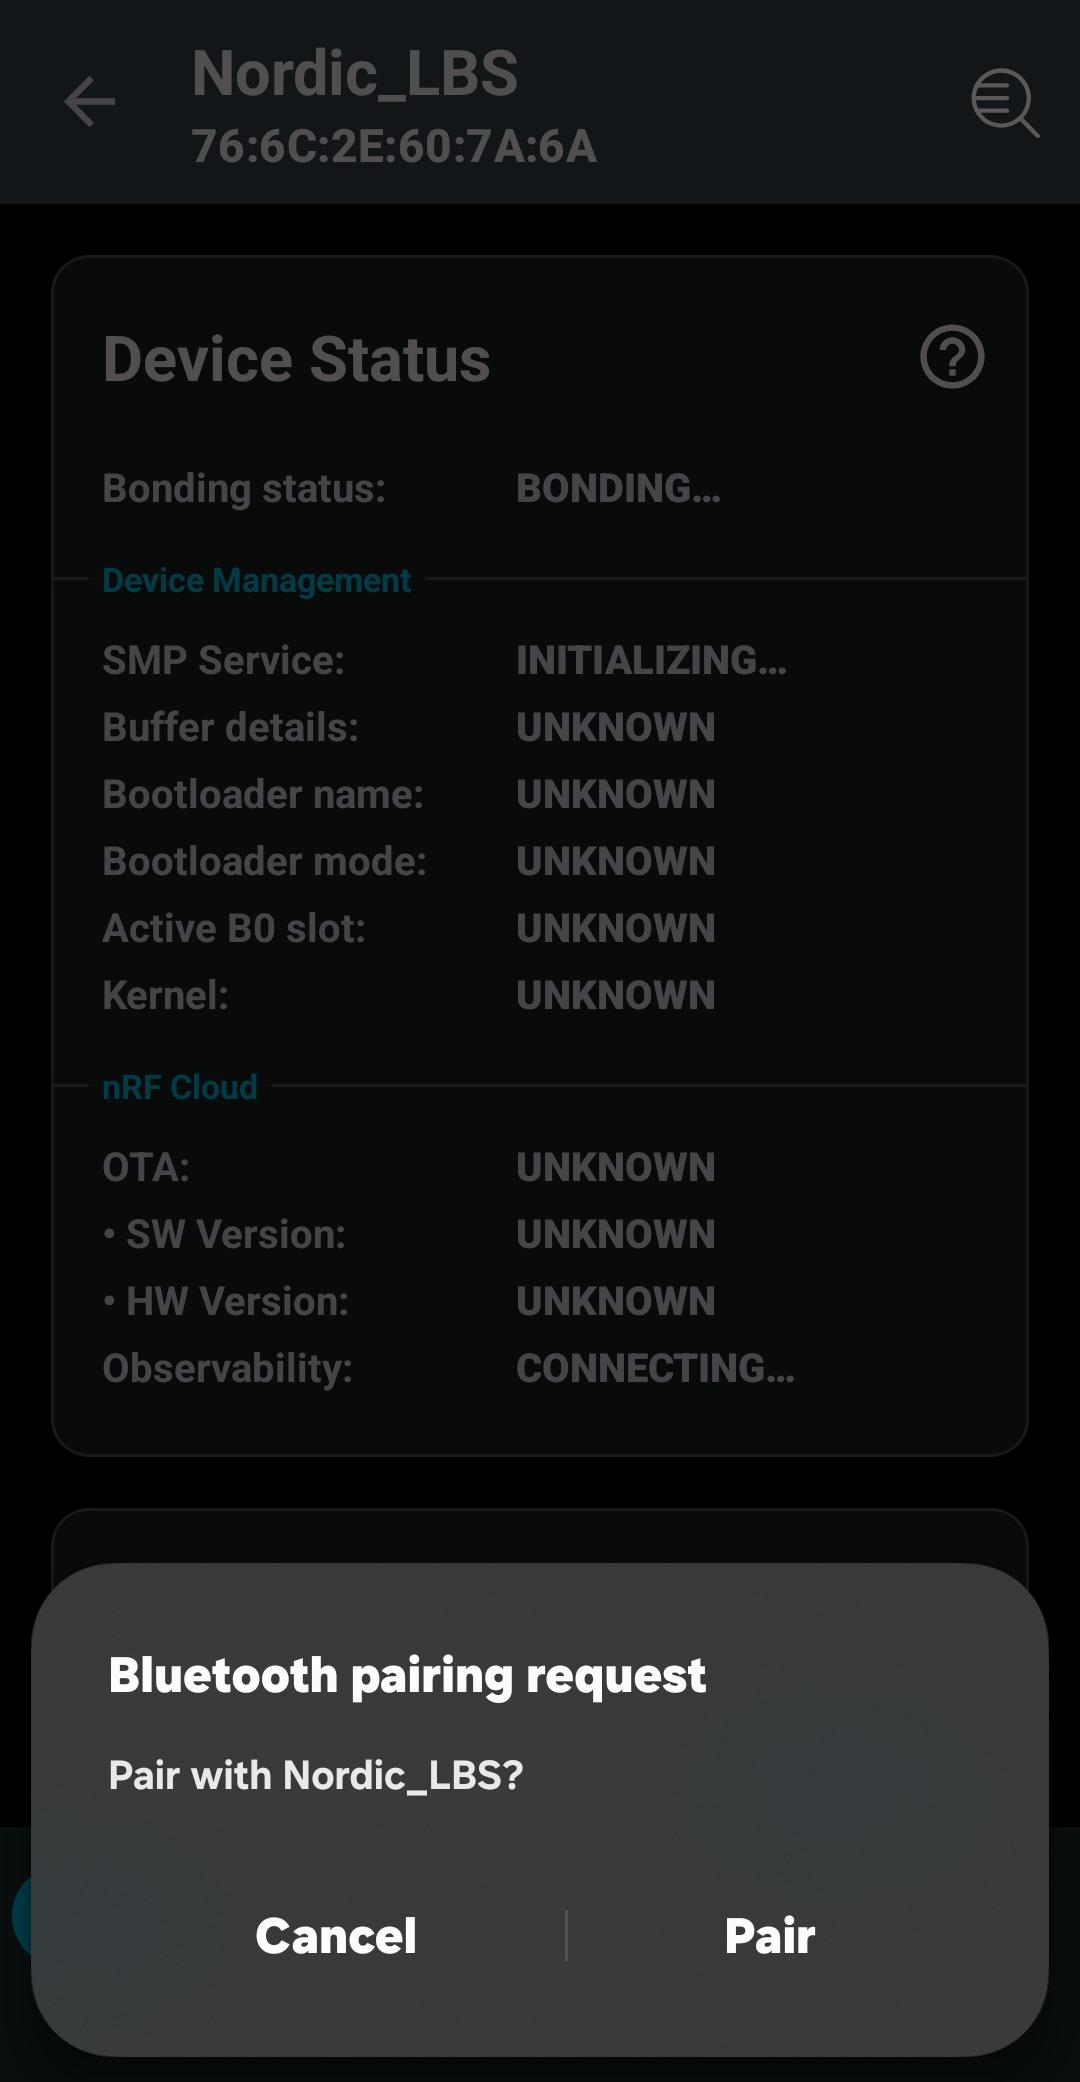
8.1 On your Android phone, Open nRF Connect Device Manager (no login/account needed — the device’s project key drives the cloud association) and connect to the device.
8.2 On first connection your phone shows a pairing prompt; with Just Works pairing you simply acknowledge/accept it (there is no PIN to enter)
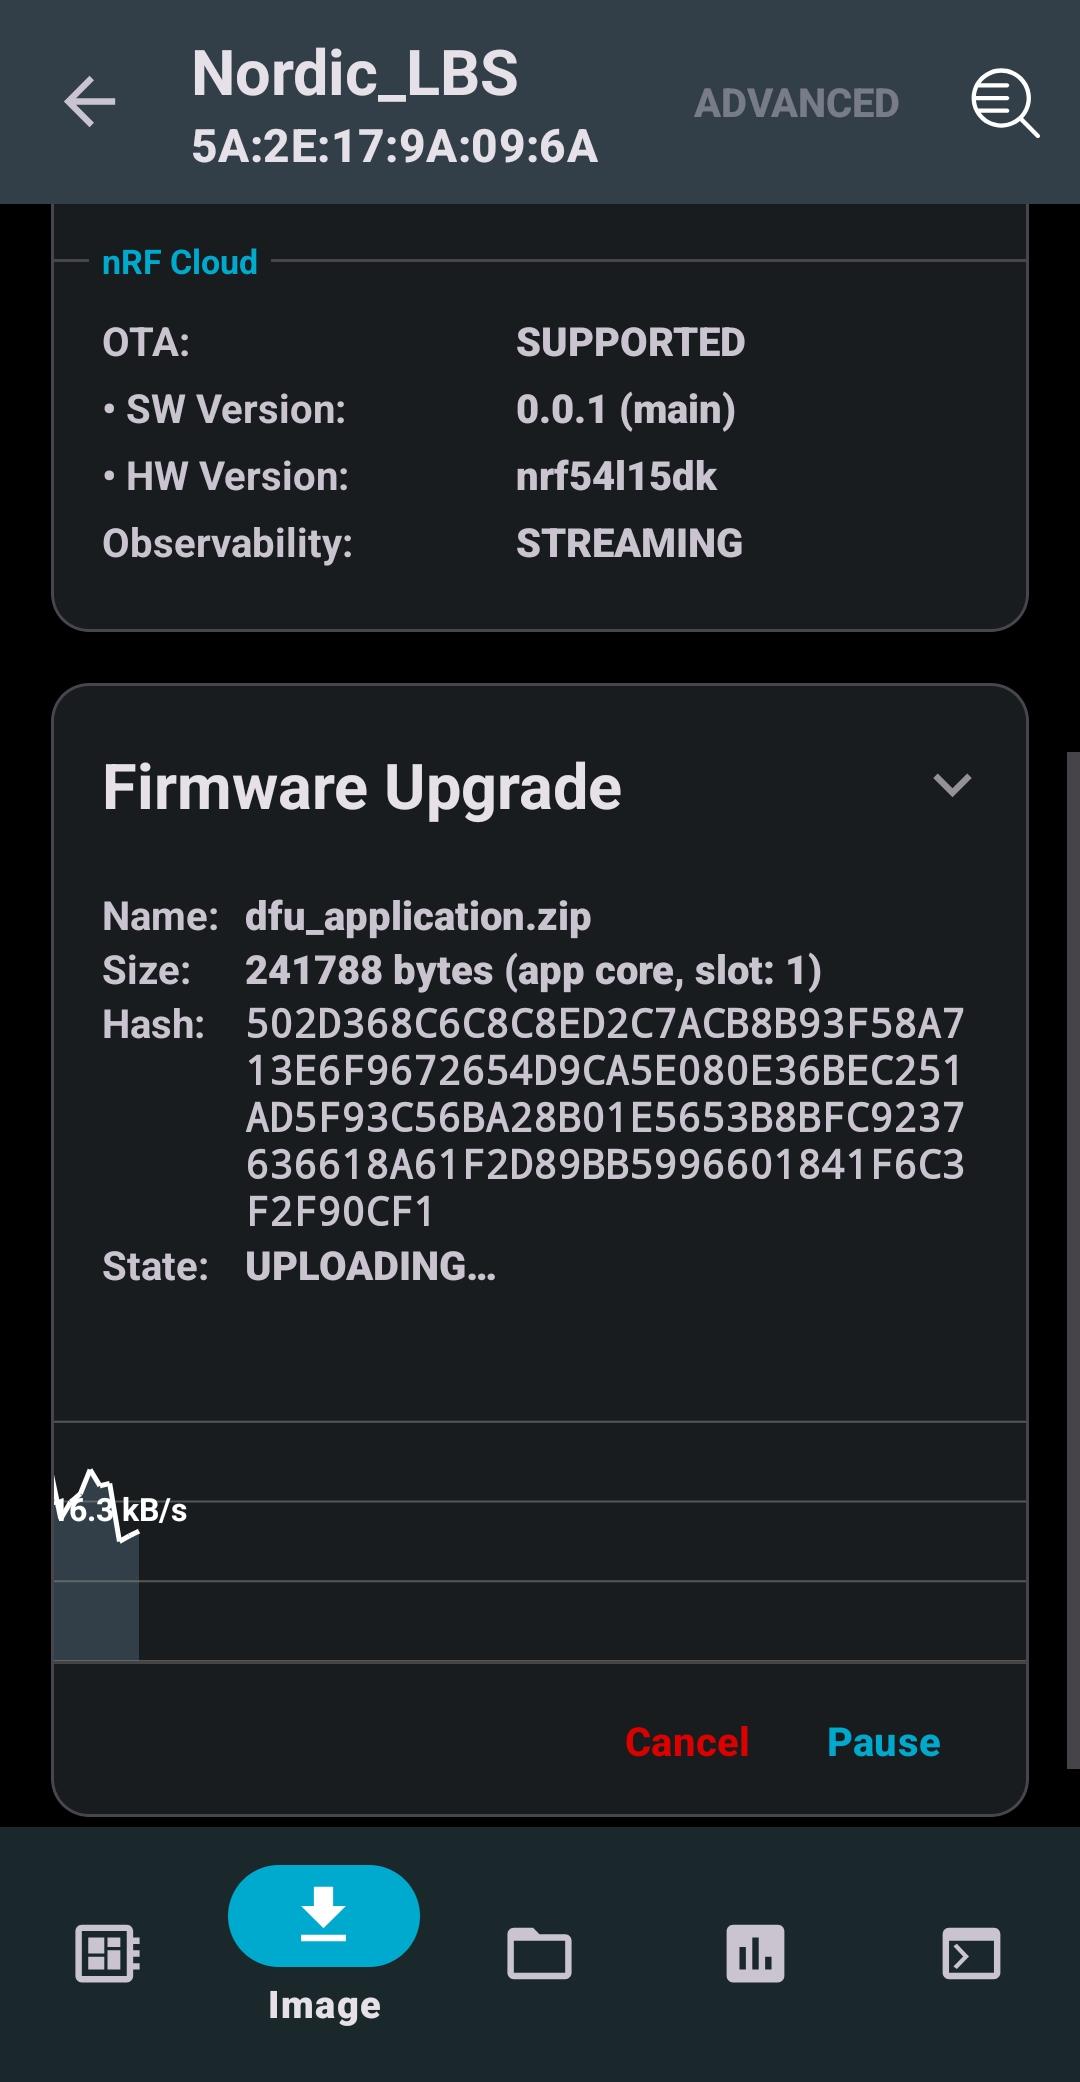
Once paired, observe the nRF Cloud status, which should indicate that the OTA status is SUPPORTED and the Observability status is STREAMING.
8.3 Switch to the Image tab
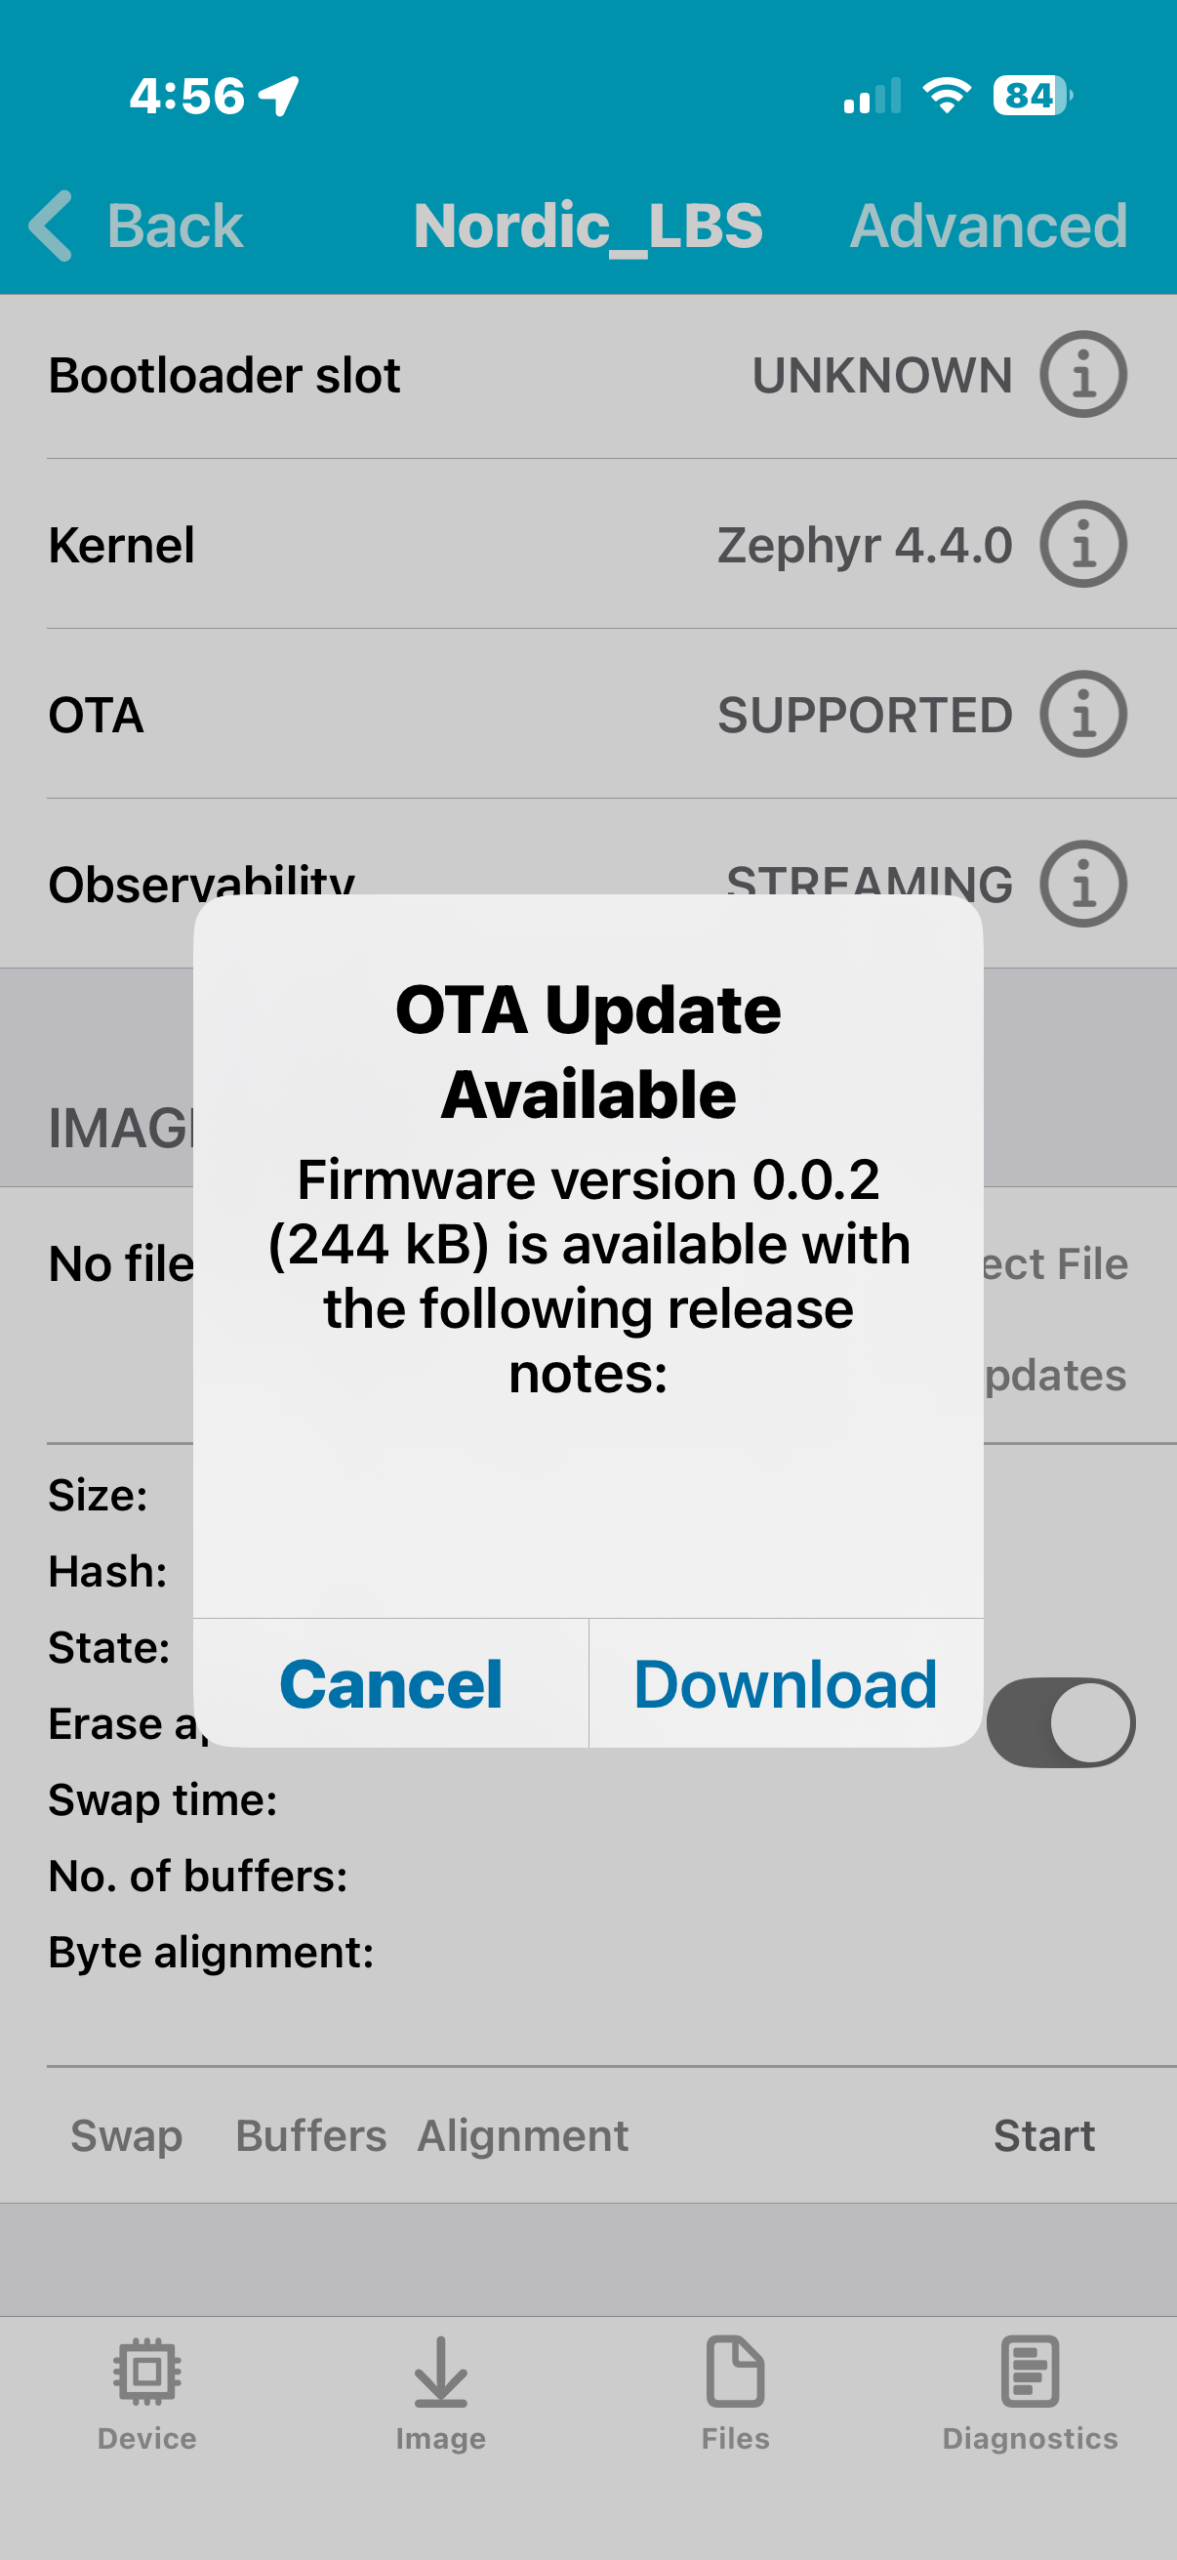
Image tab → Check for Updates → Download . This will download the new firmware image from nRF Cloud and prepare to be sent to the device
The release notes are empty simply because we didn’t fill them in step 7.1.
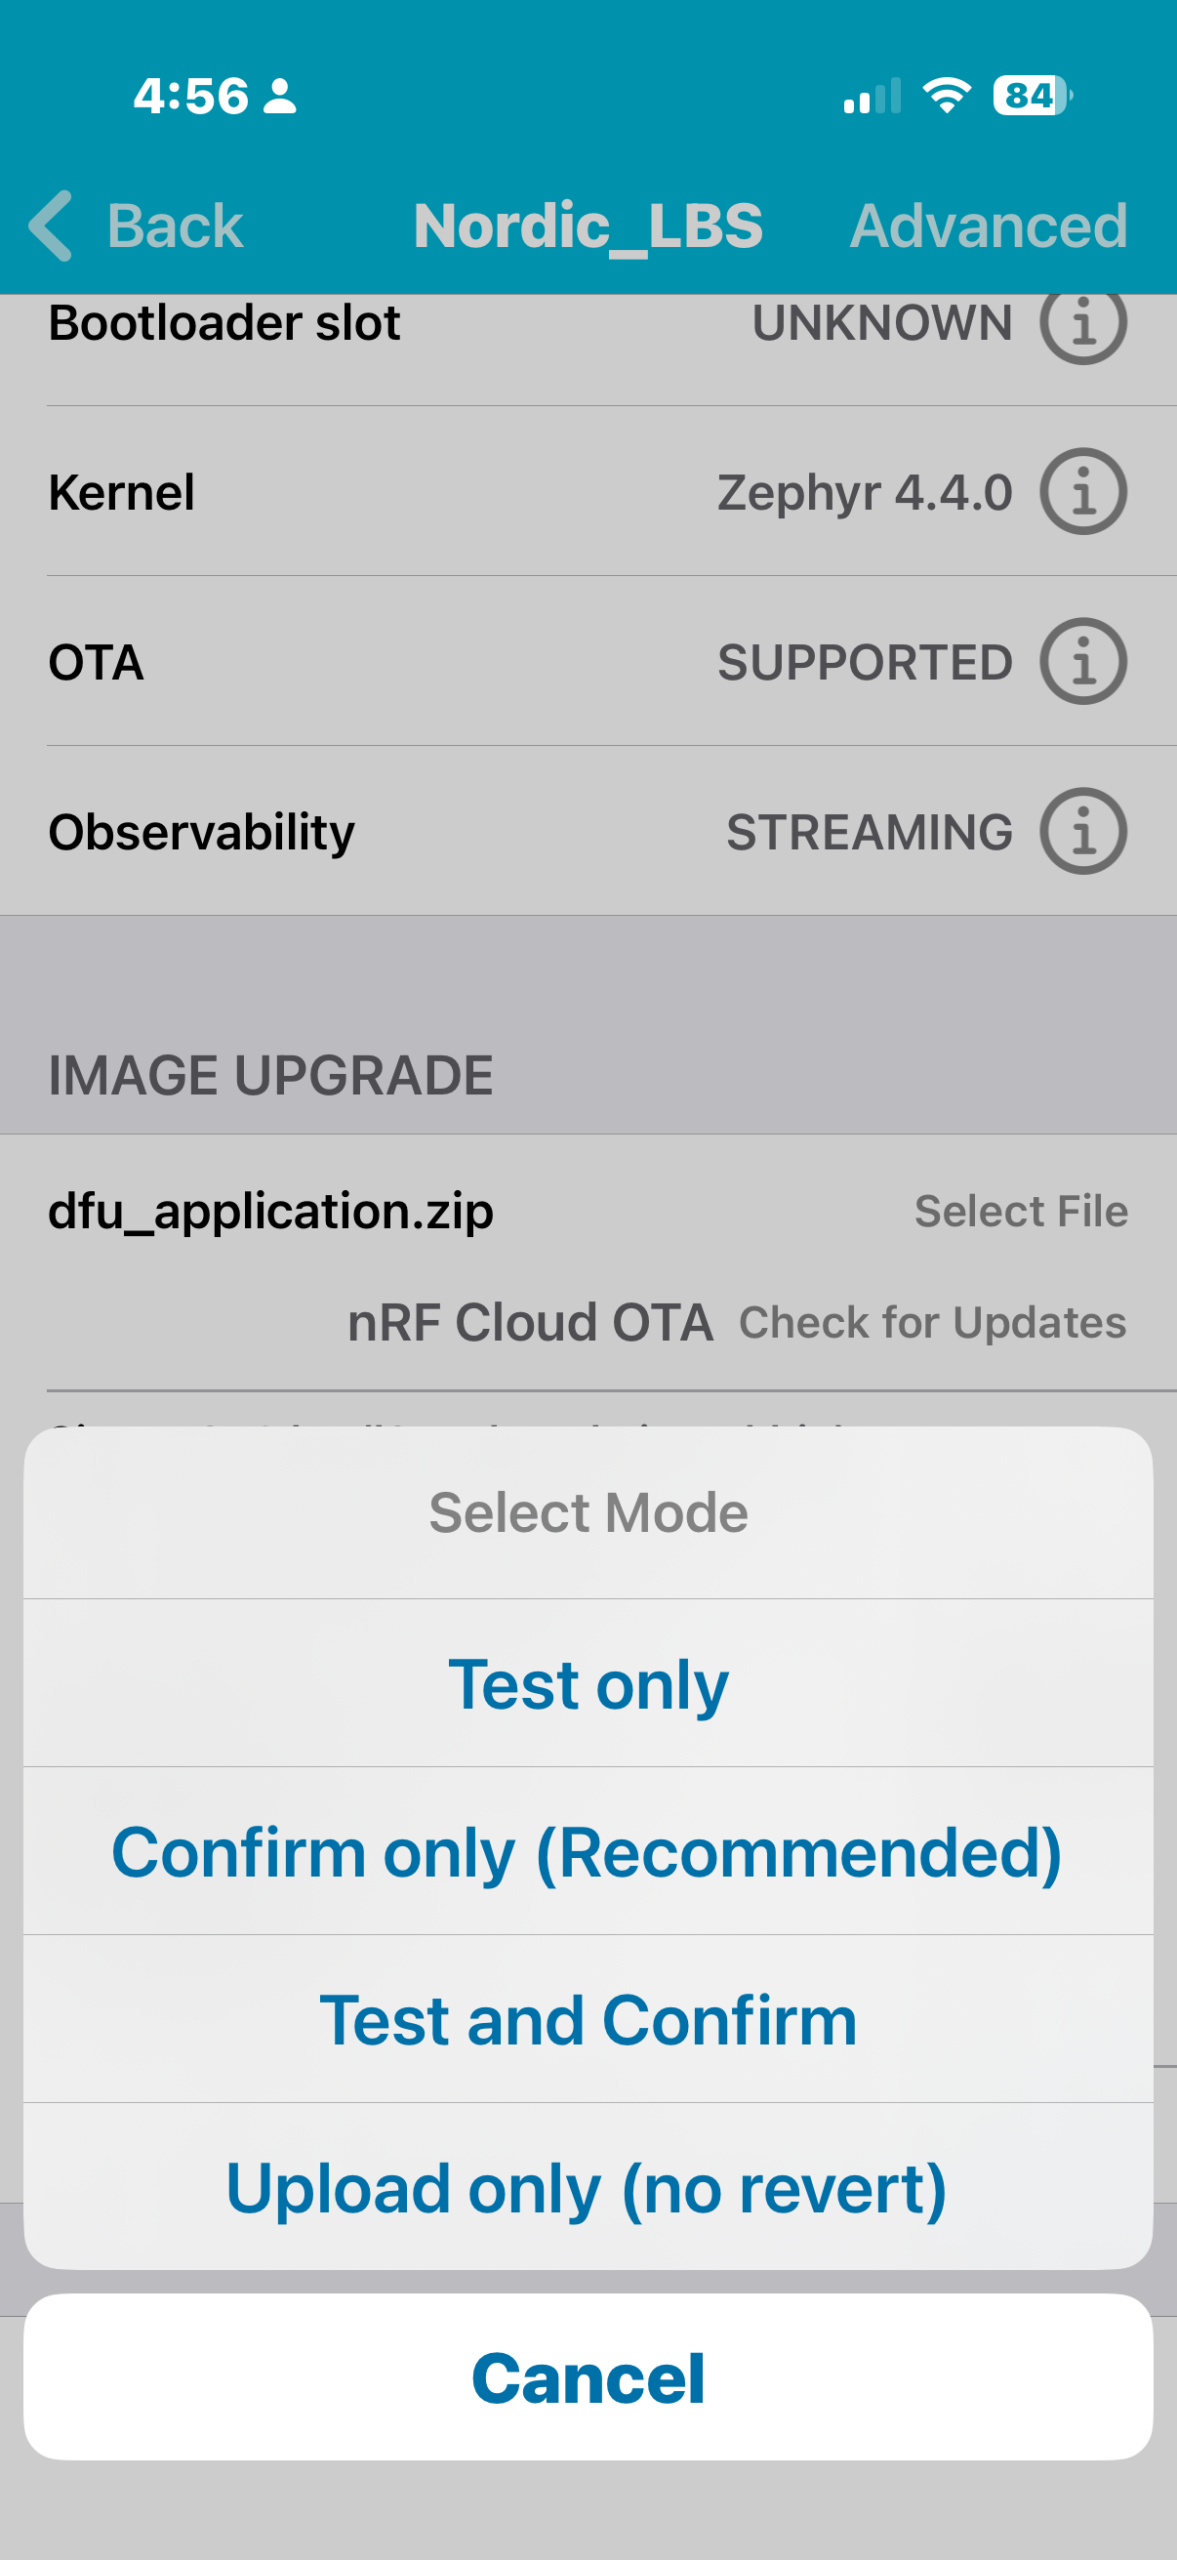
Once the new firmware image is downloaded, press Start and select ConfirmOnly. The transfer will take some time to finish . On “UPLOAD COMPLETE” the device reboots and MCUboot installs the image.
iOS
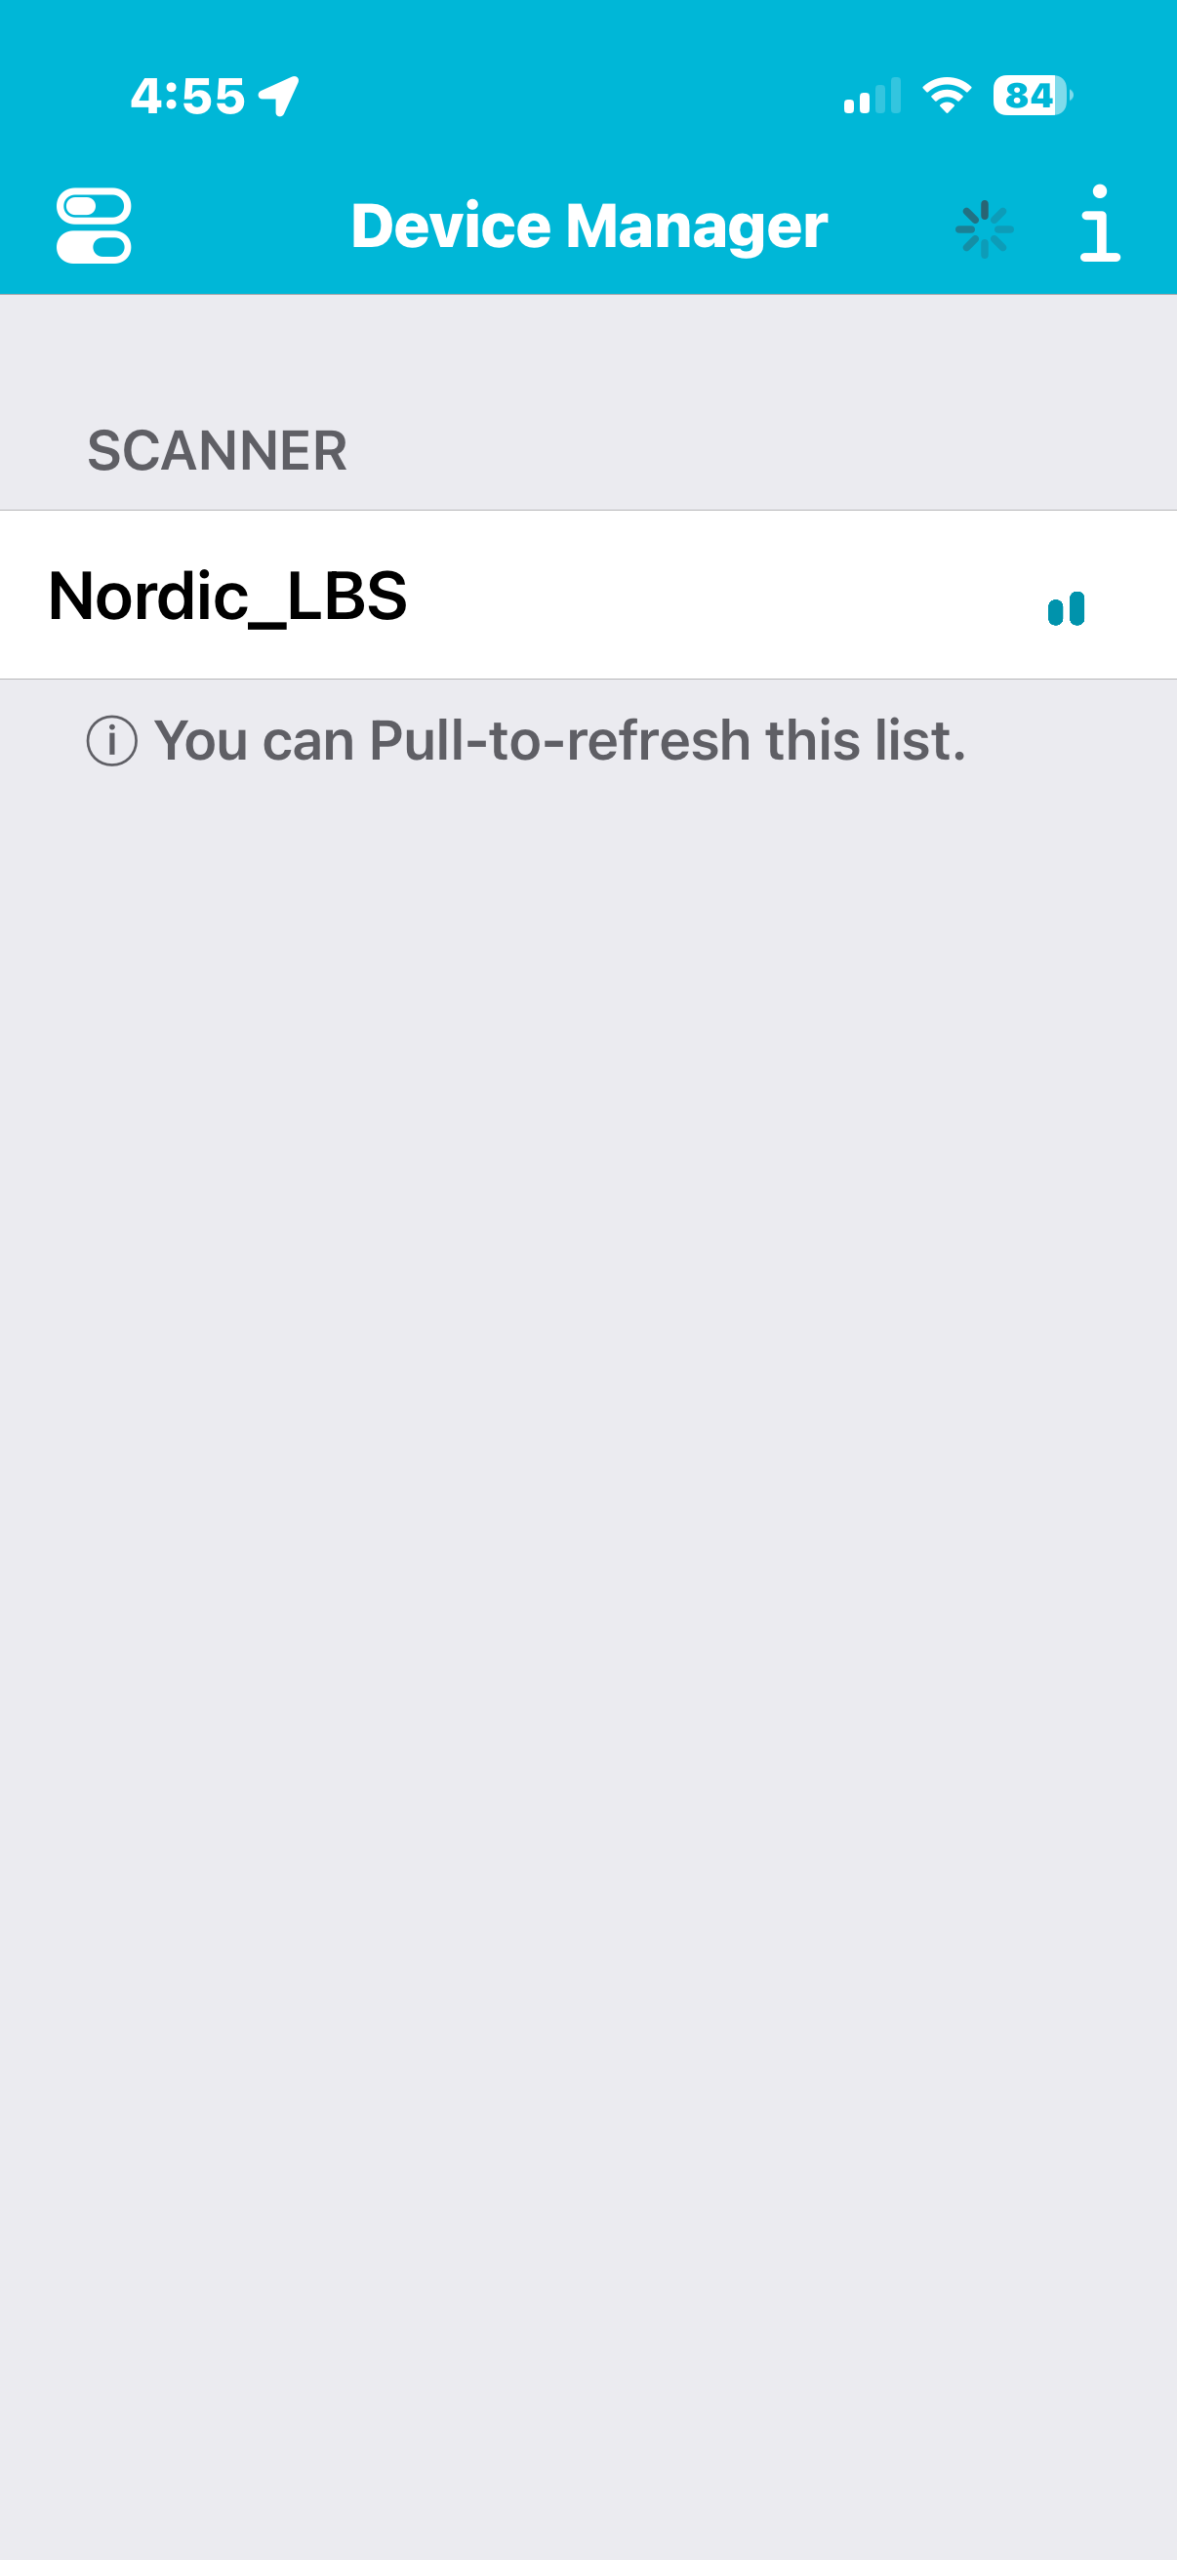
8.1 On your iOS phone, Open nRF Connect Device Manager (no login/account needed ” the device’s project key drives the cloud association”) and connect to the device.
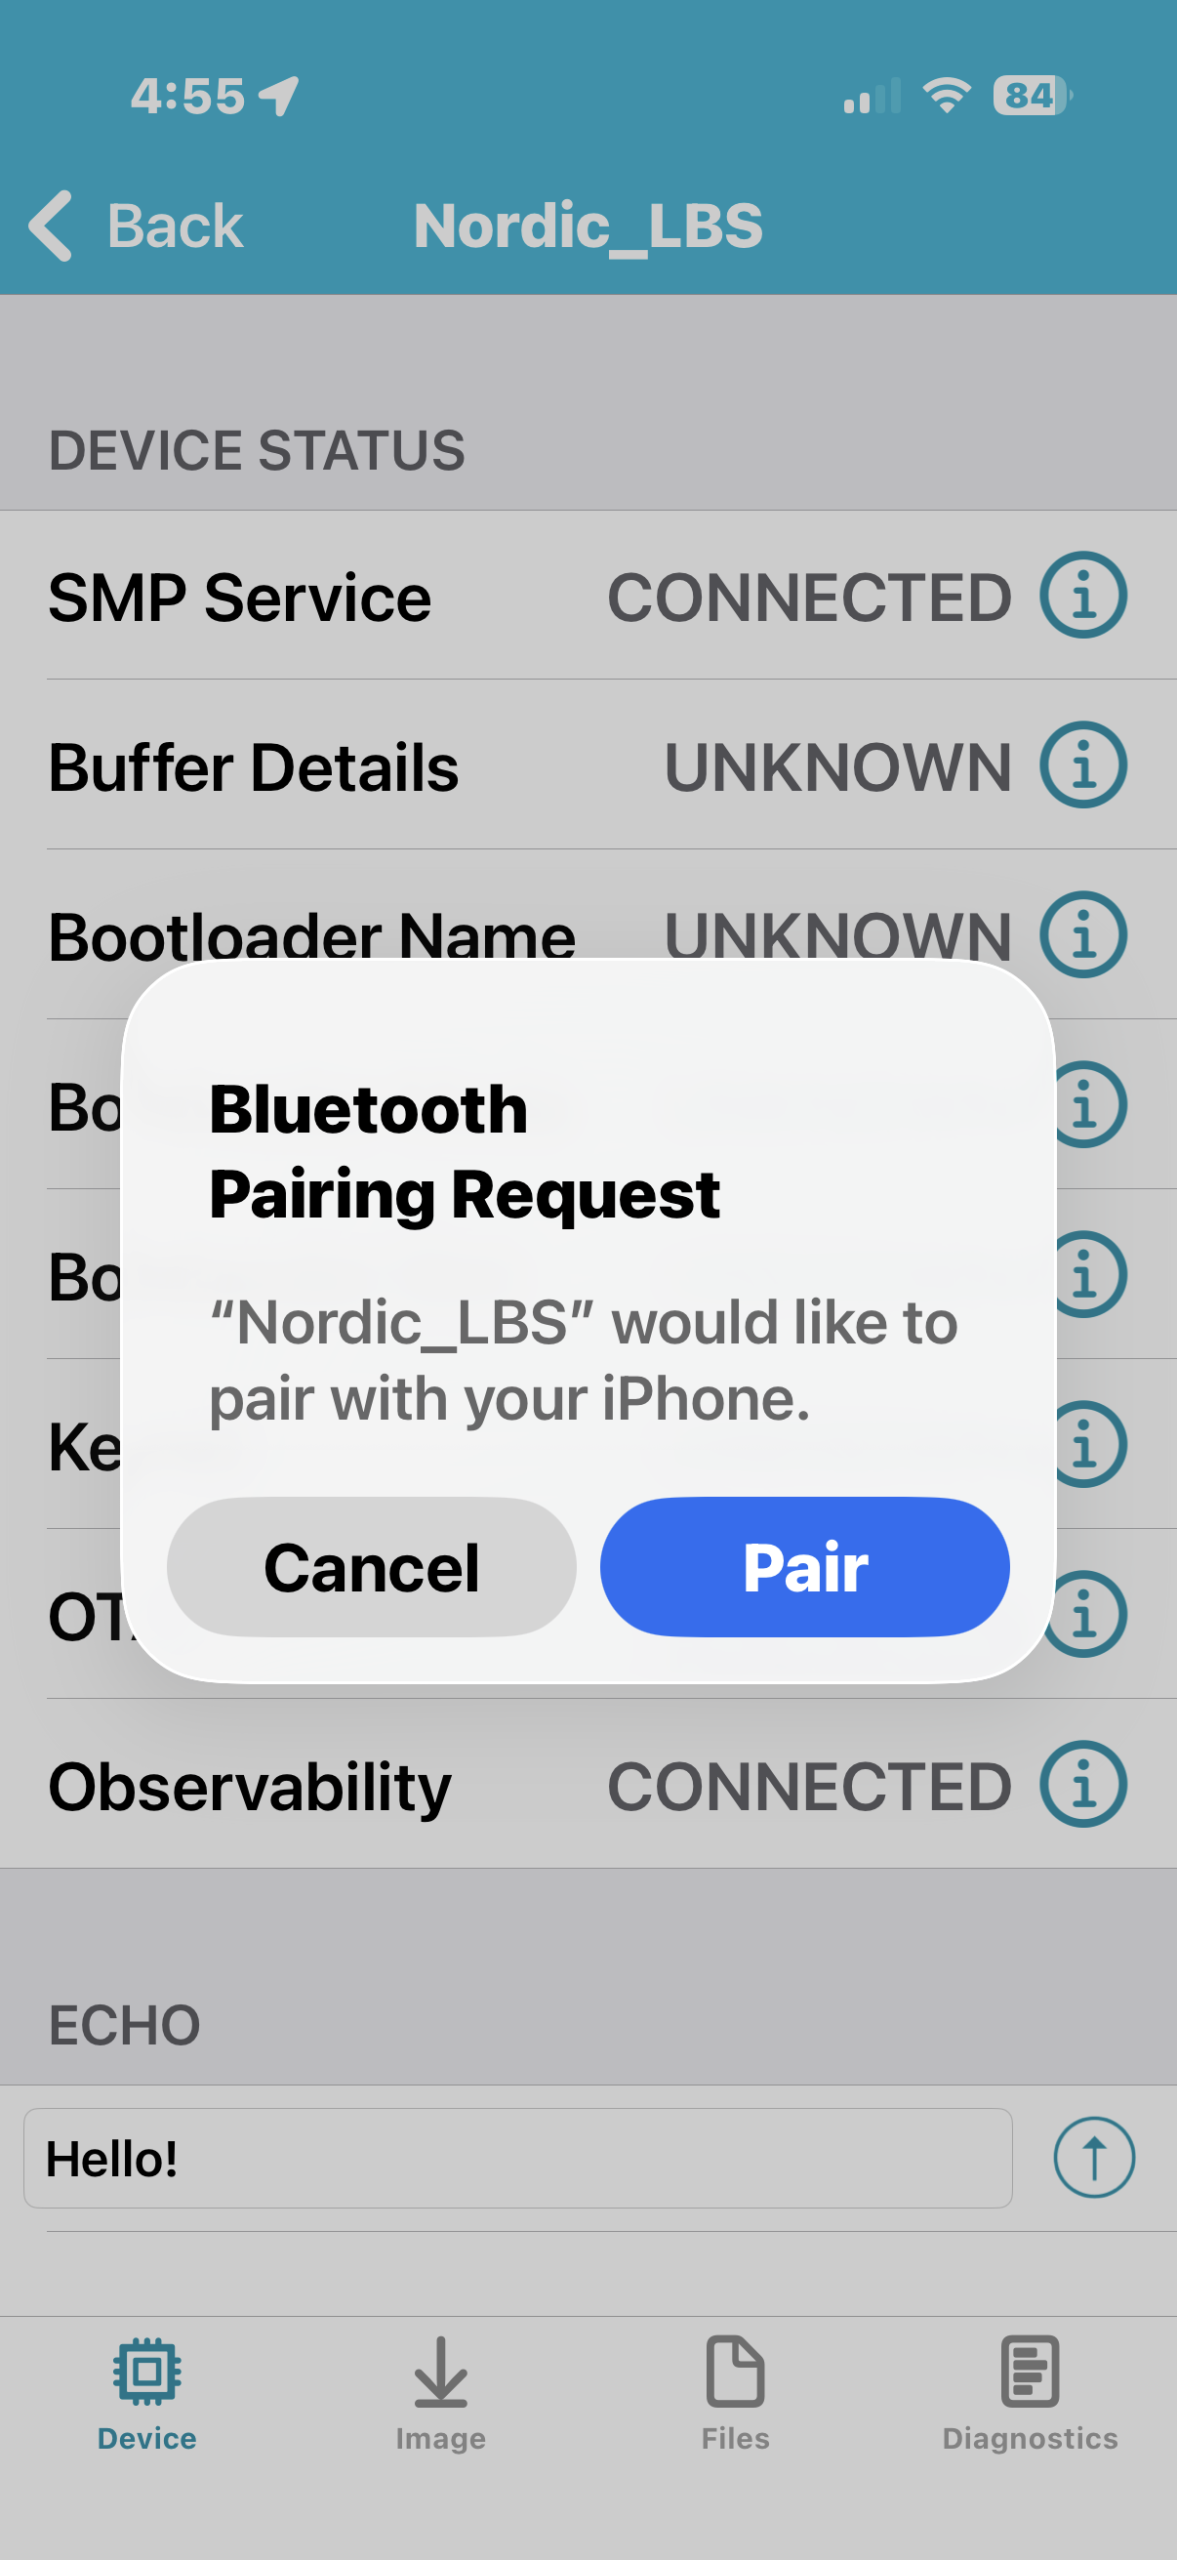
8.2 On first connection your phone shows a pairing prompt; with Just Works pairing you simply acknowledge/accept it (there is no PIN to enter)
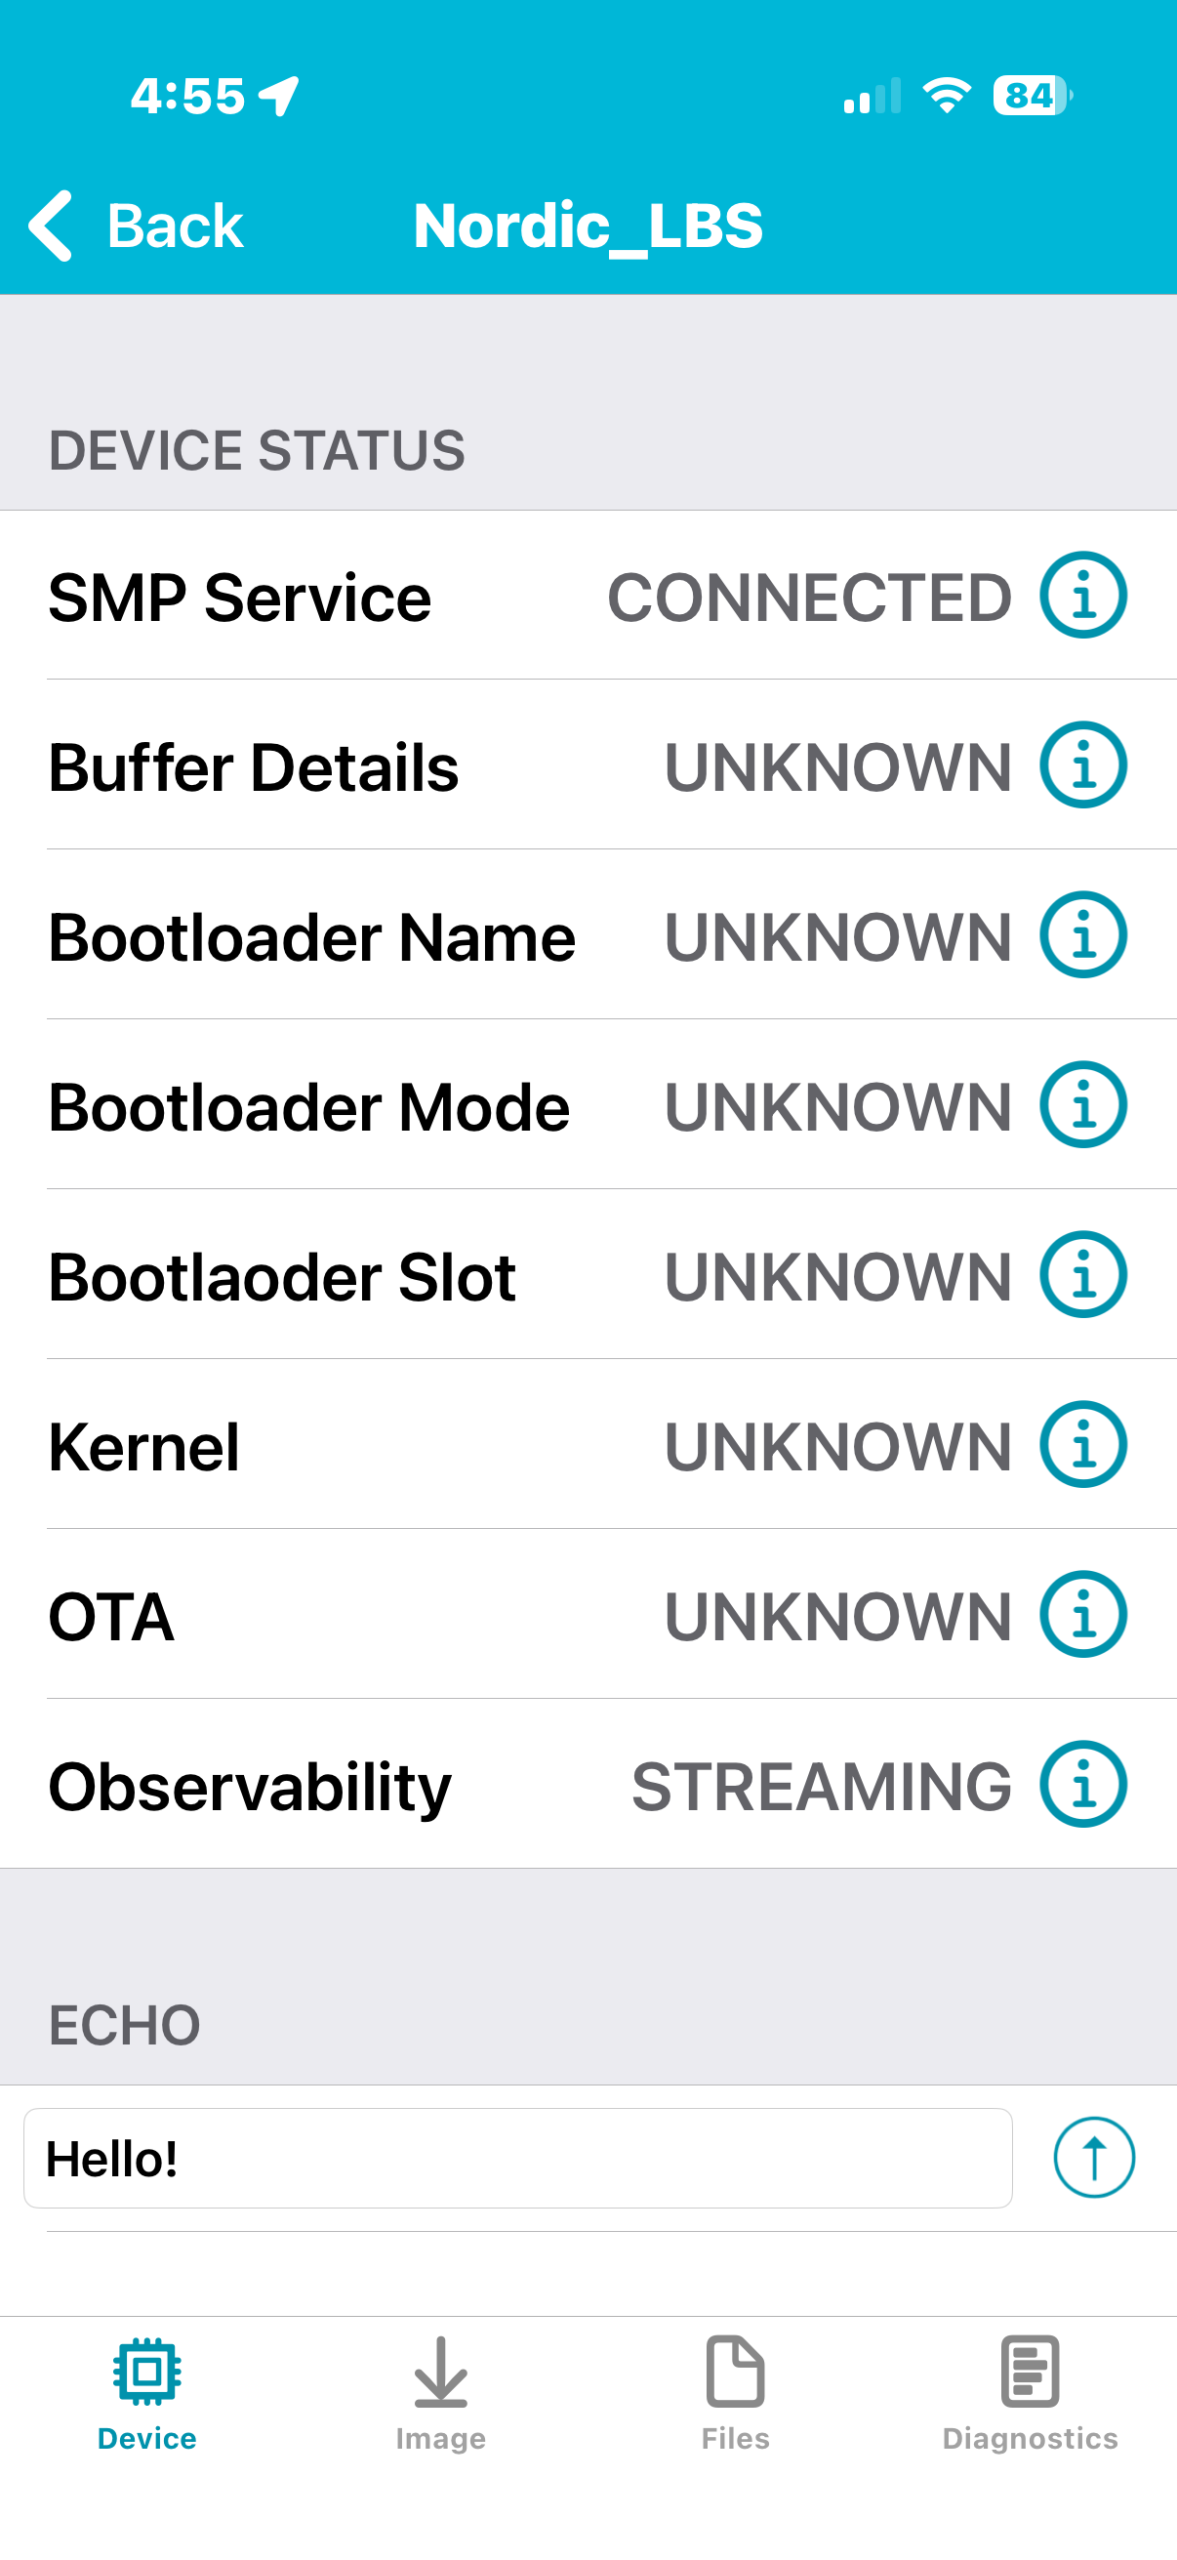
Once paired, observe the nRF Cloud status, which should indicate that the SMP Service is CONNECTED and the Observability status is STREAMING.
8.3 Switch to the Image tab
Image tab → Check for Updates → Download. This will download the new firmware image from nRF Cloud and prepare to be sent to the device
The release notes are empty simply because we didn’t fill them in step 7.1.
Once the new firmware image is downloaded, press Start and select Confirm Only. The transfer will take some time to finish . On “UPLOAD COMPLETE” the device reboots and MCUboot installs the image.
9. Verification.
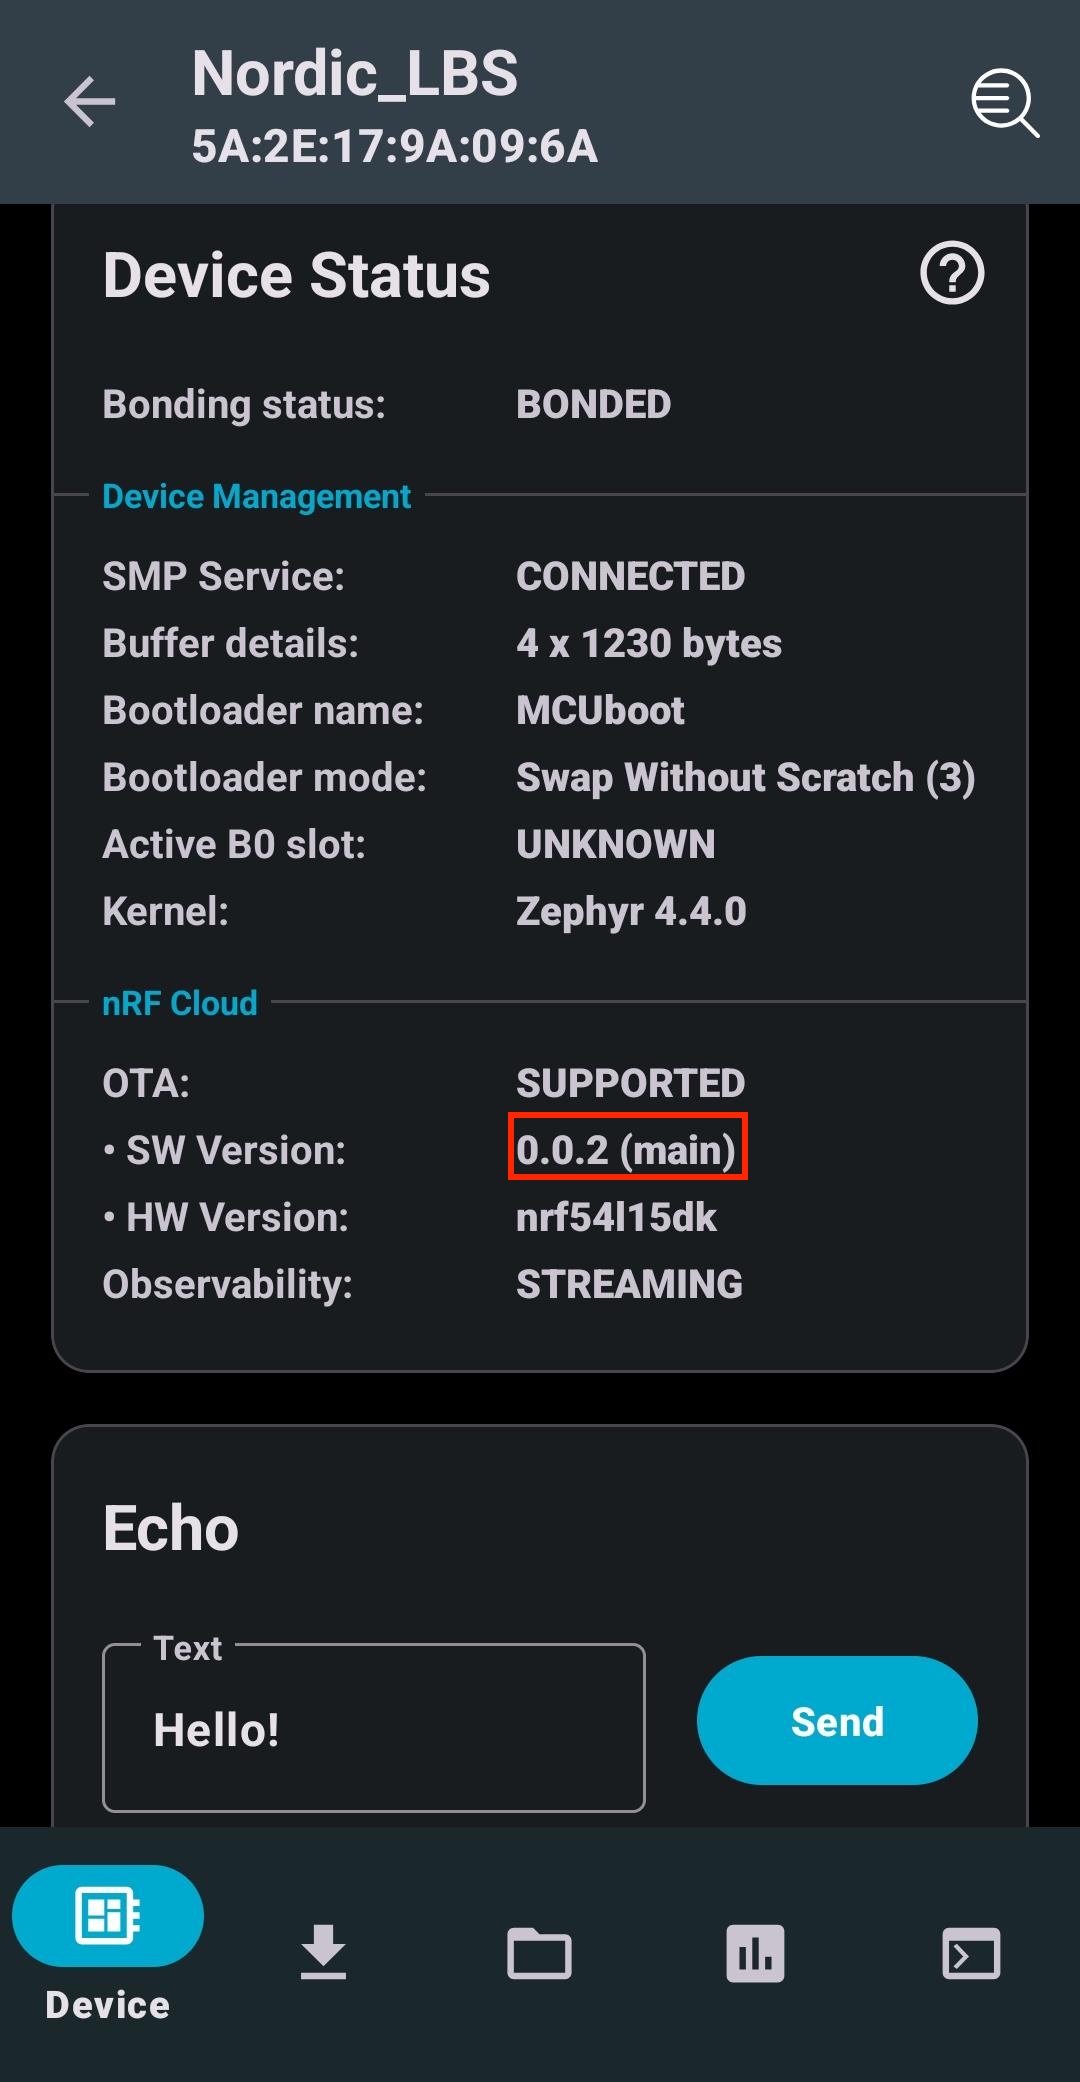
9.1 Reconnect to the DK using nRF Connect Device Manager(Press back to go to the scan tab, then press on Nordi_LBS to reconnect). You should observe now that the SW Version of the firmware running on the DK is 0.0.2.
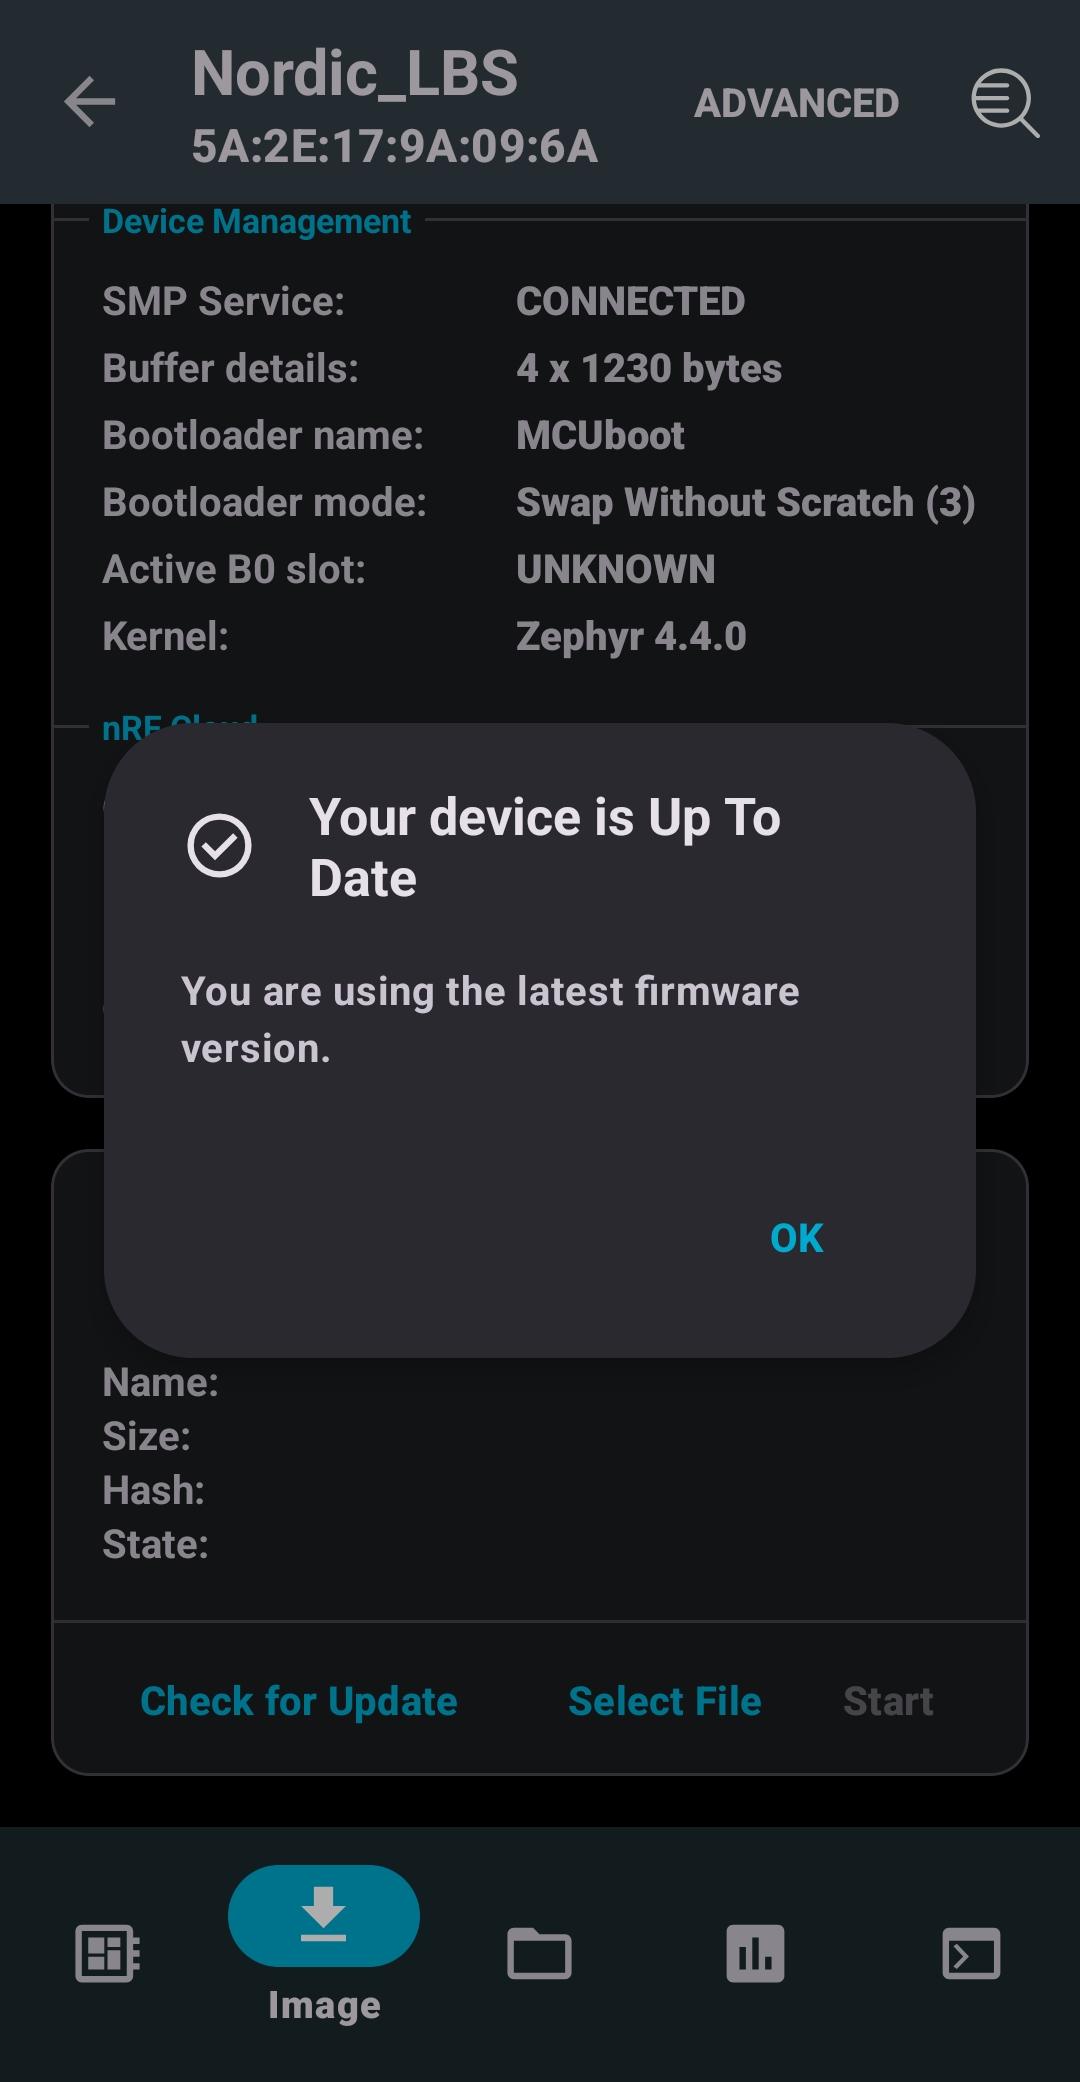
9.2 Switch to the Image tab and press on Check for Update. Since 0.0.2 is the latest release created in nRF Cloud, the app will report that the device is up to date.
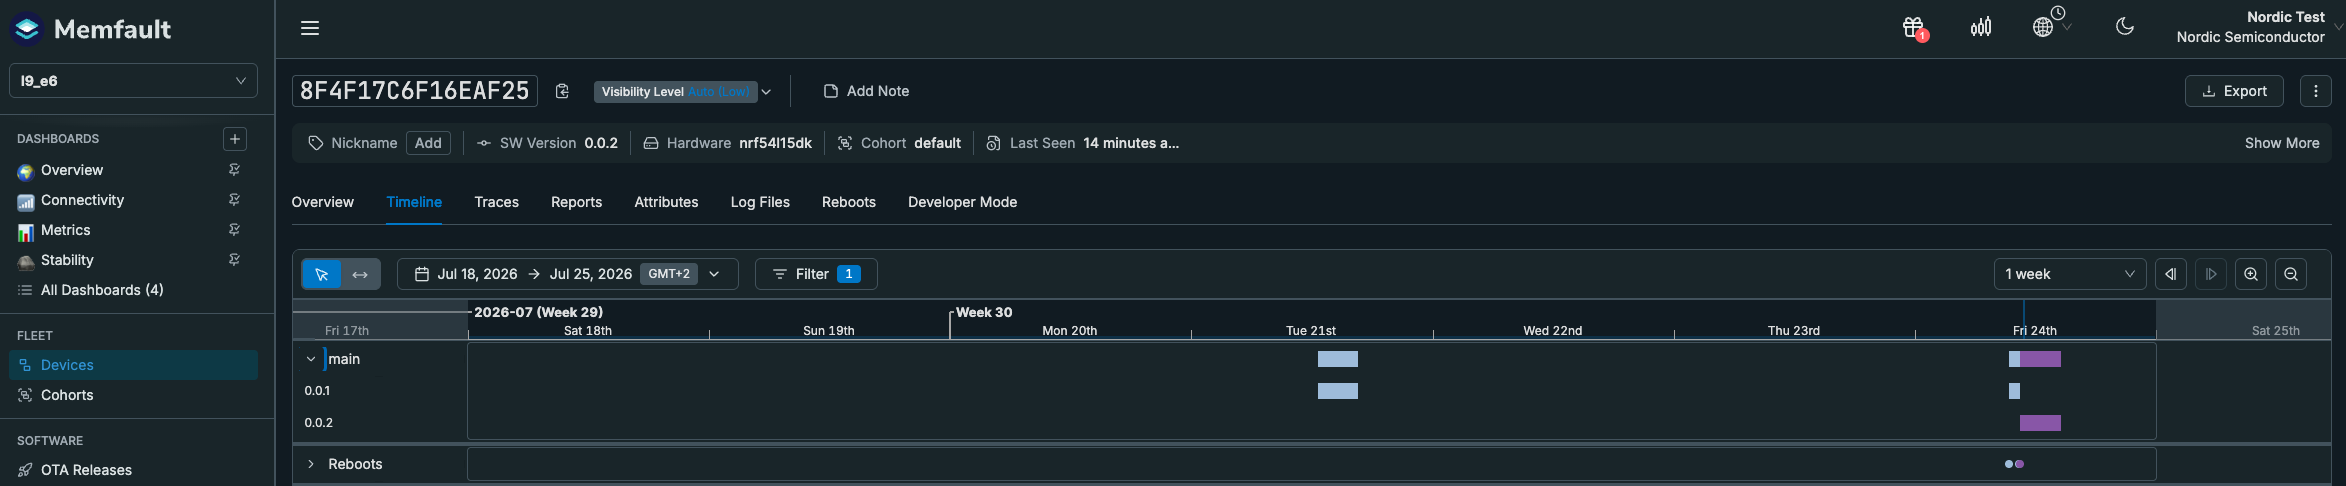
9.3 In nRF Cloud Fleet → Devices confirm 0.0.2; the device Timeline shows the reboot and the 0.0.1 → 0.0.2 change.
Wrap-up
The OTA transfer reused the same Bluetooth LE connection as the diagnostics service; its throughput depends on the connection parameters (interval, DLE, MTU). You have practiced the full field-update loop — observe → diagnose → fix → deploy — without physical access to the device.
Because you set CONFIG_MCUMGR_GRP_ZBASIC_STORAGE_ERASE=n, the bond survived the upgrade — after the device rebooted into 0.0.2, your phone reconnected and re-encrypted without re-pairing.
Troubleshooting
“Check for Updates” says the device is already up to date. The release’s Software Type must match CONFIG_MEMFAULT_NCS_FW_TYPE (main) and the Hardware version must match what the device reports (CONFIG_MEMFAULT_NCS_HW_VERSION, e.g. nrf54l15dk / nrf5340dk), and the device must be in the activated release’s cohort (default). Check Fleet → Devices to see exactly what the device reports.
Connection fails right after re-flashing (Security failed ... err 2 in the log). Flashing with mass-erase wipes the device’s bonds, but your phone still has the old bond. Forget the device in your phone’s Bluetooth settings (and toggle Bluetooth off/on), then reconnect to re-pair. (A normal OTA upgrade does not need this — bonds persist, see step 1.1.)
No serial output. On the nRF54L15 and nRF5340 DKs the application console is on VCOM1, the second of the two J-Link serial ports.
The full solution is available in the course repository in the directory l9/l9_e6_sol. Note that you still need to update the CONFIG_MEMFAULT_NCS_PROJECT_KEY in prj.conf with your own project key for the solution to work.
Nordic Developer Academy Privacy Policy
1. Introduction
In this Privacy Policy you will find information on Nordic Semiconductor ASA (“Nordic Semiconductor”) processes your personal data when you use the Nordic Developer Academy.
References to “we” and “us” in this document refers to Nordic Semiconductor.
2. Our processing of personal data when you use the Nordic Developer Academy
2.1 Nordic Developer Academy
Nordic Semiconductor processes personal data in order to provide you with the features and functionality of the Nordic Developer Academy. Creating a user account is optional, but required if you want to track you progress and view your completed courses and obtained certificates. If you choose to create a user account, we will process the following categories of personal data:
Email
Name
Password (encrypted)
Course progression (e.g. which course you have completely or partly completed)
Certificate information, which consists of name of completed course and the validity of the certificate
Course results
During your use of the Nordic Developer Academy, you may also be asked if you want to provide feedback. If you choose to respond to any such surveys, we will also process the personal data in your responses in that survey.
The legal basis for this processing is GDPR article 6 (1) b. The processing is necessary for Nordic Semiconductor to provide the Nordic Developer Academy under the Terms of Service.
2.2 Analytics
If you consent to analytics, Nordic Semiconductor will use Google Analytics to obtain statistics about how the Nordic Developer Academy is used. This includes collecting information on for example what pages are viewed, the duration of the visit, the way in which the pages are maneuvered, what links are clicked, technical information about your equipment. The information is used to learn how Nordic Developer Academy is used and how the user experience can be further developed.
2.2 Newsletter
You can consent to receive newsletters from Nordic from within the Nordic Developer Academy. How your personal data is processed when you sign up for our newsletters is described in the Nordic Semiconductor Privacy Policy.
3. Retention period
We will store your personal data for as long you use the Nordic Developer Academy. If our systems register that you have not used your account for 36 months, your account will be deleted.
4. Additional information
Additional information on how we process personal data can be found in the Nordic Semiconductor Privacy Policy and Cookie Policy.
Nordic Developer Academy Terms of Service
1. Introduction
These terms and conditions (“Terms of Use”) apply to the use of the Nordic Developer Academy, provided by Nordic Semiconductor ASA, org. nr. 966 011 726, a public limited liability company registered in Norway (“Nordic Semiconductor”).
Nordic Developer Academy allows the user to take technical courses related to Nordic Semiconductor products, software and services, and obtain a certificate certifying completion of these courses. By completing the registration process for the Nordic Developer Academy, you are agreeing to be bound by these Terms of Use.
These Terms of Use are applicable as long as you have a user account giving you access to Nordic Developer Academy.
2. Access to and use of Nordic Developer Academy
Upon acceptance of these Terms of Use you are granted a non-exclusive right of access to, and use of Nordic Developer Academy, as it is provided to you at any time. Nordic Semiconductor provides Nordic Developer Academy to you free of charge, subject to the provisions of these Terms of Use and the Nordic Developer Academy Privacy Policy.
To access select features of Nordic Developer Academy, you need to create a user account. You are solely responsible for the security associated with your user account, including always keeping your login details safe.
You will able to receive an electronic certificate from Nordic Developer Academy upon completion of courses. By issuing you such a certificate, Nordic Semiconductor certifies that you have completed the applicable course, but does not provide any further warrants or endorsements for any particular skills or professional qualifications.
Nordic Semiconductor will continuously develop Nordic Developer Academy with new features and functionality, but reserves the right to remove or alter any existing functions without notice.
3. Acceptable use
You undertake that you will use Nordic Developer Academy in accordance with applicable law and regulations, and in accordance with these Terms of Use. You must not modify, adapt, or hack Nordic Developer Academy or modify another website so as to falsely imply that it is associated with Nordic Developer Academy, Nordic Semiconductor, or any other Nordic Semiconductor product, software or service.
You agree not to reproduce, duplicate, copy, sell, resell or in any other way exploit any portion of Nordic Developer Academy, use of Nordic Developer Academy, or access to Nordic Developer Academy without the express written permission by Nordic Semiconductor. You must not upload, post, host, or transmit unsolicited email, SMS, or \”spam\” messages.
You are responsible for ensuring that the information you post and the content you share does not;
contain false, misleading or otherwise erroneous information
infringe someone else’s copyrights or other intellectual property rights
contain sensitive personal data or
contain information that might be received as offensive or insulting.
Such information may be removed without prior notice.
Nordic Semiconductor reserves the right to at any time determine whether a use of Nordic Developer Academy is in violation of its requirements for acceptable use.
Violation of the at any time applicable requirements for acceptable use may result in termination of your account. We will take reasonable steps to notify you and state the reason for termination in such cases.
4. Routines for planned maintenance
Certain types of maintenance may imply a stop or reduction in availability of Nordic Developer Academy. Nordic Semiconductor does not warrant any level of service availability but will provide its best effort to limit the impact of any planned maintenance on the availability of Nordic Developer Academy.
5. Intellectual property rights
Nordic Semiconductor retains all rights to all elements of Nordic Developer Academy. This includes, but is not limited to, the concept, design, trademarks, know-how, trade secrets, copyrights and all other intellectual property rights.
Nordic Semiconductor receives all rights to all content uploaded or created in Nordic Developer Academy. You do not receive any license or usage rights to Nordic Developer Academy beyond what is explicitly stated in this Agreement.
6. Liability and damages
Nothing within these Terms of Use is intended to limit your statutory data privacy rights as a data subject, as described in the Nordic Developer Academy Privacy Policy. You acknowledge that errors might occur from time to time and waive any right to claim for compensation as a result of errors in Nordic Developer Academy. When an error occurs, you shall notify Nordic Semiconductor of the error and provide a description of the error situation.
You agree to indemnify Nordic Semiconductor for any loss, including indirect loss, arising out of or in connection with your use of Nordic Developer Academy or violations of these Terms of Use. Nordic Semiconductor shall not be held liable for, and does not warrant that (i) Nordic Developer Academy will meet your specific requirements, (ii) Nordic Developer Academy will be uninterrupted, timely, secure, or error-free, (iii) the results that may be obtained from the use of Nordic Developer Academy will be accurate or reliable, (iv) the quality of any products, services, information, or other material purchased or obtained by you through Nordic Developer Academy will meet your expectations, or that (v) any errors in Nordic Developer Academy will be corrected.
You accept that this is a service provided to you without any payment and hence you accept that Nordic Semiconductor will not be held responsible, or liable, for any breaches of these Terms of Use or any loss connected to your use of Nordic Developer Academy. Unless otherwise follows from mandatory law, Nordic Semiconductor will not accept any such responsibility or liability.
7. Change of terms
Nordic Semiconductor may update and change the Terms of Use from time to time. Nordic Semiconductor will seek to notify you about significant changes before such changes come into force and give you a possibility to evaluate the effects of proposed changes. Continued use of Nordic Developer Academy after any such changes shall constitute your acceptance of such changes. You can review the current version of the Terms of Use at any time at https://academy.nordicsemi.com/terms-of-service/
8. Transfer of rights
Nordic Semiconductor is entitled to transfer its rights and obligation pursuant to these Terms of Use to a third party as part of a merger or acquisition process, or as a result of other organizational changes.
9. Third Party Services
To the extent Nordic Developer Academy facilitates access to services provided by a third party, you agree to comply with the terms governing such third party services. Nordic Semiconductor shall not be held liable for any errors, omissions, inaccuracies, etc. related to such third party services.
10. Dispute resolution
The Terms of Use and any other legally binding agreement between yourself and Nordic Semiconductor shall be subject to Norwegian law and Norwegian courts’ exclusive jurisdiction.
Switch language?
Progress is tracked separately for each language. Switching will continue from your progress in that language or start fresh if you haven't begun.
Your current progress is saved, and you can switch back anytime.