Different advertising intervals: 30ms, 200ms, 2000ms
Bluetooth LE Connection
Different throughputs: 0 kbps, Low, Medium, High, Max.
General CPU Processing
Solving ~1M quadratic equations every 2.5s, goes idle when done.
System ON mode – IDLE (aka : sleep mode)
With full memory retention, 192 KB RAM, 96 KB RAM.
System OFF mode (aka: deep sleep mode)
With and without GRTC
The demo is optionally hands-on, so if you’d like to follow along and reproduce the steps for yourself, you will need the following hardware and software.
We will start by flashing the demo firmware onto the nRF54L15 Development Kit and then connecting the kit to a Power Profiler Kit II (PPK2) to monitor power consumption under different case scenarios. The four buttons on the development kit allow us to switch between these scenarios. The Power Profiler desktop application will read and display the measurements of the PPK2.
Throughout this demo, we will introduce several powerful Nordic tools that can assist you with developing and debugging Bluetooth LE projects.
Demo setup
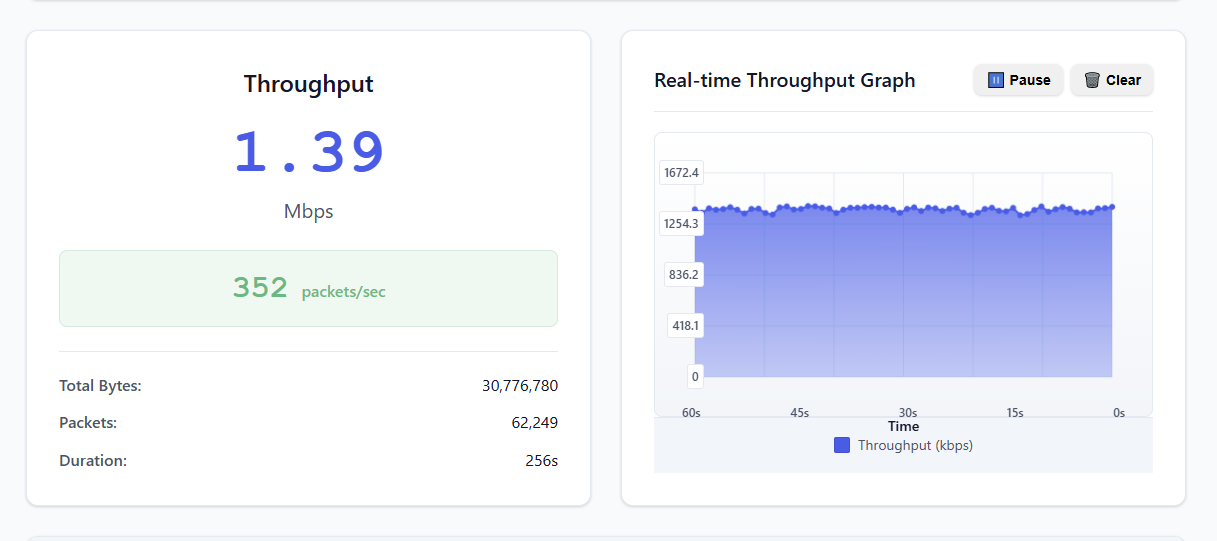
For the Bluetooth LE connection test, we will need a device for the DK to connect to. You can use another Nordic DK, a mobile phone running nRF Connect for Mobile, or a web application named “Bluetooth LE Throughput Monitor” running on a compatible browser. This application will act as a Bluetooth LE central device, displaying the content of the packets received over Bluetooth LE and monitoring the throughput in real time while we measure power.
The exercise is divided into two parts for clarity and structured learning:
Part 1 focuses on preparing the development kit and conducting the Bluetooth LE Advertising testing.
Part 2 covers the remaining test cases.
Demo steps
Step 1 – Flashing the demo firmware to the development kit
1.1 Connect your nRF54L15 DK to your computer using a USB-C cable. Make sure it is powered on.
1.2 Download the demo’s binary file from the course GitHub repository. Use the file demo.hex if you plan to use another DK or a mobile phone running nRF Connect for Mobile for the connection testing. Use demo_webapp_optimized.hex if you plan to use the web app for connection testing.
1.3 Make sure you have installed the nRF Connect for Desktop application with its following apps (Programmer app, Board Configurator app, and Power Profiler app).
More on this
nRF Connect for Desktop is a cross‑platform framework and launcher application that runs on Windows, macOS, and Linux. It bundles a collection of modular desktop applications, such as Bluetooth Low Energy tools, Programmer, Power Profiler, RSSI Viewer, Board Configurator.
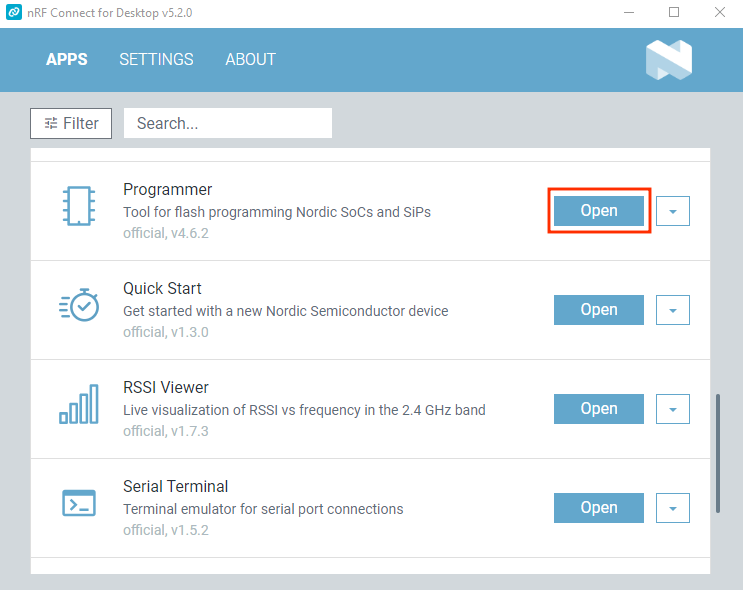
1.4 Open nRF Connect for Desktop, and launch the Programmer desktop application.
nRF Connect for Desktop
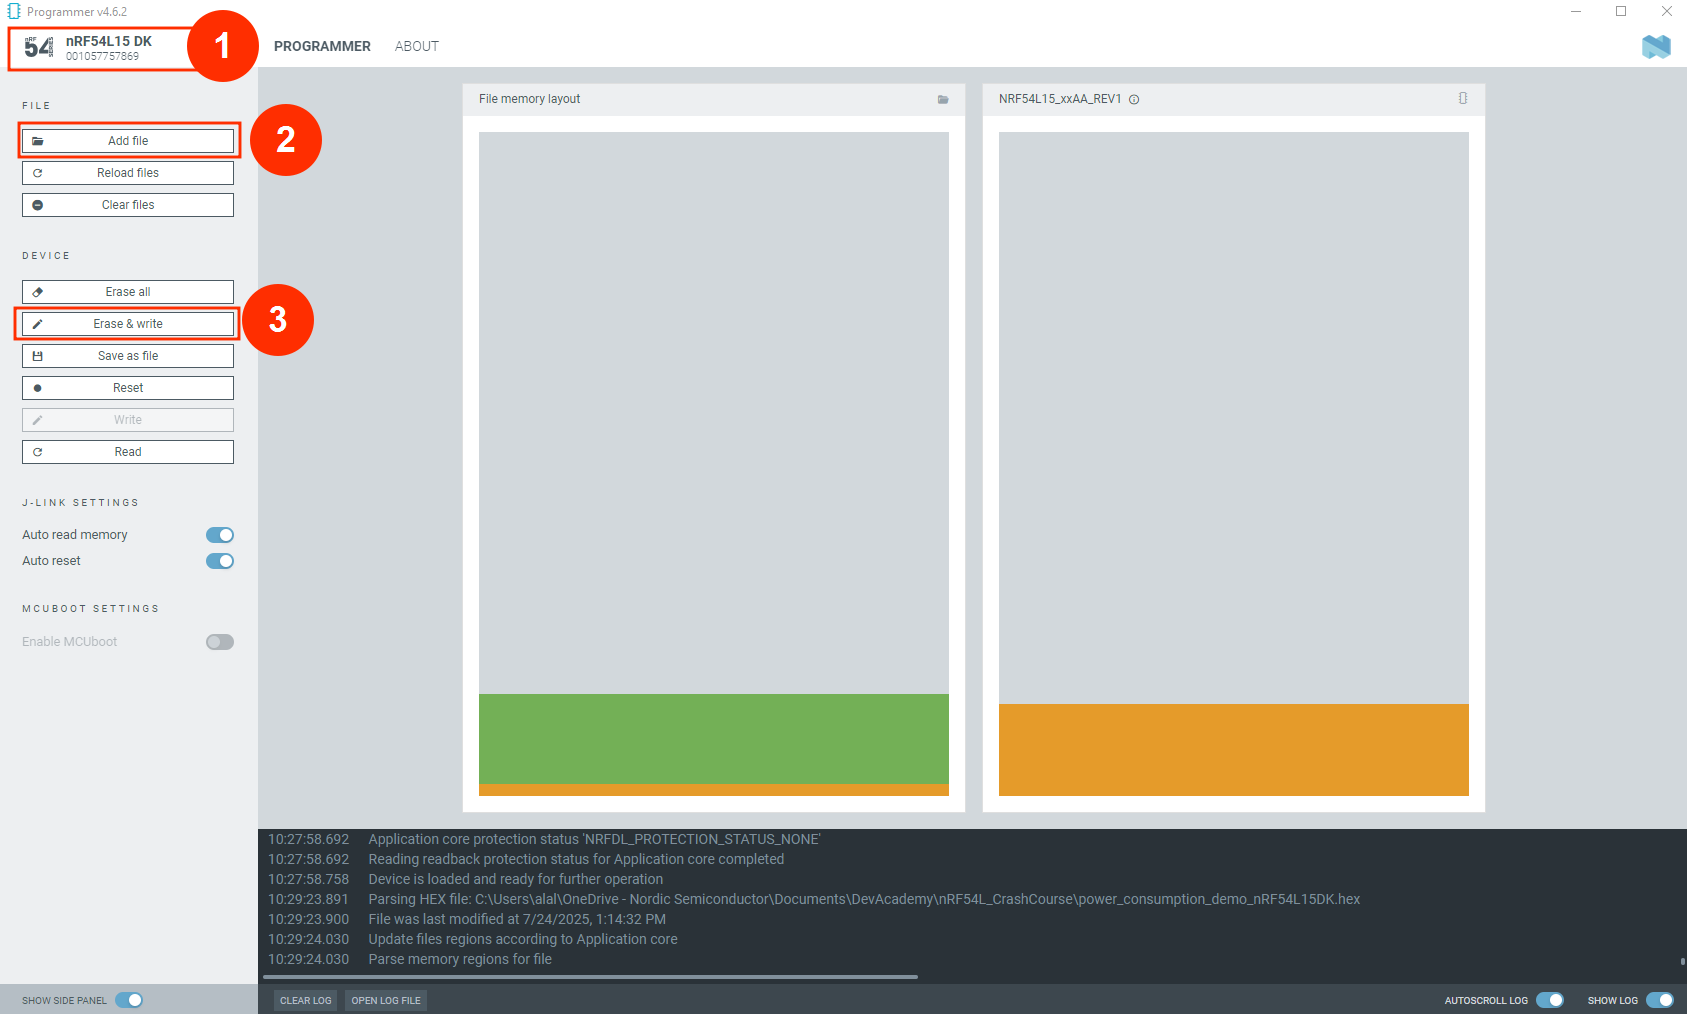
1.5 From the Select Device menu, choose your nRF54L15 DK, then click on Add file. Select the binary file downloaded in the step 1.2.
1.6 Click Erase & write.
Programmer app available through nRF Connect for Desktop
1.7 Examine the log. On a successful write, you should see a log similar to the following:
 INFO Writing HEX to Application core
 INFO Writing HEX to Application core 0%
 INFO Writing HEX to Application core 50%
 INFO Writing HEX to Application core 50%
 INFO Writing HEX to Application core 63%
 INFO Writing HEX to Application core 75%
 INFO Writing HEX to Application core 88%
 INFO Writing HEX to Application core 100%
 INFO Writing HEX to Application core completed
 INFO Reading memory for Application core
 INFO Reading memory for Application core 0%
 INFO Reading memory for Application core 100%
 INFO Reading memory for Application core completed
 INFO Parse memory regions for Application core
 DEBUG Sending event "programmer: running nrfutil device"
 DEBUG Sending event "programmer: running nrfutil device"
 DEBUG Sending event "programmer: running nrfutil device"
 INFO Reading readback protection status for Application core
 INFO Reading readback protection status for Application core 0%
 INFO Reading readback protection status for Application core 100%
Terminal
Close the Programmer app.
Now that the DK is running the demo, the next step is to prepare it for power measurements using the PPK2.
Step 2 – Preparing the development kit for power measurements
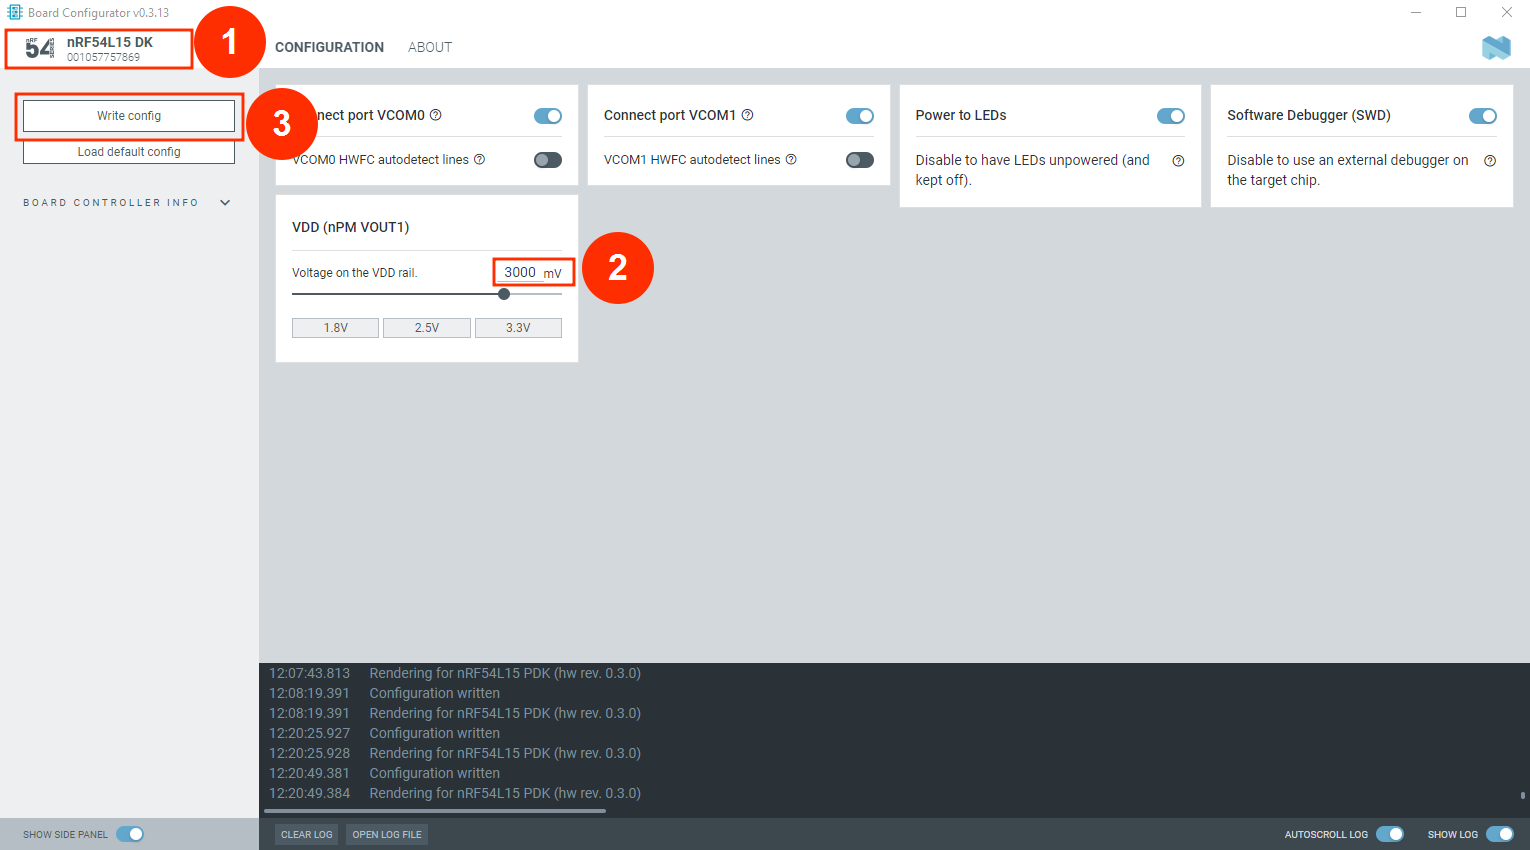
2.1 Launch the Board Configurator desktop application from nRF Connect for Desktop. We will change the voltage from the default setting of 1.8V to 3V to suit our specific testing requirements.
More on this
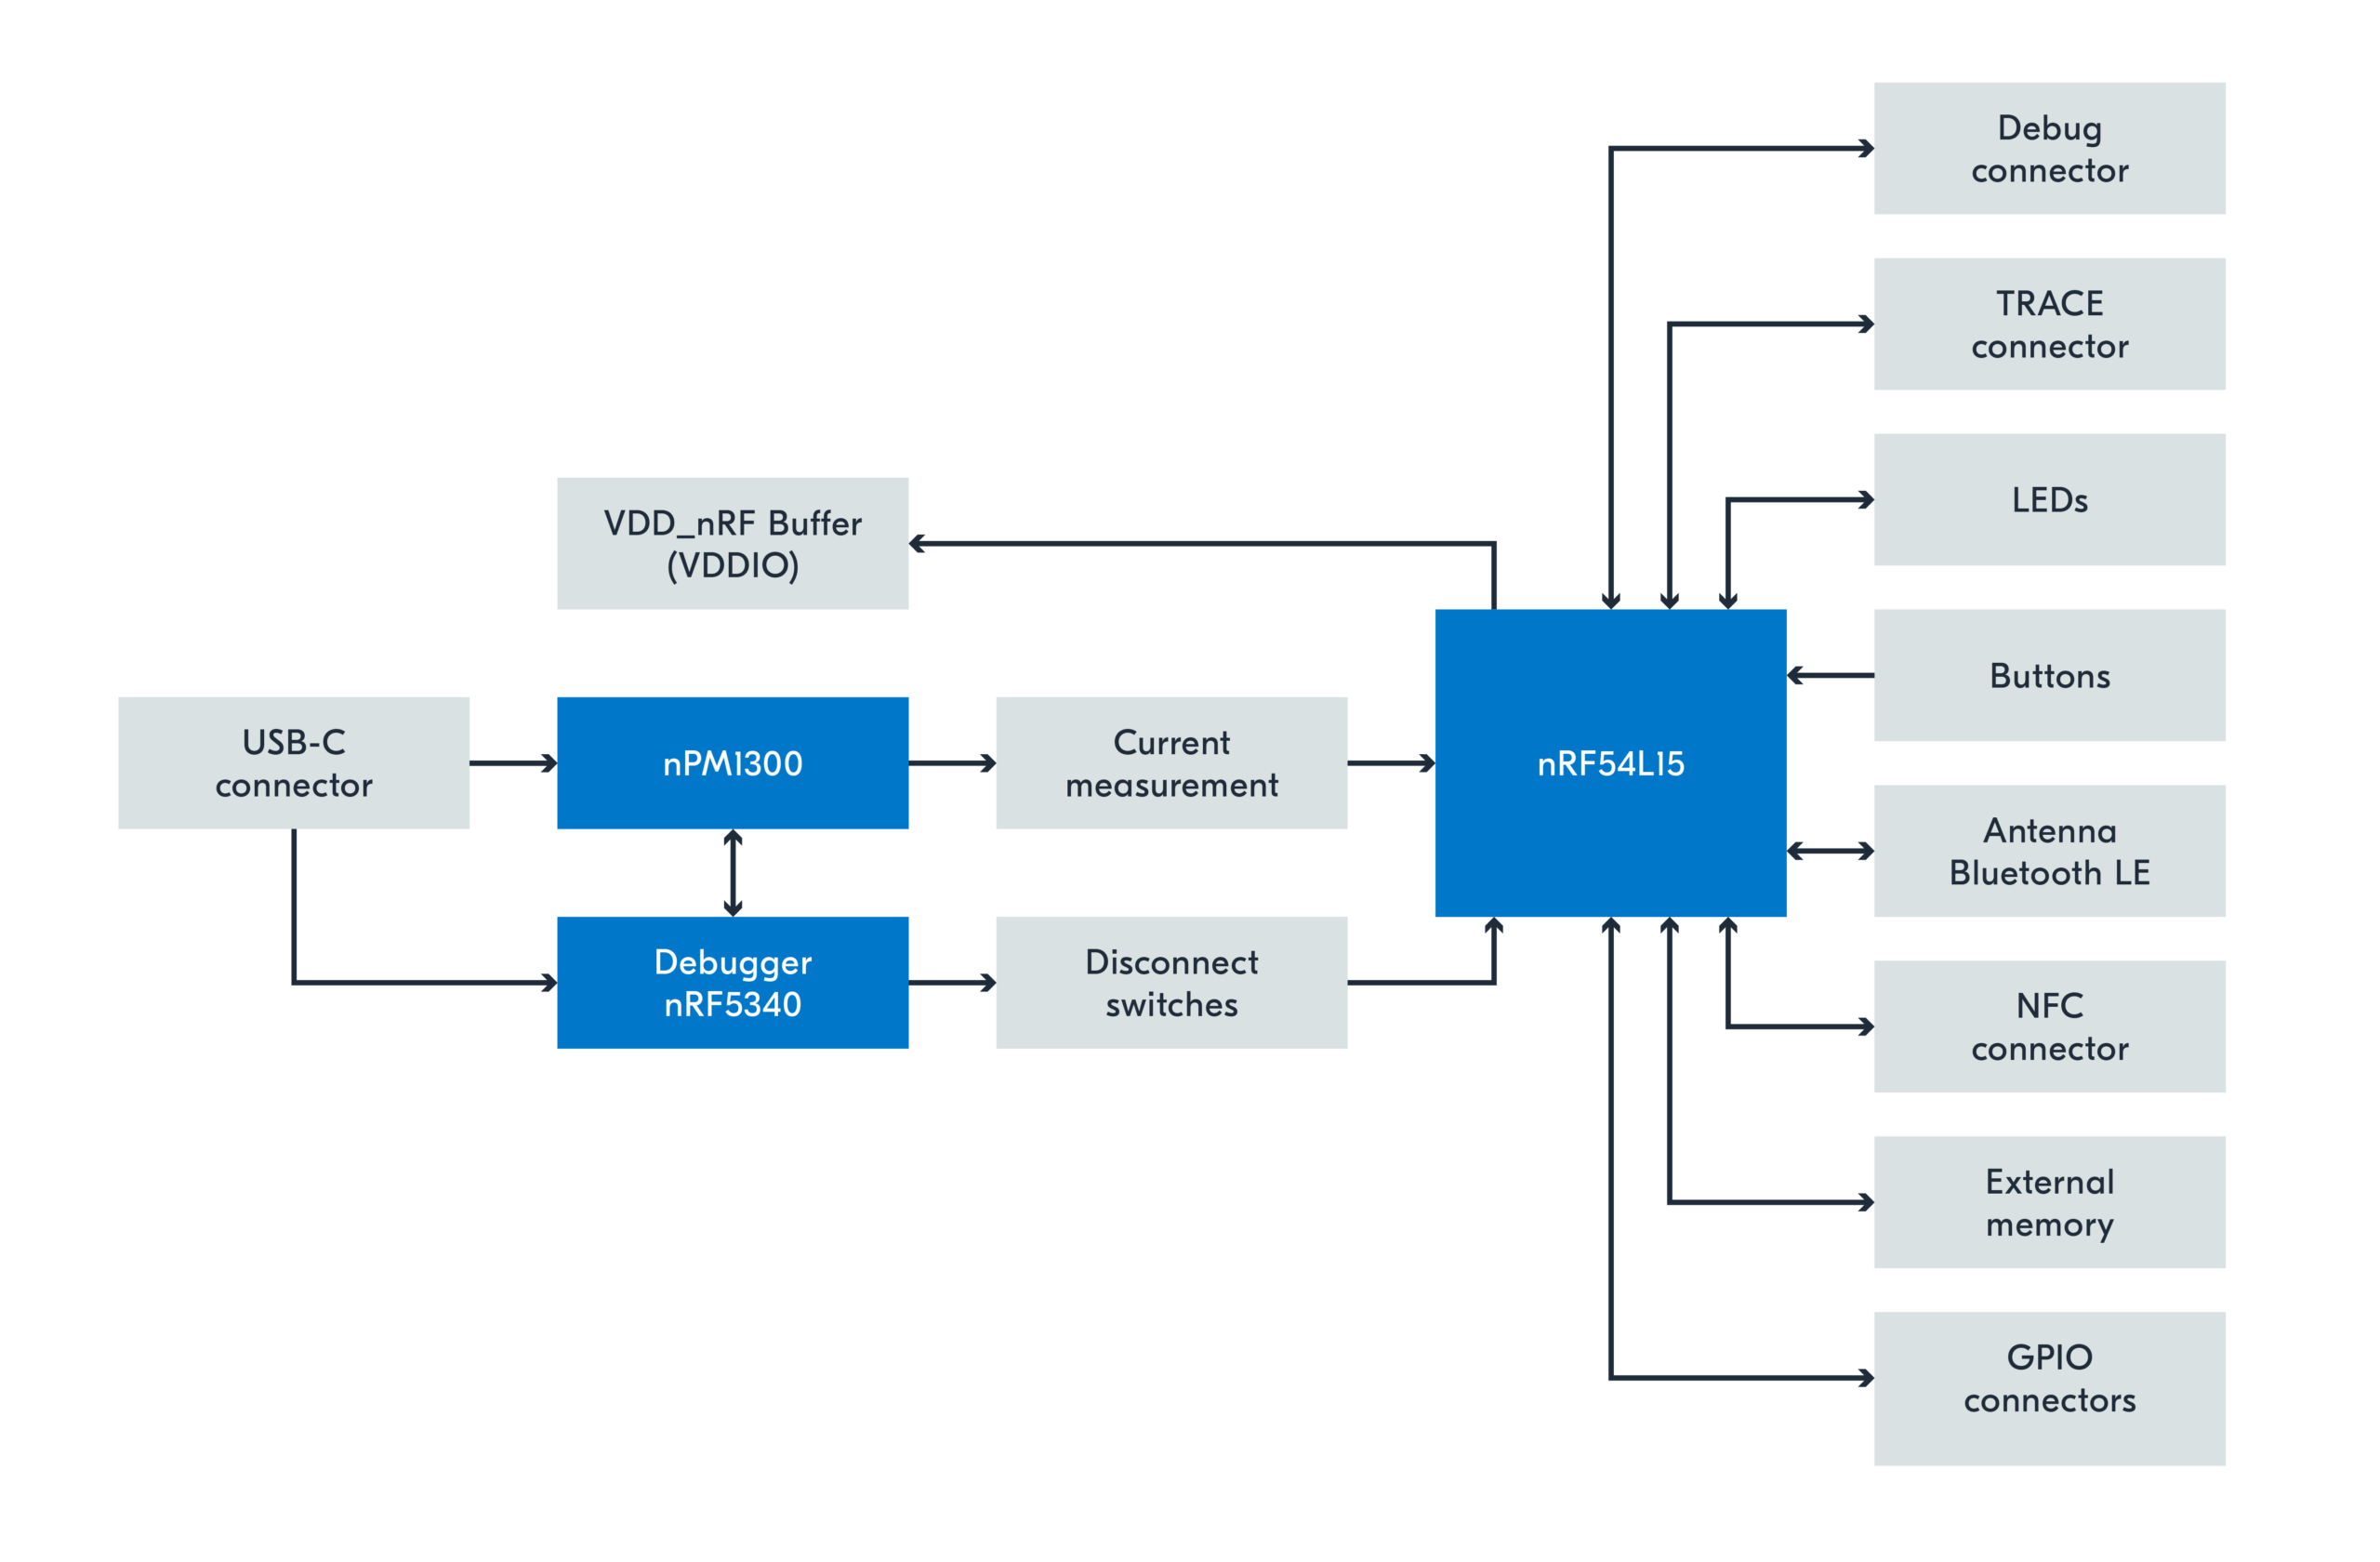
The Board Configurator is designed to help you update and manage the configuration of the board controller on your development kit. The board controller, which is the firmware running on the Interface MCU and debugger (nRF5340 SoC), dictates the behavior of the development kit (DK). In this step, we will use the application to adjust the output voltage of the nPM1300 PMIC, which powers the nRF54L15 SoC on the nRF54L15 DK.
nRF54L15 DK – Block Diagram
2.1 From the Select Device menu, choose your device, then change VDD from 1800mV to 3000mV and click on Write config.
Power Profiler app available through nRF Connect for Desktop
2.2 Examine the log. On a successful write, you should see a log similar to the following:
Configuration writtenRendering for nRF54L15 PDK (hw rev. x.x.x)
Terminal
This adjustment will enable us to test the power consumption at 3V, which is the same voltage level used to report the results in Lesson 1. You can also experiment with different voltage levels.
Close the Board Configurator app.
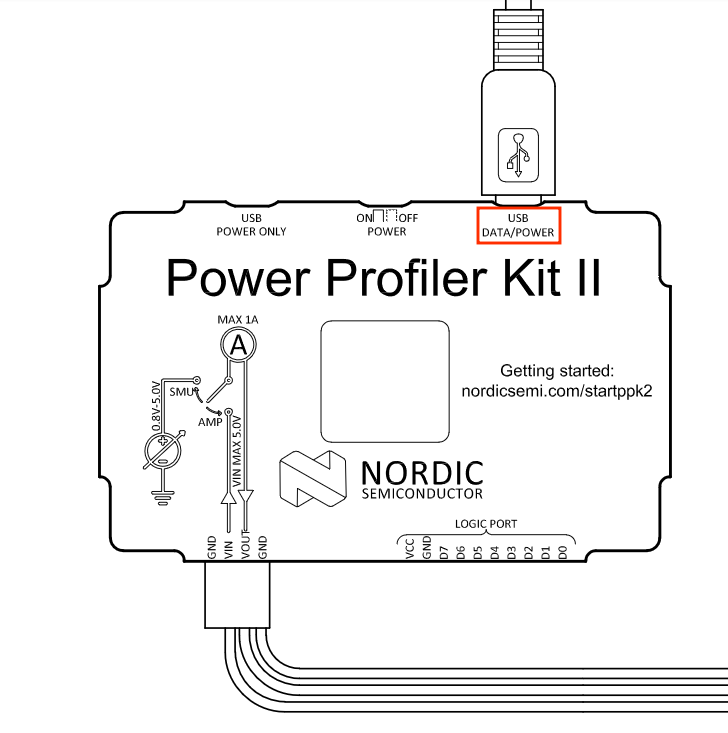
2.3 Connect the Power Profiler Kit II (PPK2) to your computer and make sure it is powered on. You must connect the cable to the DATA/POWER port on the PPK2. Additionally, attach the 4-pin jumper cable (shipped with the PPK2), which is required to measure the power consumption on your device. We will connect the PPK2 in this demo in Ampere meter configuration.
More on this
The Power Profiler Kit II (PPK2) is a standalone, cost-effective tool designed to measure real‑time power consumption for embedded systems. It supports currents from sub‑µA levels up to 1 A with automatic switching across five measurement ranges, offering resolution from roughly 0.2 µA to 1 mA and sampling speeds up to 100 kS/s—enabling detection of both long-term average consumption and short current spikes . The PPK2 can function in two modes: as an ampere‑meter (with an external power source to the Device Under Test (DUT)) or as a source meter supplying VCC from 0.8 to 5 V and up to 1 A directly . Additionally, it includes up to eight digital logic inputs to act as a low‑end logic analyzer, syncing power measurements with code execution. All data is streamed via USB to Nordic’s Power Profiler app in the nRF Connect for Desktop suite, allowing visualization, logging, export, and post‑processing.
DATA/POWER port on the PPK2
Your demo setup should look as follows:
Demo Setup
Note
If the PPK2 and DUT (nRF54L15 DK) are powered from different USB sources, you must connect the PPK2’s ground to the DUT’s ground.
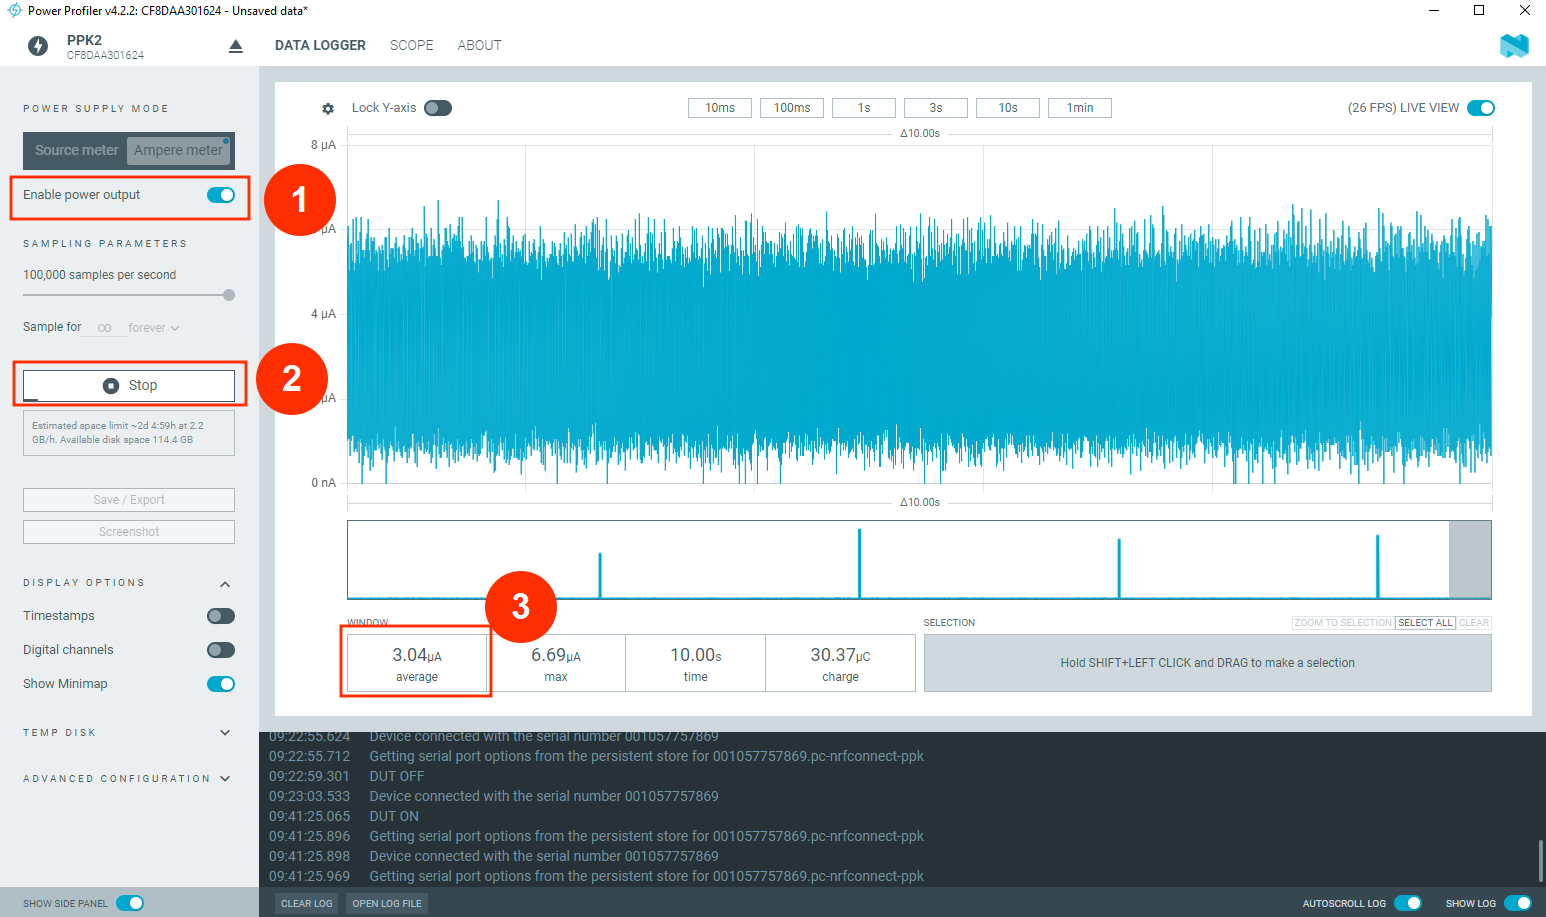
2.8 Open the Power Profiler app in nRF Connect for Desktop. From the Select Device menu, choose your PPK2, and for the Power supply mode, select Ampere meter.
Note
If a message asks whether the development kit needs to be programmed, select the option to program the kit.
Amper Meter mode in Power Profiler
2.9 Enable power output and click Start. You should see an average current of ~ 2.9 µA . This is the System ON—IDLE current consumption (with full memory retention), which we will cover in Step 3.
Sleep current (System ON – IDLE) on nRF54L15 DK 0.8.1
The DK is now prepared for testing. The next step involves examining the various use cases.
Note
Older SoC revisions (Engineering B), used in some early DKs, have higher sleep current (~3 µA – shown in the screenshot above) than newer DKs (v1.0.0 and above) with SoC revision 2, which have lower sleep current (~2.9 µA) . More on SoC revisions can be found here. So the Sleep current (System ON – IDLE) will slightly differ based on the version of the development kit you have.
Also, Be aware that the power consumption numbers are temperature-dependent and will vary slightly depending on the temperature.
Step 3 – Testing
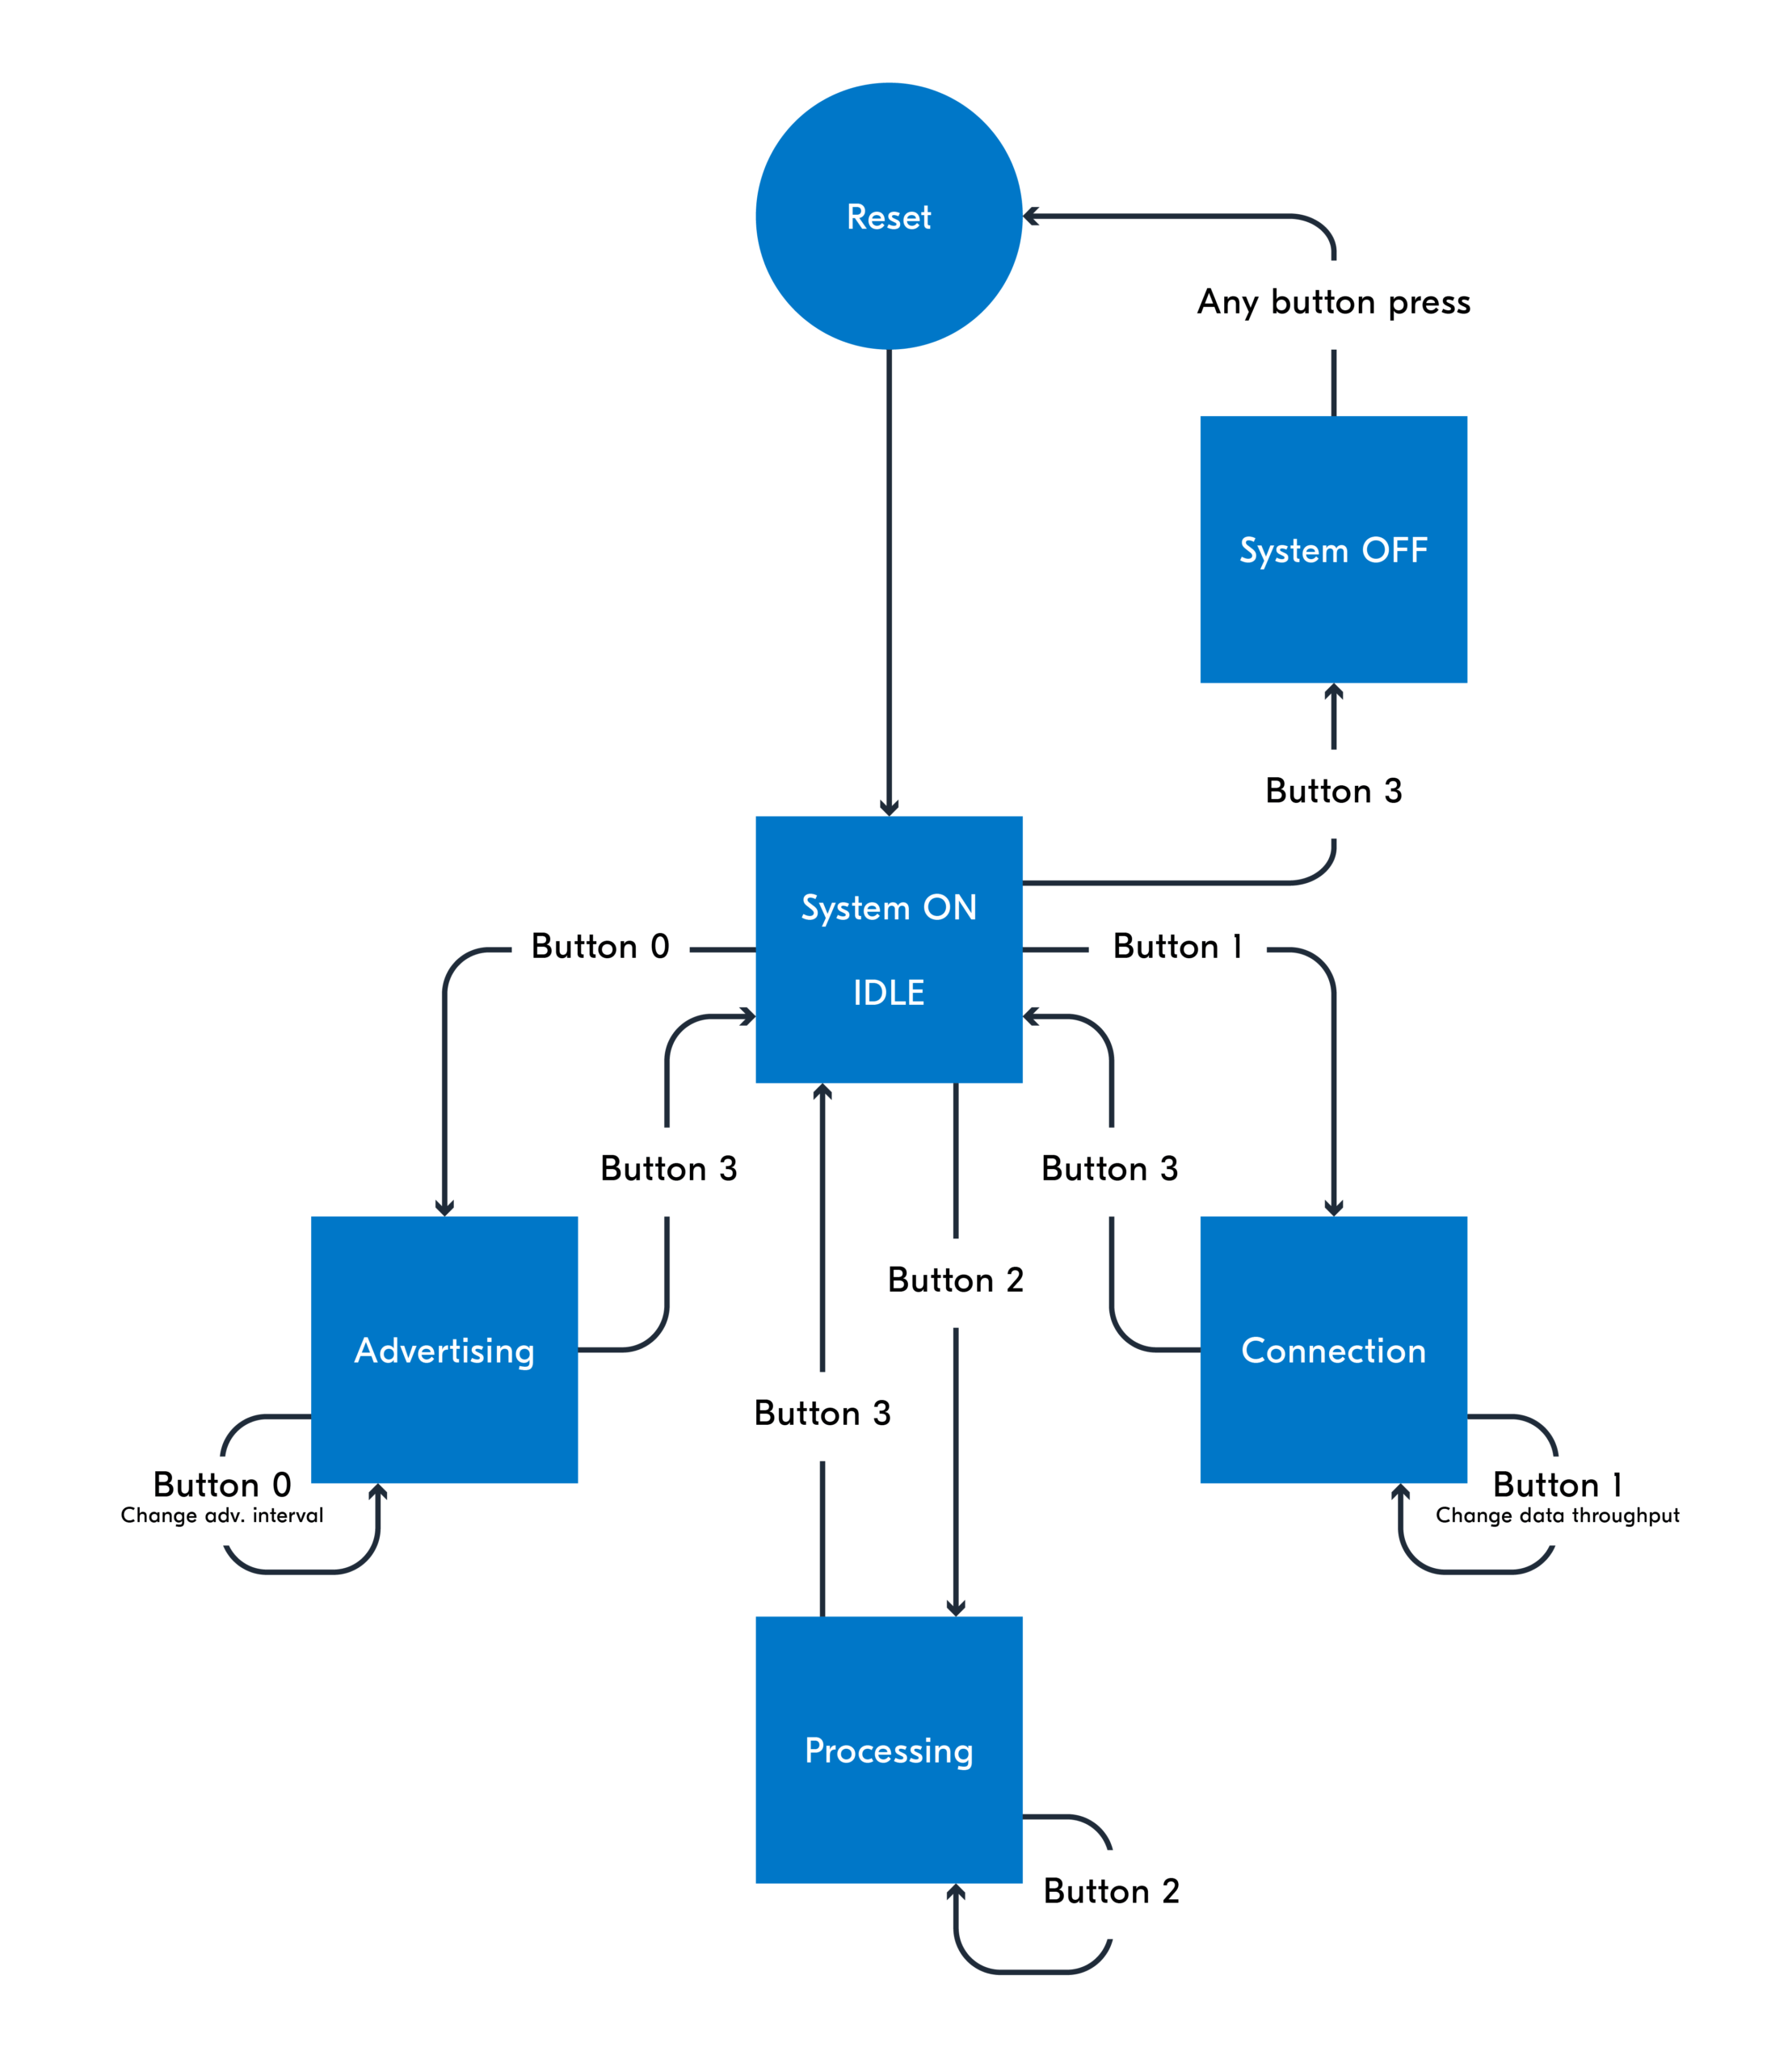
As mentioned before, the device automatically enters the System ON-IDLE state with full memory retention by default upon bootup or reset. In this section, we will use the four buttons available on the development kit to switch between different use case scenarios as outlined in the accompanying table and state machine diagram.
Button
First press
subsequent presses
button 0
Enter advertising state at 30 ms interval (non-connectable).
Cycle between different advertising intervals 200 ms, 2000 ms , -> 30 ms
button 1
Start connection state* (connectable-advertising). Upon connection, zero throughput.
Upon connection, cycle between different data throughput Low, Medium, High, Max → 0
button 2
Enter processing state, solving ~1M quadratic equations every 2.5ms.
No change
button 3
Enter System ON – IDLE mode .
Enter System OFF Mode. System OFF mode is exited by pressing any button.
Demo state machine diagram
*A Bluetooth LE central device is required for testing the connection state. The central device can be a web application, a mobile phone with the nRF Connect for Mobile app, or another development kit. This is covered in part 2.
Step 3.1 – Bluetooth LE Advertising
Now, we will proceed to measure the power consumption when the device is in the mode of advertising non-connectable Bluetooth LE packets.
3.1.1 Press button 0. This will wake up the device from the System ON—IDLE state and put the device in the advertising state.
The device will periodically advertise non-connectable Bluetooth LE packets with the payload below, using TX only (scan response disabled).
Role
Advertising non-connectable (TX only)
Advertising Interval
30 ms – 200 ms – 2000 ms
TX Power
0 dBm
TX data payload (excluding headers, CRC, etc..)
Advertising Data: 8 Bytes 1B length+ 1B Type+ 6B data
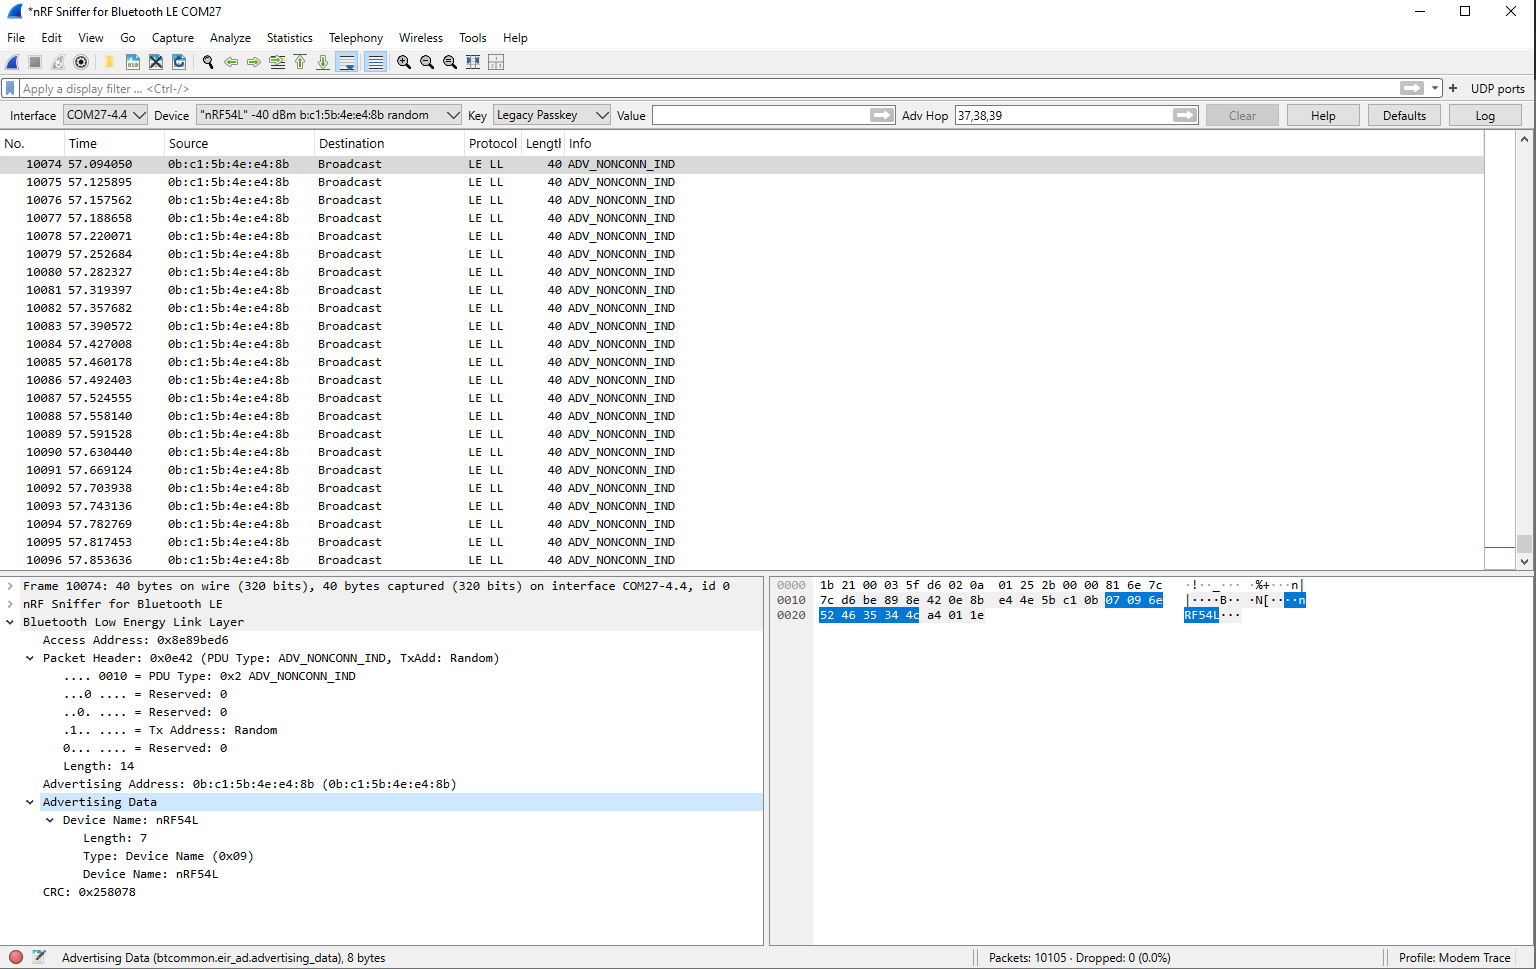
Optional: The advertised packets can be examined over the air using Nordic Semiconductor’s simple and affordable Bluetooth LE sniffer. See the Lesson 6—Bluetooth LE sniffer in the Bluetooth LE Fundamentals course lesson. As detailed in the lesson, you will need another device that supports Bluetooth (Nordic Semiconductor’s DK or a Dongle) to perform the sniffing.
Content of the advertising data obtained using Wireshark+nRF Sniffer for Bluetooth LE
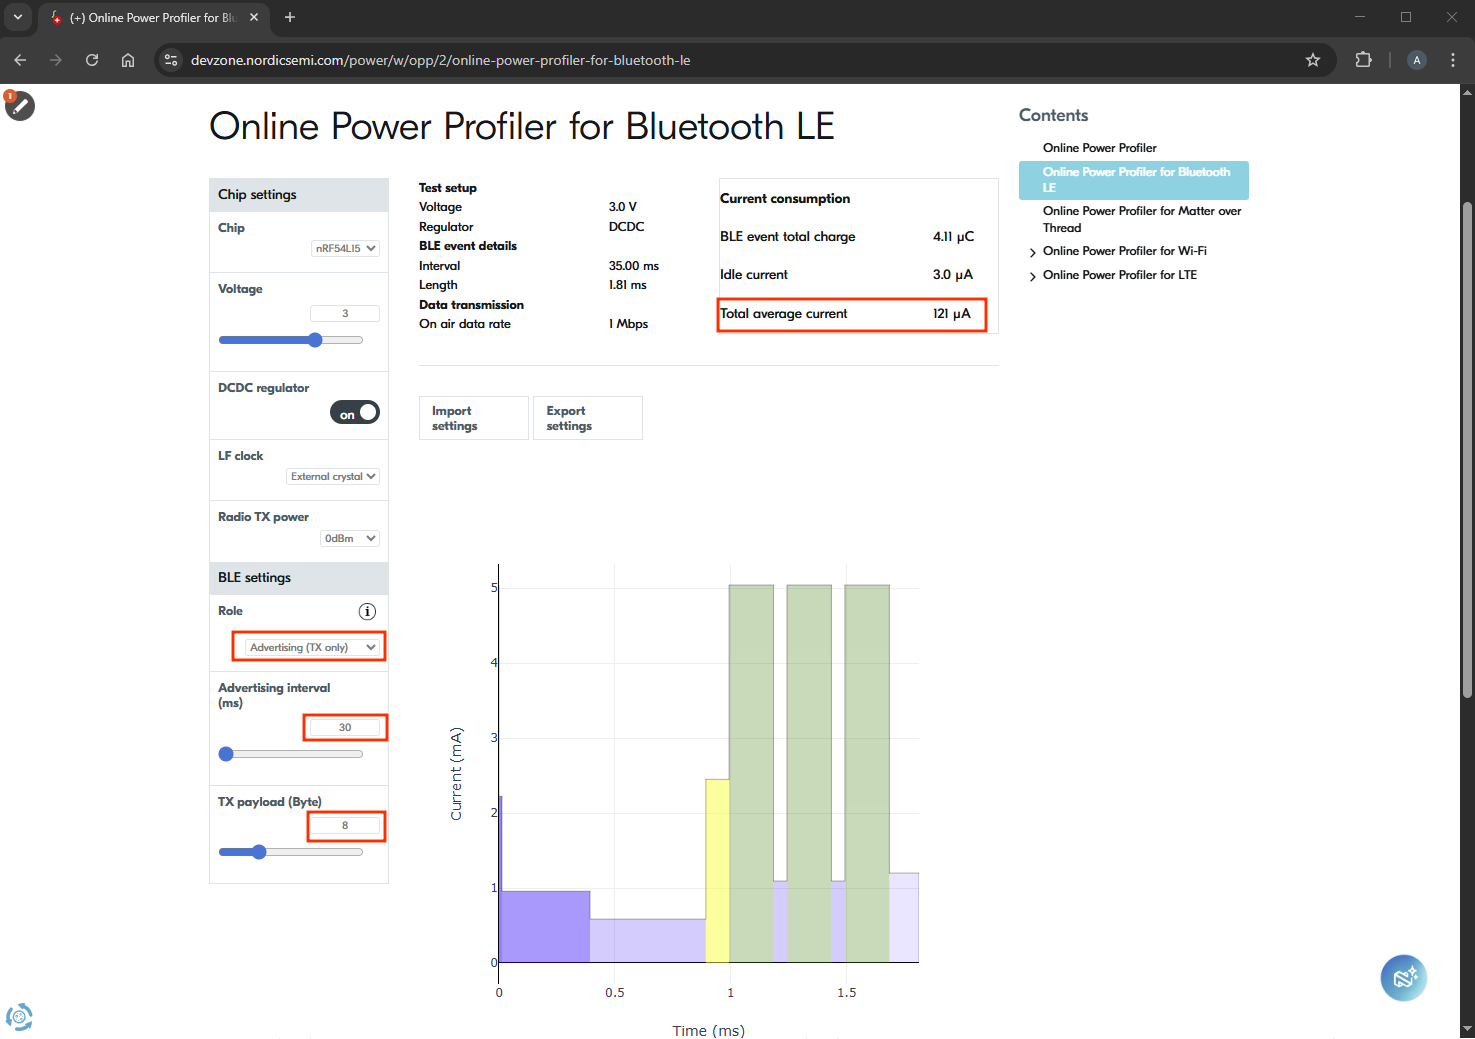
The tool predicts a total average current of 121 µA. In the next step, we will validate this on real hardware.
More on this
The Online Power Profiler (OPP), hosted on DevZone, is a web-based estimation tool designed to predict the average current consumption of Nordic chips—such as nRF52, nRF53, nRF54L, and nRF91 Series—across multiple wireless protocols. It offers separate interfaces for Bluetooth LE, Matter over Thread, Wi‑Fi, and LTE‑M/NB‑IoT, letting users input parameters like voltage, payload size, TX power and interval timing. The OPP runs a statistical power model based on lab measurements (typically within ±5 % error for reference boards) to estimate energy use components per wireless event and idle power.
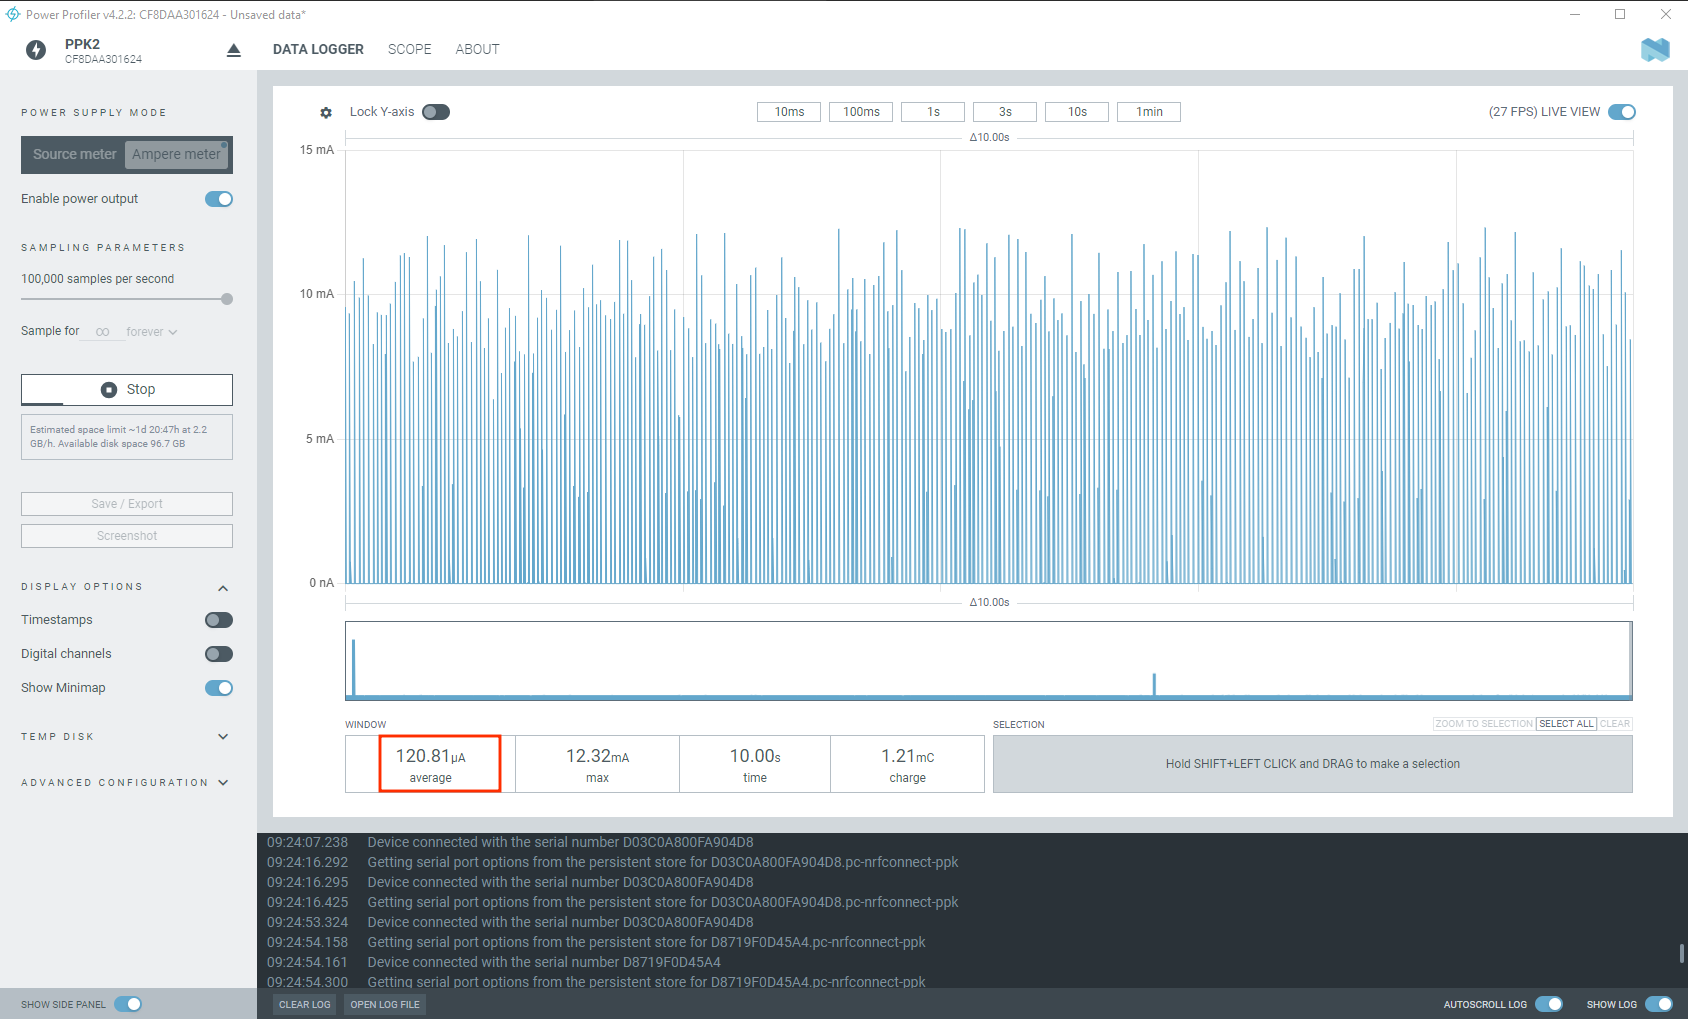
3.1.3 Examine the Power Profiler app to see the average current consumption. It should be around 121 µA for the 30 ms advertising interval.
Power consumption on 30 ms advertising interval (non-connectable)
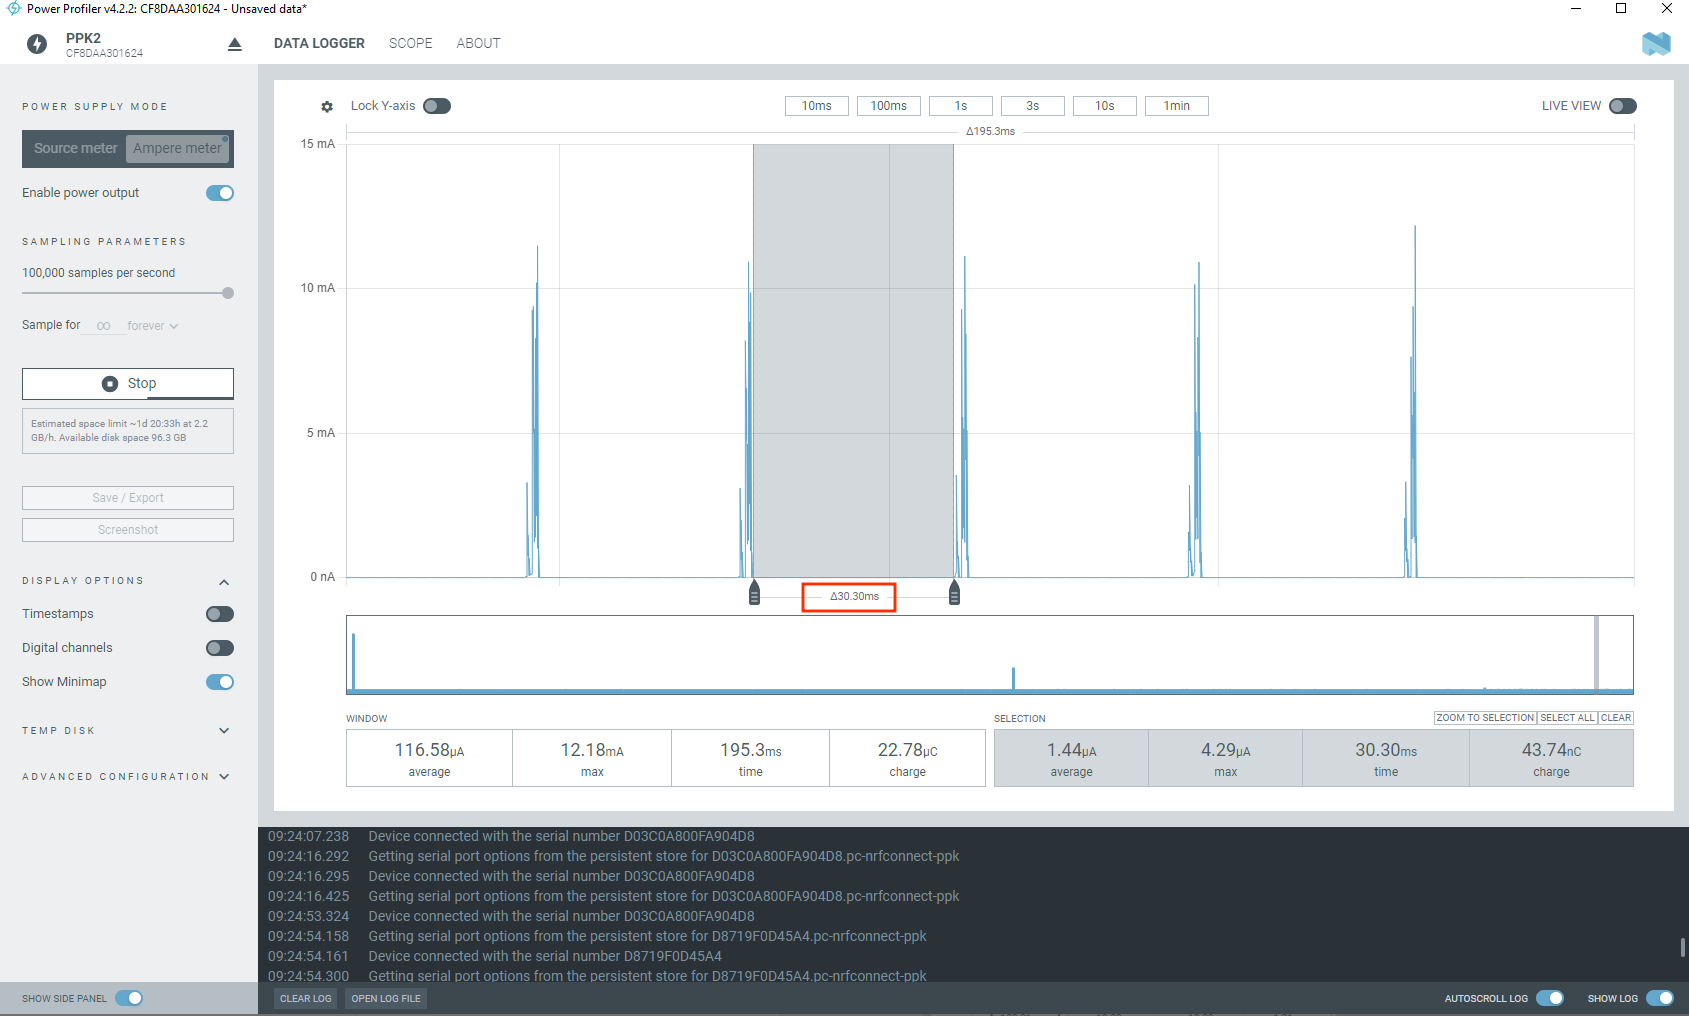
You can zoom in using the mouse scroll and hold Shift + Left mouse button to measure the delta time between the two advertising events. The time should be around 30 ms:
Delta time between two advertising events
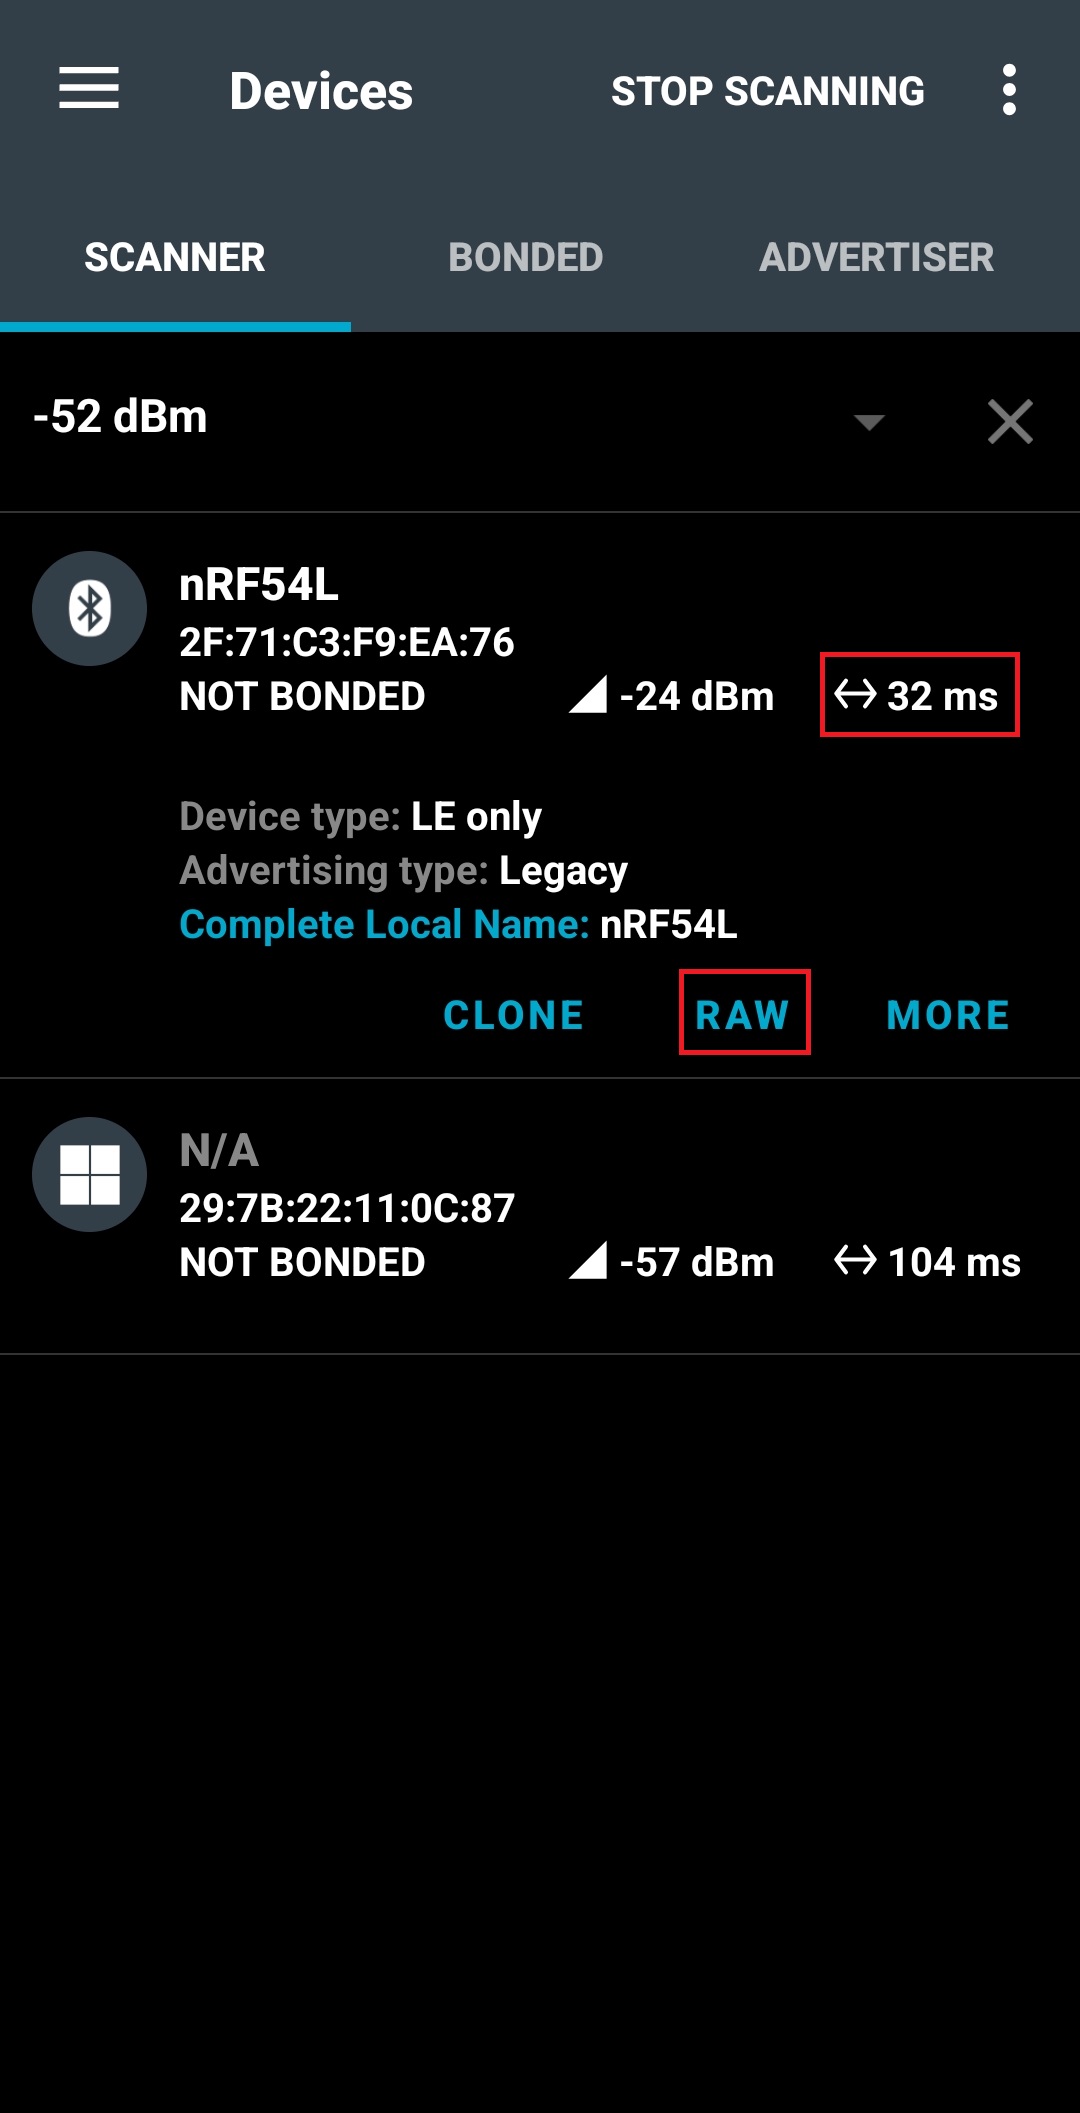
3.1.4 (Optional) Another way to examine the advertising details, such as the interval and data, is to use the nRF Connect for Mobile app, which is available on Android and iOS. From the SCANNER tab, scan for the device and examine the advertising interval and advertising data:
Examine the advertising interval using nRF Connect for Mobile – AndroidExamine the advertising data using nRF Connect for Mobile – Android
More on this
nRF Connect for Mobile is a powerful smartphone application for scanning, exploring, and communicating with Bluetooth LE devices. It enables users to scan for Bluetooth LE peripherals, parse advertising data, view live RSSI graphs, and export data. You can connect to any compatible Bluetooth LE device, discover its services and characteristics, and perform read/write operations. The app supports enabling and disabling notifications and indications, configuring a GATT server, and operating in advertising/peripheral mode. It also integrates support for Device Firmware Update (DFU) profiles—allowing over‑the‑air firmware updates from HEX or ZIP file
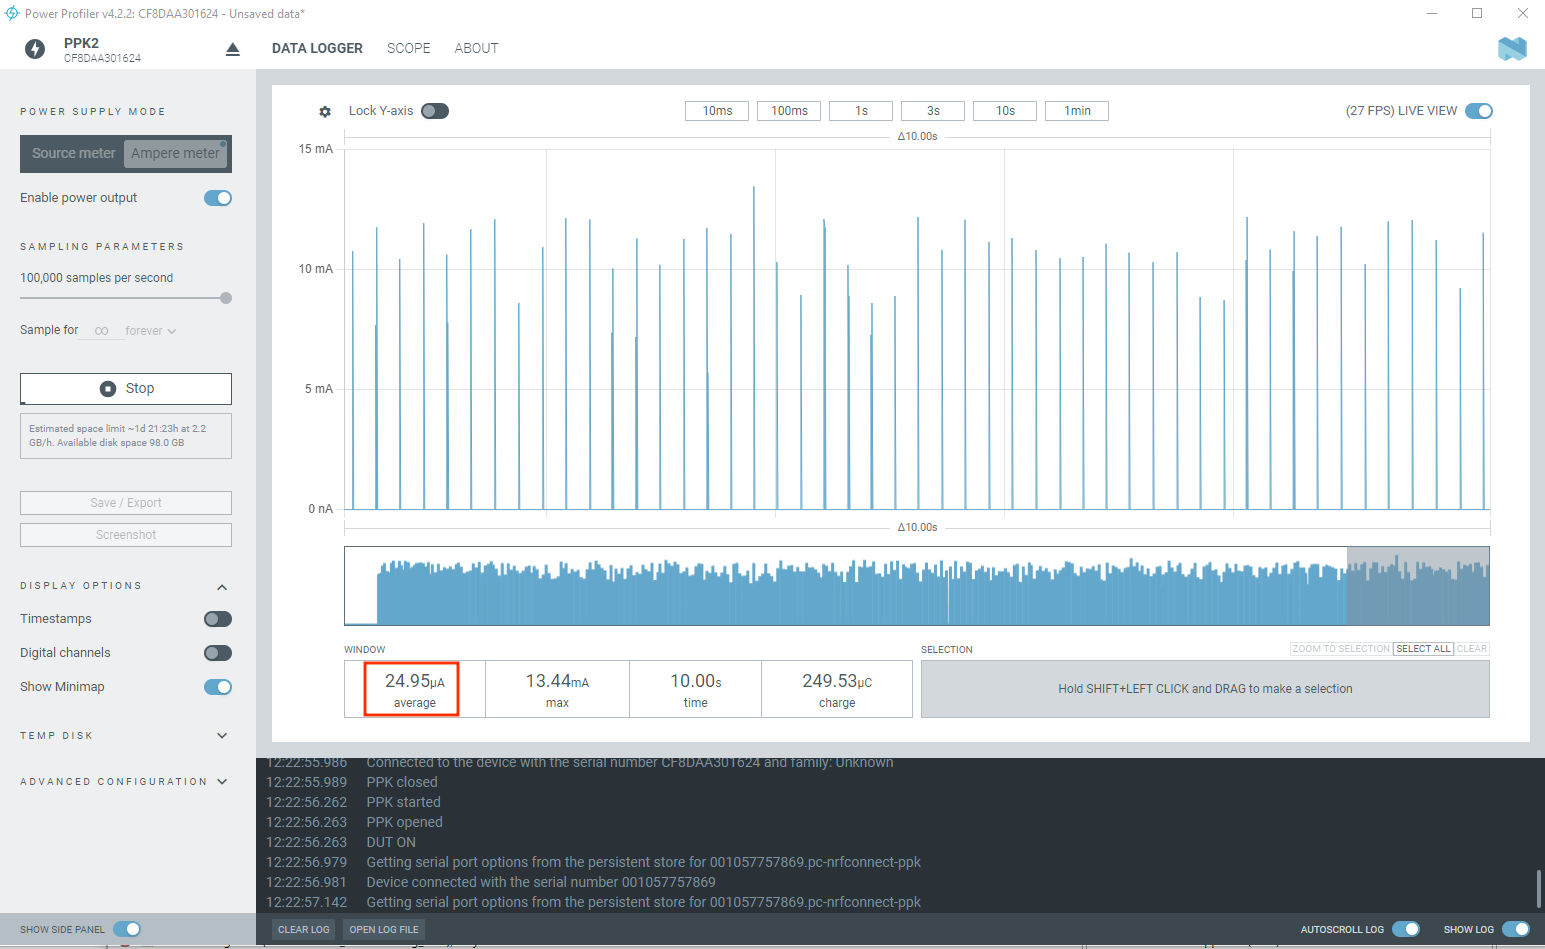
3.1.5 Press button 0 again to change the advertising interval to 200 ms.
Power consumption on 200 ms advertising interval (non-connectable)
The predicted average current consumption by the Online Power Profiler is 23 µA. Examining the Power Profiler app gives us around 24 µA.
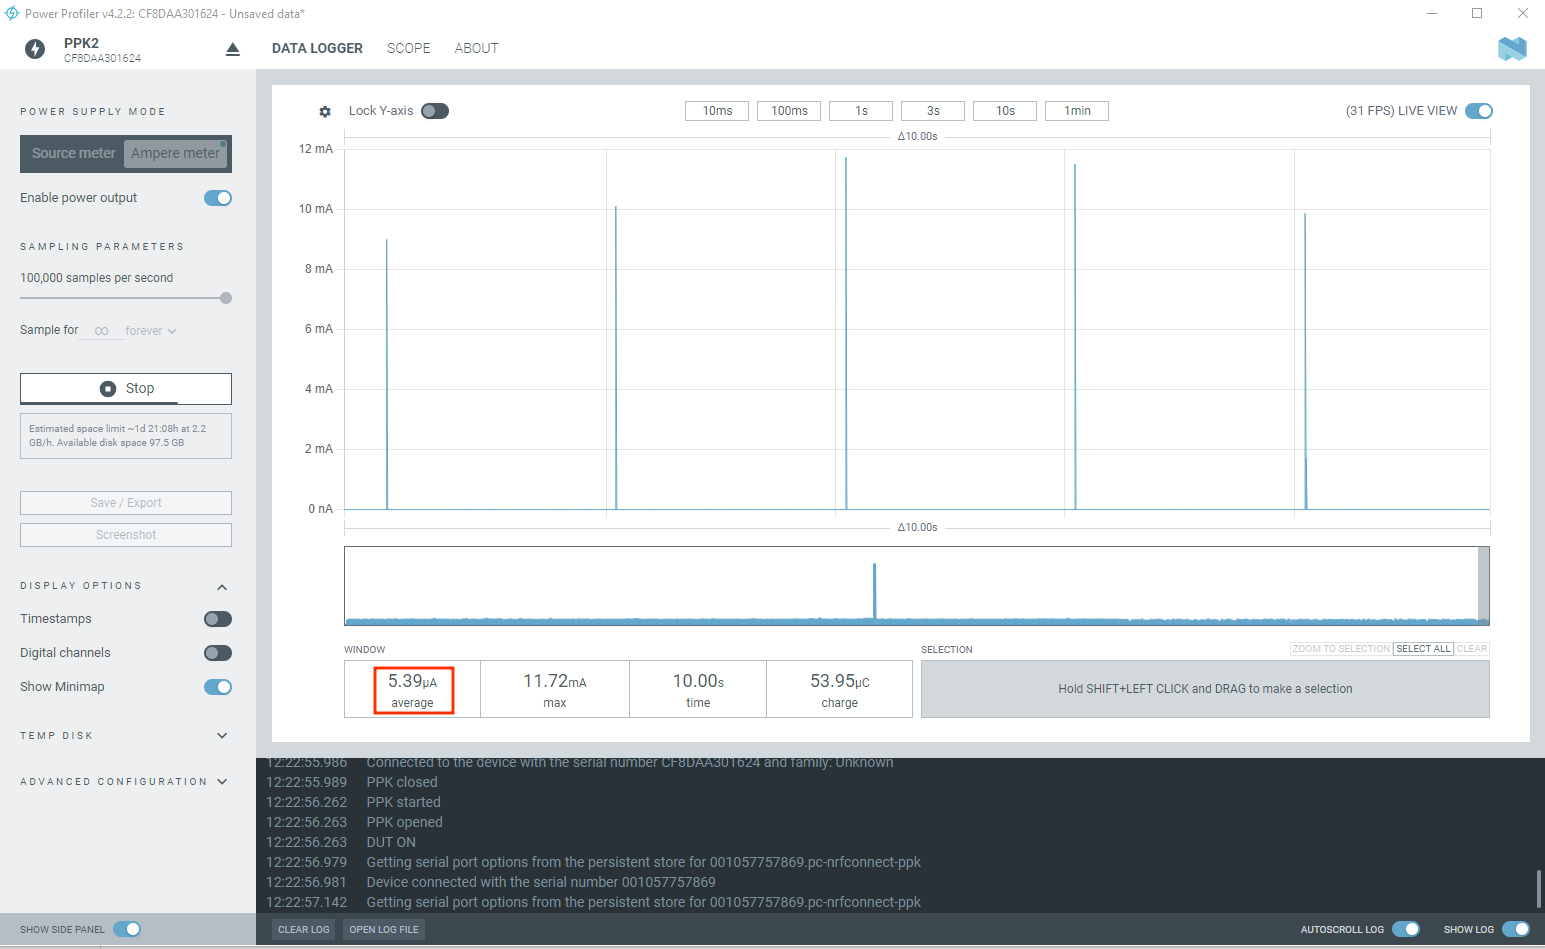
3.1.6 Press button 0 one last time to change the advertising interval to 2 seconds.
Power consumption on 2000 ms advertising interval (non-connectable)
The predicted average current consumption by the Online Power Profiler is 7.1 µA. Examining the Power Profiler app gives us around 5.39 μA.
We have tested the power consumption for non-connectable Bluetooth LE advertising at 30 ms, 200 ms, and 2000ms.
In part 2, we will evaluate the power consumption for Bluetooth LE connection, general CPU processing, and the different sleep modes
Nordic Developer Academy Privacy Policy
1. Introduction
In this Privacy Policy you will find information on Nordic Semiconductor ASA (“Nordic Semiconductor”) processes your personal data when you use the Nordic Developer Academy.
References to “we” and “us” in this document refers to Nordic Semiconductor.
2. Our processing of personal data when you use the Nordic Developer Academy
2.1 Nordic Developer Academy
Nordic Semiconductor processes personal data in order to provide you with the features and functionality of the Nordic Developer Academy. Creating a user account is optional, but required if you want to track you progress and view your completed courses and obtained certificates. If you choose to create a user account, we will process the following categories of personal data:
Email
Name
Password (encrypted)
Course progression (e.g. which course you have completely or partly completed)
Certificate information, which consists of name of completed course and the validity of the certificate
Course results
During your use of the Nordic Developer Academy, you may also be asked if you want to provide feedback. If you choose to respond to any such surveys, we will also process the personal data in your responses in that survey.
The legal basis for this processing is GDPR article 6 (1) b. The processing is necessary for Nordic Semiconductor to provide the Nordic Developer Academy under the Terms of Service.
2.2 Analytics
If you consent to analytics, Nordic Semiconductor will use Google Analytics to obtain statistics about how the Nordic Developer Academy is used. This includes collecting information on for example what pages are viewed, the duration of the visit, the way in which the pages are maneuvered, what links are clicked, technical information about your equipment. The information is used to learn how Nordic Developer Academy is used and how the user experience can be further developed.
2.2 Newsletter
You can consent to receive newsletters from Nordic from within the Nordic Developer Academy. How your personal data is processed when you sign up for our newsletters is described in the Nordic Semiconductor Privacy Policy.
3. Retention period
We will store your personal data for as long you use the Nordic Developer Academy. If our systems register that you have not used your account for 36 months, your account will be deleted.
4. Additional information
Additional information on how we process personal data can be found in the Nordic Semiconductor Privacy Policy and Cookie Policy.
Nordic Developer Academy Terms of Service
1. Introduction
These terms and conditions (“Terms of Use”) apply to the use of the Nordic Developer Academy, provided by Nordic Semiconductor ASA, org. nr. 966 011 726, a public limited liability company registered in Norway (“Nordic Semiconductor”).
Nordic Developer Academy allows the user to take technical courses related to Nordic Semiconductor products, software and services, and obtain a certificate certifying completion of these courses. By completing the registration process for the Nordic Developer Academy, you are agreeing to be bound by these Terms of Use.
These Terms of Use are applicable as long as you have a user account giving you access to Nordic Developer Academy.
2. Access to and use of Nordic Developer Academy
Upon acceptance of these Terms of Use you are granted a non-exclusive right of access to, and use of Nordic Developer Academy, as it is provided to you at any time. Nordic Semiconductor provides Nordic Developer Academy to you free of charge, subject to the provisions of these Terms of Use and the Nordic Developer Academy Privacy Policy.
To access select features of Nordic Developer Academy, you need to create a user account. You are solely responsible for the security associated with your user account, including always keeping your login details safe.
You will able to receive an electronic certificate from Nordic Developer Academy upon completion of courses. By issuing you such a certificate, Nordic Semiconductor certifies that you have completed the applicable course, but does not provide any further warrants or endorsements for any particular skills or professional qualifications.
Nordic Semiconductor will continuously develop Nordic Developer Academy with new features and functionality, but reserves the right to remove or alter any existing functions without notice.
3. Acceptable use
You undertake that you will use Nordic Developer Academy in accordance with applicable law and regulations, and in accordance with these Terms of Use. You must not modify, adapt, or hack Nordic Developer Academy or modify another website so as to falsely imply that it is associated with Nordic Developer Academy, Nordic Semiconductor, or any other Nordic Semiconductor product, software or service.
You agree not to reproduce, duplicate, copy, sell, resell or in any other way exploit any portion of Nordic Developer Academy, use of Nordic Developer Academy, or access to Nordic Developer Academy without the express written permission by Nordic Semiconductor. You must not upload, post, host, or transmit unsolicited email, SMS, or \”spam\” messages.
You are responsible for ensuring that the information you post and the content you share does not;
contain false, misleading or otherwise erroneous information
infringe someone else’s copyrights or other intellectual property rights
contain sensitive personal data or
contain information that might be received as offensive or insulting.
Such information may be removed without prior notice.
Nordic Semiconductor reserves the right to at any time determine whether a use of Nordic Developer Academy is in violation of its requirements for acceptable use.
Violation of the at any time applicable requirements for acceptable use may result in termination of your account. We will take reasonable steps to notify you and state the reason for termination in such cases.
4. Routines for planned maintenance
Certain types of maintenance may imply a stop or reduction in availability of Nordic Developer Academy. Nordic Semiconductor does not warrant any level of service availability but will provide its best effort to limit the impact of any planned maintenance on the availability of Nordic Developer Academy.
5. Intellectual property rights
Nordic Semiconductor retains all rights to all elements of Nordic Developer Academy. This includes, but is not limited to, the concept, design, trademarks, know-how, trade secrets, copyrights and all other intellectual property rights.
Nordic Semiconductor receives all rights to all content uploaded or created in Nordic Developer Academy. You do not receive any license or usage rights to Nordic Developer Academy beyond what is explicitly stated in this Agreement.
6. Liability and damages
Nothing within these Terms of Use is intended to limit your statutory data privacy rights as a data subject, as described in the Nordic Developer Academy Privacy Policy. You acknowledge that errors might occur from time to time and waive any right to claim for compensation as a result of errors in Nordic Developer Academy. When an error occurs, you shall notify Nordic Semiconductor of the error and provide a description of the error situation.
You agree to indemnify Nordic Semiconductor for any loss, including indirect loss, arising out of or in connection with your use of Nordic Developer Academy or violations of these Terms of Use. Nordic Semiconductor shall not be held liable for, and does not warrant that (i) Nordic Developer Academy will meet your specific requirements, (ii) Nordic Developer Academy will be uninterrupted, timely, secure, or error-free, (iii) the results that may be obtained from the use of Nordic Developer Academy will be accurate or reliable, (iv) the quality of any products, services, information, or other material purchased or obtained by you through Nordic Developer Academy will meet your expectations, or that (v) any errors in Nordic Developer Academy will be corrected.
You accept that this is a service provided to you without any payment and hence you accept that Nordic Semiconductor will not be held responsible, or liable, for any breaches of these Terms of Use or any loss connected to your use of Nordic Developer Academy. Unless otherwise follows from mandatory law, Nordic Semiconductor will not accept any such responsibility or liability.
7. Change of terms
Nordic Semiconductor may update and change the Terms of Use from time to time. Nordic Semiconductor will seek to notify you about significant changes before such changes come into force and give you a possibility to evaluate the effects of proposed changes. Continued use of Nordic Developer Academy after any such changes shall constitute your acceptance of such changes. You can review the current version of the Terms of Use at any time at https://academy.nordicsemi.com/terms-of-service/
8. Transfer of rights
Nordic Semiconductor is entitled to transfer its rights and obligation pursuant to these Terms of Use to a third party as part of a merger or acquisition process, or as a result of other organizational changes.
9. Third Party Services
To the extent Nordic Developer Academy facilitates access to services provided by a third party, you agree to comply with the terms governing such third party services. Nordic Semiconductor shall not be held liable for any errors, omissions, inaccuracies, etc. related to such third party services.
10. Dispute resolution
The Terms of Use and any other legally binding agreement between yourself and Nordic Semiconductor shall be subject to Norwegian law and Norwegian courts’ exclusive jurisdiction.
Switch language?
Progress is tracked separately for each language. Switching will continue from your progress in that language or start fresh if you haven't begun.
Your current progress is saved, and you can switch back anytime.